 Did we miss anything in this section? Is there something we didn't discover?
Let us know!
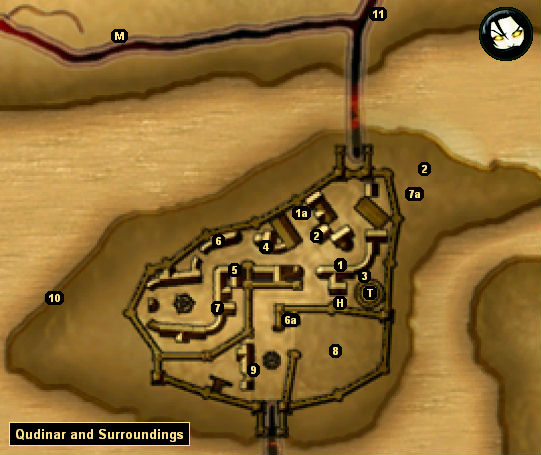
1 - Argos Moraios
Did we miss anything in this section? Is there something we didn't discover?
Let us know!
1 - Argos Moraios
Argos (#1) will give you the quest "Find Necromancers." He'll ask you if you've seen any Necromancers in the city, and, if you have, to report them. You'll find a Necromancy shopkeeper just to the north (#1a). If you turn him in, then you'll receive gold, experience, and 2 points of reputation with the Society. From what we've seen, nothing bad will happen to the shopkeeper if you turn him in, so there isn't any downside to completing the quest.
2 - Yan Radeios / Cellar / Smuggler's Cave
When you approach him, Yan will tell you that burglars have invaded his cellar, and he'll ask you to drive them out. If you agree, then you'll receive the quest "Burglars Downstairs!"
Yan's cellar is located right next to him. Inside, you'll encounter several bandits, as expected. If you explore the entire cellar, then you'll find that it exits at the Smuggler's Cave outside the city, which explains why there are bandits inside. Killing the bandits will earn you 1 skill point, and then when you return to Yan, he'll reward you with gold and experience.
3 - Society Mages
Around the nearby teleporter (T) you'll encounter a handful of Society mages, including a soul patcher, two shopkeepers, and a trainer. The trainer will offer to teach you Earth Magic and Water Magic.
You'll also meet Seloth Brotun here. He'll give you two quests to help him study Necromancy. For the quest "Find a Necromancer's Spell," you'll need to deliver to him a Summon Skeleton spell. For the quest "Find a Necromancer's Staff," you'll need to deliver to him a
Senior Necro Staff. For both of these quests, you'll receive gold, experience, and 2 points of reputation with the Society when you complete them.
Note:
Senior Necro Staves are usually carried by trachidis shamans (south of the river) and by the necromancers at the five Claw towers. So if you have trouble finding one, those are the best places to look.
After completing the second quest, Origen Ormaios (next to Argos Moraios at #1) will stop you when you attempt to leave the area. He'll angrily inform you that Brotun has become a Necromancer, and he'll demand that you hunt him down. This conversation will trigger the quest "Hunt Down the Mage-Turned-Necromancer."
You'll find Brotun hiding in the local graveyard (#7a). Brotun will start out neutral to you, but if you talk to him he won't give you an alternative method for completing the quest. If you kill him, then you'll receive gold, experience, and reputation when you return to Ormaios.
4 - Giriza Headquarters
You'll encounter a guard out in front of the Giriza headquarters. You'll probably need a certain amount of reputation with the Giriza before he'll let you in, but, if so, 4 points is enough to pass through.
Inside the headquarters, you'll meet three people who will trigger quests:
Zatagi will give you the quest "The Breach." He'll ask you to keep your eyes open for any documents relating to the Merchant's Guild. The Merchant's Guild will be most accommodating to this request, as they'll give you no less than three quests to deliver a
Merchant's Association Package to different members of their guild (see #5 plus the overview pages for
Tharbakin and
Cathalon for more information about these quests). At any time during these delivery quests, you can give the package to Zatagi instead. He'll examine the documents inside to discover that the Merchant's Guild is planning to produce dwarven steel, and then he'll put the documents back inside so that you can deliver the package as intended. For betraying the Merchant's Guild in this way, Zatagi will reward you with gold and reputation, and you won't lose any status with the Merchant's Guild.
Sling will give you the quest "The Shard." He'll tell you that a man named Scar has caused many problems for the family, and he'll ask you to tack him down and kill him. You'll find Scar in
Four Stones Village. Scar will start out neutral to you, but you won't be given any options for how to solve the quest. If you decide to kill Scar, then you'll receive 2 points of reputation with the Giriza at the time of the deed, and you'll receive some gold when you return to Sling.
Finally, Aki Hosuno will give you the quest "Removal." He'll tell you that the Merchant's Guild has plotted against the Giriza, and that the only solution to such an affront is to kill their leader, Talor Ravinard. However, Ravinard won't start out in the game. To make him appear, you'll have to complete the courier quests for the Merchant's Guild. Once the
Merchant's Association Package has arrived in
Ashos, Ravinard will send for you, and you'll find him in the Merchant's Guild headquarters in
Cathalon. From there, it should be easy enough to kill him, and if you do, then you'll receive 30,000 gold pieces, plus some experience and reputation, when you return to Hosuno.
Note: As of version 1.5, killing Ravinard will drop your reputation to 0 with the Merchant's Guild, but it won't change your shopping bonus with their shopkeepers. This is probably a bug.
5 - Merchant's Guild Building
Inside this building you'll meet Garrid Swan. If you picked up the quest "The Arrangement" from Samon Veller in
Cathalon, then Swan will accept the
Merchant's Association Package from you, and he'll reward you with gold, experience, and 2 points of reputation with the Merchant's Guild. But then Swan will adjust some of the documents inside the package, and he'll ask you to deliver it to Takashi (aka Misuke) in
Ashos. If you accept this task, then you'll receive the quest "Another Strange Delivery," and you'll earn more gold, experience, and reputation when you complete it.
As always, you can also take the package to Zatagi at the Giriza headquarters (#4) for some easy gold, and the Merchant's Guild will never know the difference. But note: you can only take the package to the Giriza once (to complete the quest "The Breach" from Zatagi).
6 - Yan Tadeios' House
Yan Tadeios (#6) will give you the quest "Smuggle in the Poison." He'll tell you that he's sick of the way the army has been treating the people of the city, and he'll ask you to smuggle some
Poison into General Panas Lumios' house (#6a), so that the general will become sick and leave the city.
When you reach the general's house, Stelios Tarm will stop you and tell you that only war heroes are allowed inside. To become a war hero, you'll have to find Nikias Chroes in the training grounds (#8) and purchase a
Medal from him for 100 gold pieces. With
Medal in hand, Stelios will admit you into the general's house.
Once you've made it into the general's house, you should have two choices for how to complete the quest. You should be able to give the
Poison to the servant or you should be able to tell the general about the conspiracy, but as of version 1.5, the conversation with the general is broken, and so the only way to complete the quest is to deliver the
Poison as expected. The
Poison isn't supposed to kill the general (at least, so they say) so we suppose it's not too evil to complete the quest that way. For delivering the
Poison, you'll receive some experience.
7 - Takis Royo's House
Takis Royo (#7) will tell you that his dead wife haunts his dreams, all because he neglected to bury her with her favorite necklace. If you agree to help out, then Takis will give you his
Wife's Necklace, and you'll receive the quest "A Dead Wife."
To put the wife to rest, you'll need to visit her grave marker in the small graveyard east of the city (#7a). When you reach right spot, the
Wife's Necklace will disappear, and the quest will update. Then when you return to Takis, he'll reward you with some gold and experience.
8 - Training Grounds
You'll find three trainers in the training grounds. They'll offer to teach you Balance, Berserking, Blinding Arrow, Deadly Pirouette, Disarming Arrow, Double Blade, Knock Down, Multi Arrow, Piercing, Stun, and Unhorse Strike.
9 - Athos Keios
Athos Keios will tell you that Stelios Lomaios, his regular supplier of
Lockpicks, is mad at him because he robbed his house, and he'll ask you to supply him with some
Lockpicks instead. Meanwhile, if you go over the steps to the west, you'll run into Stelios, and he'll demand that you get his
Family Heirloom back from Athos. Between the two men, you'll receive two quests: "Supply Lockpicks" (to give 5
Lockpicks to Athos) and "Get Back the Family Heirloom" (to return the
Family Heirloom to Stelios).
As of version 1.5, to complete both quests you'll need to give the
Lockpicks to Athos before talking to Stelios. Otherwise, if you talk to Stelios first, then whatever you say to Athos next will determine which of the two quests you'll be able to complete. That's because if you ask for the
Family Heirloom, then Athos will attack you and quickly die, breaking his quest, and if you give Athos the
Lockpicks, then Stelios' quest will break, and you'll never be able to ask for the heirloom.
If you complete the quests in the right order, then you'll receive gold and experience for completing Athos' quest, and you'll receive gold, experience, and 2 points of reputation with the Giriza for completing Stelios' quest. You'll also get your
Lockpicks back when you kill Athos.
10 - Hidden Treasure
The hidden treasure will only appear here after you've completed the quest "The Cook" for Bodlo in the
Eastern Army Camp.
11 - Gandohar
You'll need to meet with Gandohar to complete the main quest
The Relic.
Other Places of Interest:
| E | Enemy (Bandit / Grom / Orc) Camp
|
| H | Health (Maliel) Shrine
|
| M | Magic Source
|
| T | Teleporter
|
| $ | Treasure Container
|


