 Did we miss anything in this section? Is there something we didn't discover?
Let us know!
1 - Veran Korstill
Did we miss anything in this section? Is there something we didn't discover?
Let us know!
1 - Veran Korstill
Veran will tell you that he's looking for a special birthday gift for his wife, a mountain crystal called the
Moon Eye, and he'll ask to you to buy it for him from a merchant named Edvin in
Brumhill. To pay for the crystal, plus to cover your expenses, he'll give you 500 gold pieces. If you agree to help out Veran, then you'll receive two quests: "Moon Eye" (to acquire the crystal) and "Edvin from Brumhill" (to find the merchant).
Brumhill is located far to the east. When you arrive at the town, you'll discover that it has been overrun by glacier orcs, and that all of the inhabitants are dead. You'll complete the "Edvin" quest by walking around the town (Edvin is apparently one of the bodies on the ground), and you'll complete the "Moon Eye" quest by picking up the
Moon Eye Crystal from in front of a doorway on the northern side of the town.
When you bring the
Moon Eye Crystal to Veran, he'll reward you with some gold, and you'll also receive 2 points of reputation with the Merchant's Guild.
2 - Nalax Gonga
Nalax will tell you that a year ago, many people from Komorin left town and formed the village of
Brumhill far to the east. However, nobody has heard from
Brumhill in some time, and Nalax will ask you to investigate. As with Veran's quest (#1), if you agree to help Nalax, then you'll receive two quests in your quest log: "No News from Brumhill" (to investigate the village) and "Brumhill Village" (to find out what happened to the villagers).
Brumhill is located far to the east. When you arrive at the town, you'll discover that it has been overrun by glacier orcs, and that all of the inhabitants are dead. To complete the quests, just wander around the town a little. They should update automatically. Then when you return to Nalax with the news, he'll reward you with some gold and experience.
3 - Lucius Darx
When you approach him, Lucius will tell you that Delurna the horse breeder needs protection, and he'll ask you to help the man out. This is the trigger for the quest "A Troubled Horse Breeder." You'll find Delurna slightly south of the town (#6).
4 - Ferid Redismos
When you approach Ferid (#4), you'll complete the quest "An Old Friend" and earn some experience. Then Ferid will tell you that he has created a universal activator for the teleporters (T) in Thalmont, but that they still need to be tested. He'll then give you one of his
Teleport Activators, but he'll ask you to do him a favor, to activate a teleporter to the east (#4a).
Now, Ferid's request might sound like an easy mission, but when you arrive at the teleporter you'll discover that it is being guarded by a few reapers, who will probably be pretty tough for you at your level. Fortunately, you don't have to kill them. To activate the teleporter, you'll just need to run up to it (and actually stand on it; just getting the teleporter to show up on your map isn't enough). After that you can run away if you want, and deal with the reapers later when you're more powerful.
Note: Besides the teleporter to the east, the
Teleport Activator that Ferid gives you will allow you to use any teleporter in the land, provided that you've gotten close enough to it to activate it.
When you return to Ferid, he'll thank you for your help, and he'll allow you to keep the
Teleport Activator that he gave you before. You'll also receive 2 points of reputation with the Society. Then Ferid will tell you that he's working on a new invention -- a
Teleport Stone that will allow you to access the teleporters from wherever you are -- but that he'll need some
Magnesite to create it.
Magnesite is a white crystal that you'll typically find on the ground in places where monsters congregate, such as at the Grom Siege cave to the southeast (#8). When you bring two pieces of
Magnesite to Ferid, he'll reward you with a
Teleport Stone, and you'll gain 2 more points of reputation with the Society.
Note: To use the
Teleport Stone, double click on it. That will activate it and drop it where you're standing. To pick the stone back up, you'll need to move close to it, but not
too close, and then the hand icon will appear.
Finally, Ferid will tell you that he'll keep giving you more
Teleport Stones if you'll keep bringing him more
Magnesite. But the next time you make a delivery, he'll inform you that the Society doesn't like "strangers in their teleport network," and that he's not allowed to give you any more stones. However, he'll decide to keep his agreement with you -- one last time anyway -- and give you two more
Teleport Stones for your troubles.
5 - Gandohar
Gandohar will lead you through most of the required quests in the game. See the "Main Questline" section of the walkthrough for more information.
6 - Vesit Delurna
Delurna (#6) will tell you that some bandits are trying to "convince" him to sell his corral, and he'll ask you to help him out. You'll find the bandits in a cave to the northwest (#6a). They'll automatically attack you when you approach, so there's only one way to complete the quest.
When you kill the three bandits, you'll immediately receive 1 skill point. Then when you return to Delurna, he'll reward you with a horse, and you'll also receive some experience and 4 total points of reputation with the Brotherhood (2 points for completing "A Troubled Horse Breeder" and 2 points for completing "Extortion").
7 - Camp Site
At this camp site, you'll meet a trainer and a merchant. The trainer will offer to teach you Death Strike and Stealing.
8 - Grom Siege
You'll find over a dozen young groms in the cave here. If you can defeat them, then you'll find a couple of treasure chests, two pieces of
Magnesite, and a
Goblin Totem. You can use the
Magnesite with Ferid Redismos (#4), and you can use the totem in the quest
Ruining the Groms' War for Them.
9 - Old Smuggler's Cave
You'll find a pair of locked chests inside the cave.
10 - Goat's Cave
The Goat's Cave is an underground cave containing a health shrine and a treasure chest, but mostly it's just there as a quiet meeting place when you can talk to Reist Tungard. Your conversations with Reist are covered in the quest entry for
A Dim Light.
Note: If you pick open the chest while Reist is in the cave, then he'll attack you. So wait until after you've spoken too him, since he'll leave at that time.
11 - Stag Horn Tower
You'll encounter a "cyclop" at the tower. Cyclopes are much tougher to kill than bears, but if you're patient, you can use the same strategy to defeat them (that is, just jump back every time they take a swing at you). You'll find an unlocked treasure container at the cyclops' camp, but there doesn't seem to be any way to actually enter the tower itself.
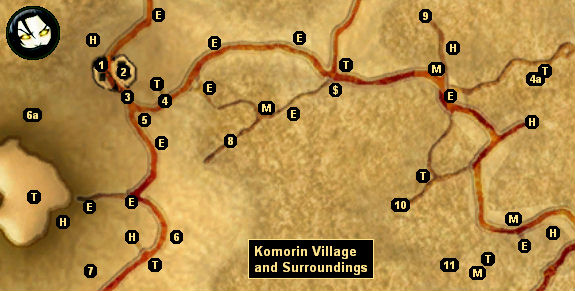
Other Places of Interest:
| E | Enemy (Bandit / Grom / Orc) Camp
|
| H | Health (Maliel) Shrine
|
| M | Magic Source
|
| T | Teleporter
|
| $ | Treasure Container
|


