 Did we miss anything in this section? Is there something we didn't discover?
Let us know!
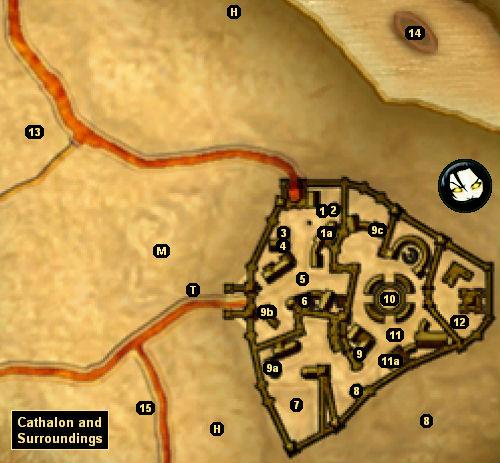
1 - Gil Braver
Did we miss anything in this section? Is there something we didn't discover?
Let us know!
1 - Gil Braver
Gil Braver (#1) will tell you that refugees flow into Cathalon every day, but that the "old wretch" Rose Primsey (#1a) won't take any of them in. If you agree to look into the matter, then you'll receive two quests: "Crowded with Refugees" (to find a home for the refugees) and "Talk to Rose Primsey" (to talk to Rose).
If you immediately head to Rose's house, then she'll toss you out on your ear. To make Rose more receptive, you'll need to start the quest "The Heritage" (#9). During that quest you'll receive a
Beautiful Flower. If you give that flower to Rose, then she'll change her mind and allow orphans to stay with her, and she'll reward you with some experience. Then when you return to Gil, you'll receive even more experience plus some gold.
2 - Garondel's Shop
Garondel is an astrologer, and he has a grudge against Fariel the astronomer, who apparently ridicules him at every opportunity. If you're sympathetic to Garondel, then he'll give you the quest "Against Astrology." He'll also give you a
Summon Spider Figurine, and he'll ask you to take it to Fariel's shop (#3).
When you enter Fariel's shop, a giant spider will appear and probably attack Fariel. You won't have to worry about protecting Fariel, as he's much tougher than the spider, but you might want to attack the spider anyway just to claim the experience from killing it. Then when you return to Garondel he'll give you some gold as a reward.
Note: The
Summon Spider Figurine won't disappear after you've completed the quest, but it won't have any further use, either.
3 - Fariel's Shop
Fariel is an astronomer. When you meet him, after taking some time to disparage astrology, he'll tell you that he needs a new lens for his telescope, and that only a
Diamond will do. If you agree to look for one for him, then you'll trigger the quest "True Astronomy."
Diamonds are regular alchemy items, and you can find them randomly in a variety of places. If you do not have a
Diamond yet, then you can find one in the Cathalon Dungeon (#8). When you give a
Diamond to Fariel, he'll reward you with gold and experience.
Note: Fariel's shop opens at night.
4 - Merchant's Guild Headquarters
You'll meet up to three people inside the Merchant's Guild headquarters. Tamar Cull will tell you a little bit about the guild, and Samon Veller will accept the
Merchant's Association Package entrusted to you in the quest "Earning Trust" from Ion Furvo in
Tharbakin.
Then, once you've gained enough reputation with the Merchant's Guild, Veller will give you another courier quest, "The Arrangement." This time you'll need to deliver the
Merchant's Association Package to Garrid Swan in
Qudinar. Just accepting the quest will increase your reputation with the Merchant's Guild, and if you complete the task then you'll receive gold, experience, and 2 more points of reputation.
Also, as in "Earning Trust," Veller will let slip that the Giriza would love to see the contents of the package. You can only show the
Merchant's Association Package to the Giriza once, so if you resisted temptation during "Earning Trust," you'll have another chance here. To show the package to the Giriza, you'll need to travel to
Qudinar and talk to Zatagi there. He'll reward you with gold and reputation for your efforts. Showing the package to the Giriza won't prevent you from delivering it to Garrid Swan. The Merchant's Guild will never know the difference.
Finally, once you've completed the three courier quests for the Merchant's Guild (by sending the
Merchant's Association Package all the way to
Ashos), Talor Ravinard, the guildmaster, will show up. He'll ask you to kill Aki Hosuno, the leader of the Giriza, and, if you agree, you'll receive the quest "Good Business." You'll find Hosuna in the Giriza headquarters in
Qudinar. If you kill him, then when you return to Ravinard you'll receive 30,000 gold pieces, plus some experience and reputation. But note: your reputation will fall to 0 with the Giriza, and you'll pay a heavy penalty if you try to shop with any of their merchants.
5 - Stranger
There's one in every major town, or is it supposed to be the same one? In any case, this Stranger, like the other Strangers, will make some cryptic comments about you, but he won't give you a quest.
6 - Brokat's House
Inside this house you'll meet Brokat the painter. He'll tell you that he promised to deliver a special portrait for the king, but that he can't finish it without four
Saffron plants. If you agree to help, then you'll receive the quest "The Artist."
Saffron is a regular alchemy item that you'll find growing in the wilderness (including a few places near Cathalon), so you'll just have to hunt for it if you don't have enough already. If you give enough
Saffron to Brokat, then he'll reward you with some gold. But note:
Saffron is pretty rare and pretty valuable (you can use four
Saffron plants to increase your strength by 2-5, depending on your Alchemy skill), and so you might want to skip the quest.
7 - Training Grounds
You'll find a bunch of Brotherhood soldiers training here, plus five trainers. The trainers will offer to teach you
Balance, Berserking, Blinding Arrow, Burn, Deadly Pirouette, Disarming
Arrow, Double Blade, Feint, Knock Down, Multi Arrow, Overdrawing, Piercing,
Pull Shield Strike, Starting Draw, Stun, Sowrd Break Strike, and Unhorse Strike.
You'll also meet two quest givers here. Raul Dang will give you the quest
Orc Catapults, which will involve you facing the orcs south of the river. Nellor will give you the quest "Arrow Maker." He'll ask you to track down five
Dodo Feathers for him so that he can complete a batch of arrows.
Dodo Feathers are dropped by dodo birds, which you'll encounter all throughout the wilderness.
If you complete Nellor's task, then he'll reward you with some gold, and he'll offer you a second quest, "Arrows for Rigwell." For this quest you'll need to deliver a bunch of
Arrows to Rigwell in the
Eastern Army Camp. When you make the delivery, you'll earn some gold from Rigwell, and then when you return to Nellor, you'll earn absolutely nothing except for his thanks.
8 - Cathalon Dungeons / Bootlegger's Cave
Inside the dungeons / cave you'll find several skeletons, a few treasure chests, and a single
Diamond.
9 - River Dras' House
River Dras (#9) will tell you that he was in
Qudinar when his father died, and that his brother Morio (#9a) now claims that his father did not leave him an inheritance. River will suspect that his brother is lying and keeping the money all for himself, and he'll ask you to investigate. If you agree, then you'll receive the quest "The Heritage." You'll also receive several sub-quests, which we'll describe but not name.
Morio won't be agreeable when you talk to him -- he won't seem to like anybody, including you -- but eventually he'll decide to work with you, provided that you can do him a favor. He'll give you a
Beautiful Flower and ask you to deliver it to his wife, who recently left him.
You'll find the wife Ayla staying with her sister Thuya just to the north (#9b). However, when you reach their house, Thuya will stop you at the door. She'll tell you that she does not enjoy living with her sister, and she'll ask you to visit Phyrrus Nox (#9c), the local alchemist, and pick up a
Love Potion from him so that Ayla will fall in love with Morio and move back in with him.
Note: Even though there does not seem to be any reason to do so, you should enter the house and speak to Ayla at this point. If you don't, then you'll never complete the sub-quest "Unhappy Brother" (since Ayla will disappear once you've delivered the
Love Potion). Botching this sub-quest won't hurt you any since it doesn't have a reward, and since it won't prevent you from completing "The Heritage," but it's sort of annoying to be stuck with a broken quest in your quest log.
The
Love Potion will cost you 200 gold pieces, but when you deliver it to Thuya, she'll reimburse you for the cost, plus give you an extra 10% for your time. Then to complete the quest, you'll need to talk to River (to tell him to eavesdrop on Morio), talk to Morio (to learn that River took his share of the inheritance), and then talk to River again (to receive some experience and 5000 gold pieces). You won't actually use the
Beautiful Flower in this quest, but it will be important for a different quest (see #1).
10 - Fountain
You'll meet three mages at the fountain: a soul patcher, a trainer (for Earth Magic and Water Magic), and Lokar Maios. Lokar is involved in the quest "I AM the Real One" which you can pick up in
Four Stones and Windbreak Village.
11 - Drox Galor
Drox (#11) will give you the quest "The Feeding of the Poor." He'll tell you that the homeless people of Cathalon aren't getting enough to eat, but that a woman named Orna Porrey is hoarding food. Orna lives just to the south (#11a), but when you talk to her she'll claim that she doesn't have any extra food.
Meanwhile, talking to Drox will cause a woman named Saria Tolmok to spawn nearby to the east. When you talk to Saria, she'll complain that people think her food has been corrupted by the Taint, but then she'll ask you to deliver a
Small Pack of Food to the inventor Clavius, who lives next door to Orna. This will trigger two quests: "Tainted Food" (to help Saria sell her food) and "Food Delivery" (to deliver Clavius' food).
When you make the delivery to Clavius, the two of you will come up with a scheme to help Saria. Clavius will give you an
Anti-Taint Inspection Device, which, while it won't really work, will at least put the Taint rumors to rest. When you give the device to Saria, she'll reward you with experience and herbs.
With Saria's quest complete, when you speak to Orna again, you'll concoct a story about tainted food and you'll convince her to give up her surplus. She'll then give you a
Big Pack of Food, and when you deliver it to Drox, you'll receive some gold and experience.
12 - Creo
Creo is a craftsman who creates
Orc Camouflage Armor, which can be used to infiltrate orc camps. Creo will offer to make you such a suit, provided that you can obtain a permit from Othis (located nearby) and provided that you can afford the 5000 gold piece fee. If you agree to this deal, then you'll receive two quests: "Orc Camouflage Armor" (to purchase the armor) and "Talk to the Seargant-at-Arms" (to talk to Othis).
Surprisingly, Othis won't make you complete a quest to obtain the
Order for Armor. He'll just charge you 2000 gold pieces. In other words, it'll cost you 7000 gold pieces to buy the suit of
Orc Camouflage Armor, which you might not even use because, really, would you rather sneak around orcs or just kill them? But if you buy the armor you'll also receive a substantial amount of experience, and so it's a worthwhile purchase if you're flush with cash.
Note: But remember, you can only use the
Orc Camouflage Armor once.
13 - Ruins
Inside the ruins you'll meet two Society mages, Amber and Sygius Destrus. Amber will tell you about the orcs and their dead god Aziraal. Just for listening to her you'll receive experience and 2 points of reputation with the Society. Sygius, meanwhile, will warn you about the necromancers and their leader, the Flame, and he'll give you the quest
Public Enemy.
14 - Reaper Island
On this island you'll encounter three reapers guarding a
Bear's Strength Potion.
15 - Trados Prophiter
Trados will only appear here after you've accepted the quest
Orc Catapults from Raul Dang inside the city (#7). He'll hint that he's working for the orcs, and he'll ask you to bring him "somethin' of value." The conversation will be sort of vague, but if you check your quest log, you'll find that Trados is really asking you to deliver to him the three
Catapult Triggers that Raul Dang asked you to find. For more information about this quest, see the
Orc Catapults quest entry.
Other Places of Interest:
| E | Enemy (Bandit / Grom / Orc) Camp
|
| H | Health (Maliel) Shrine
|
| M | Magic Source
|
| T | Teleporter
|
| $ | Treasure Container
|


