 Did we miss anything in this location? Is there something we didn't discover? Let us know!
Background
Life was good. Easy jobs, regular pay, a reliable crew. But things went south and you had to drop off the grid. Put a bullet in the past and start fresh somewhere new.
Did we miss anything in this location? Is there something we didn't discover? Let us know!
Background
Life was good. Easy jobs, regular pay, a reliable crew. But things went south and you had to drop off the grid. Put a bullet in the past and start fresh somewhere new.
The promise of opportunity and anonymity draws you to the free city of Berlin: The Flux-State, a grand experiment in social order. Corporations tread carefully here. Even the great dragon Lofwyr only has so much sway in the constantly evolving power structure of Berlin. The perfect place for a savvy shadowrunner to disappear and begin anew.
And, as luck would have it, home to your old partner-in-crime, Monika Schafer.
It's your third run with Monika and her team. An old castle holdfast, one hour east of Berlin, perched on a hill overlooking the countryside. The job is standard smash-and-grab: crack the vault, grab the data, get out in one piece. A mediocre payday, but work is work. As the team gathers for Monika's pre-run briefing, you pause to take in your surroundings....
--- Mission Midway Point ---
So far, so good. If your skirmish with security set off any alarms, you don't hear them. Monika leads the rest of the team downward, into the basement of the Harfeld Manor.
Your payday is waiting. The data vault lies ahead.
Karma Points
Walkthrough
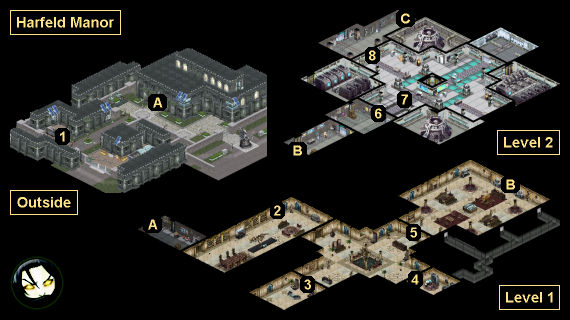
You'll begin this mission outside Harfeld Manor, right next to your van (#1). Your team leader Monika will inform you that you're on a "milk run," and that you'll just need to enter the manor's basement and extract some files from a data vault. At the end of the briefing, you should click on the van, where you'll get to choose a weapon --
AK-97,
Beretta Model 70,
Fichetti Security 500,
Machete (Old),
Sawed-Off Benelli, or
Throwing Knife -- plus loot some basic supplies, some gear based on your build, and 1250 nuyen.
Inside the manor (Exit A), you'll find everything quiet, as expected. Eventually, you'll come to an intersection with rooms to the north, east and south. The eastern door (#4) will be locked, so you'll have two choices for where to go. If you enter the security room (#3) first, then you'll encounter a guard inside the room, and you'll have to deal with two reinforcements from behind. Then when you enter the display room (#4), you'll encounter four more guards. If you enter the display room first, then you'll encounter the four guards there, and the guard in the security room will come at you from behind. So you'll have to pick your poison: two easier battles but more guards total (security room first), or one tougher battle (display room first).
Once you've dealt with the guards, you should head into the security room (#3). You'll find a terminal there. With Decking 2, you'll be able to hack it. Otherwise, Monika will take care of it for you. Hacking the terminal will unlock the door to the server room.
Inside the server room (#4), you'll need to select one character to jack into the server. You should choose Monika for this even if you're playing a decker because she'll have more programs available. If you defeat the three White IC in the matrix and interact with the data store at the end, then you'll end up with Paydata: Antiquities Delivery Schedule, which you'll be able to sell when you return to your safehouse.
When you reach Level 2 (via Exit B), you'll immediately come to a locked door (#6). Monika will insist on opening it herself, but before she can do anything, Eiger will demand that she name a second-in-command, just in case something goes wrong. No matter what you say, Monika will choose you for the job, even though you're the newest member of the team. This will annoy Eiger, which was probably the intention.
When Monika attempts to unlock the door, its intrusion countermeasures will kick in, causing her to suffer a massive stroke (you'll figure this out if you have Biotech 3; otherwise Glory will figure it out). No matter what you do, the damage will be fatal, but Monika will manage to say "Feuerschwinge" before she dies. You'll learn more about Feuerschwinge later.
Amid the shock and confusion, the locked door will open, revealing something entirely different than a data vault, and security forces will start coming for you. After defeating the first two guards, you'll be allowed to interact with a terminal near the entrance (#7). From it, you'll learn that Monika managed to infiltrate the manor's security software while she was jacked in, but that your escape route won't be available for 10 turns.
While you're waiting for the exit door (#8) to open, you'll have to defend yourself against additional security guards, which will arrive about one per turn. They'll use all four doorways into the room, including your exit door. Still, your best place for defense is right next to the exit door. You'll find lots of heavy and medium cover there.
With 5 turns left, an ork Security Captain will come in through the northern door. He'll have heavy armor, 80 hit points, and a minigun. He'll demand that you surrender, but he won't care how you respond. It isn't possible to kill the ork. He'll simply leave if you do too much damage to him. So concentrate on the other guards, and get out of the room as quickly as possible.
When you exit the manor (via Exit C), the mission will end.
1 - Starting Point
2 - Antique Vase
If you interact with the vase here, then you'll be given the option of trying to steal it. No matter what you decide, you won't end up with anything. Dietrich will talk you out of the theft, if necessary.
3 - Security Room
4 - Server Room
5 - Display Room
6 - Locked Vault Door
7 - Terminal
8 - Locked Exit Door
Exits
- Manor entrance.
- Elevator.
- Manor exit.


