 Did we miss anything in this location? Is there something we didn't discover? Let us know!
Background
The U-Bahn rattles to a halt at the edge of Kreuzberg. You're only a few blocks away from Schattennest, the kiez that Maxim and his smugglers call home.
Did we miss anything in this location? Is there something we didn't discover? Let us know!
Background
The U-Bahn rattles to a halt at the edge of Kreuzberg. You're only a few blocks away from Schattennest, the kiez that Maxim and his smugglers call home.
According to Samuel, they should be expecting you.
--- Mission Mid-Point ---
The Humanis compound smells like a locker room, and doesn't look much better. Calling the building "run down" would be an understatement; paint is peeling off of the cheap duraplast walls, and the tiles on the floor are mired with decades' worth of grime. It's an old, ugly place, perfectly suited to the old, ugly ideology being practiced here.
You enter the compound. The information that Samuel Beckenbauer sent you here to find lies somewhere ahead.
--- Mission Escape ---
You burst through the door to the Humanis compound and into the crisp night air. You're not far from your extraction point.
Time to go.
--- Mission Conclusion ---
The U-Bahn ride home feels especially comforting today. The Berlin chapter of the Humanis Policlub has suffered a terrible blow, and you're the one who dealt it. Volker Stahl's plan to incite a wave of bloody violence across Berlin has been derailed.
It isn't often that a shadowrunner gets to prevent an atrocity on the job.
Karma Points
- [3] Resolve the encounter at the Bridge.
- [1] Keep Maxim alive.
- [8] Complete the mission.
- [1] Deliver the Humanis Donor List (#13) to the phone booth in the Kreuzbasar.
Walkthrough
This mission will be available right from the start of Act 2. You'll learn about it from the Mission Computer in your safehouse, and from Samuel Beckenbauer right outside his shelter in the Kreuzbasar. Beckenbauer will tell you that a meta-human hate group called Humanis has come into possession of "an extremely hazardous chemical," and he'll ask you to infiltrate their organization, find out what they're up to, and put a stop to it. He'll offer you 22,000 nuyen as your payment, but if you have the Socialite etiquette, then you'll be able to bump that amount up to 22,500 (not that it will make any difference; you'll earn 22,500 nuyen at the end no matter what).
Then the next time you visit a U-Bahn platform, you'll meet Dietrich there. He'll tell you that his nephew Alexander works with Humanis, and he'll ask you to take him along on the job so he can convince Alexander to leave the organization. You should do this, as helping Dietrich and saving his nephew will give him (essentially) the Mana Charge ability.
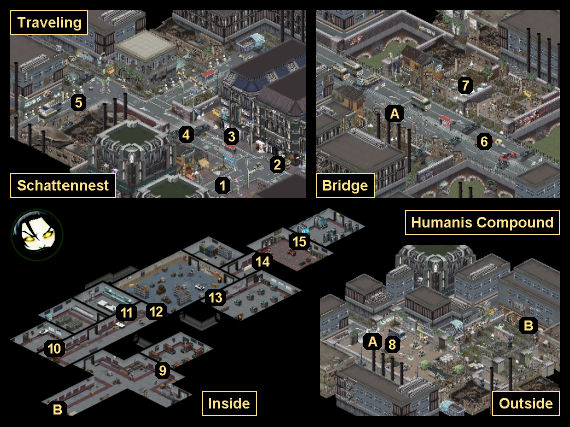
To reach the Humanis Compound, you'll have to do some traveling. For starters, you'll have to meet with Maxim, the leader of the smugglers who are transporting the chemicals to Humanis. While making your way to Maxim, you'll run into a couple of people who will warn you about where you're going (#2, #4), and you'll find a phone booth containing a request for information (#3).
When you reach Maxim (#5), he'll claim that you're late, but no matter what you say, you and the smugglers will pile into their vans and start heading for the Humanis Compound. Only along the way, you'll get stopped at a Bridge, where members of the Rammbock gang will demand that you pay a toll. You'll have three ways to respond to them:
- You can pay the toll. To do this, you'll need Willpower 3 or the Gang etiquette to convince Maxim to let you negotiate. Then when you talk to the gangers, you can either pay their initial demand of 1000 nuyen, or with Charisma 4 you can reduce the amount to 750 nuyen.
- You can help the smugglers take out the gangers. If you choose this option, then you'll end up fighting alongside the smugglers twice -- in this battle and also in a later one -- so you should try to keep them as alive as possible. To that end, you shouldn't retreat out of range of the gangers' two auto turrets (#6). Keep at least two of your team members near your starting position, and send one or two others to help with the gangers who will come at you from the west. If you can keep Maxim alive for the entire mission (not just this battle), then you'll earn 1 karma point.
- You can kill everybody. That'll make this battle more difficult, plus a later battle more difficult as well. Luckily, the gangers and the smugglers will attack each other as well as you, so if you retreat to the far west of the map or to the walled area with the ley lines (#7), then you might be able to avoid a lot of the fighting. When Maxim dies, he'll drop 2000 nuyen, so you'll have to decide if you want easier battles and a karma point (the option above), or tougher battles and money (this option).
Note: The game will autosave right before your conversation with Maxim (#5), so if the Bridge encounter doesn't go your way, you can always reload and try again.
Another Note: The most important thing to notice in the battle is that there are four barrels around the gangers and their auto turrets (#6). If you shoot one of the barrels, then you'll start a chain reaction, blowing up all four barrels and killing or wounding all of the nearby gangers.
After dealing with the gangers at the Bridge, you'll either automatically move to the next map (if you negotiated), or you'll have to get back into Maxim's van (Exit A). Either way, you'll earn 3 karma points for concluding the matter.
When you pull up in front of the Humanis Compound (#8), nobody will come out to greet you. Maxim (if he's still alive) will find this ominous, but he'll be content to sit around outside and wait. So it'll be up to you to enter the compound to see what's going on.
When you enter the compound (Exit B), you'll spot a few Humanis members fleeing away from you, but nobody else will be around. If you earlier completed the mission
Trial Run to Luca Duerr's satisfaction, then he'll call you at this point and ask you to leave the Humanis leader Volker Stahl alive.
As you explore the compound, you'll find some stuff to loot (#9, #10, #13), but eventually you should head over to Stahl's office (#14). It'll start out locked. To open the door, you'll need to learn the code word "Pride" from the barracks (#9) or the workroom (#13).
Inside the office, you'll find the Operation: False Flag Planning Report. When you pick it up, Volker Stahl and a couple of his henchmen will enter the room from the north. No matter what you say, Stahl will explain his plan -- how he's going to use the chemicals you smuggled in to cause meta-humans to go crazy, so he and his fellows can kill a lot of them and save the day. Then at the end of the conversation, more henchmen will come in, including Dietrich's nephew Alexander.
If Dietrich is with you, then you'll need to try and convince Alexander to change sides. To do this, you should select:
- "Listen to Dietrich."
- "If you side with Humanis..." or "It's up to you."
- Wait for Alexander to act.
This will cause Alexander to join your team.
If Dietrich isn't with you, then Alexander will stay with Humanis, and you'll get a Quickness 4 check to attack first. If you pass the check, then you'll get a free round all to yourself, followed by the first round of normal combat -- where you'll go first. So you'll get to take two turns before the enemies can do anything, which should make the battle pretty easy.
When the battle starts up, Stahl will flee to the north. If you don't want to kill him, then you should let him go (this isn't one of those cases where "killing" him will cause him to surrender). Then you'll just need to deal with the remaining henchmen in the cramped office. This is a good place for Glory to use her melee attacks and Eiger to use her shotgun.
After the battle, you'll stay in combat mode, but you won't have any enemies near you. This will allow you to explore the server room to the north (#15). With Decking 4, you'll be able to jack into one of the servers there. When you come to the four-way intersection in the matrix, going left will allow you to take control of the two turrets in the compound (#10, #12), going straight will allow you to open the armory door (#10), and going right will allow you to take control of the compound's security cameras.
To exit the compound, you'll have to deal with two more groups of Humanis members, one in the storage room (#12) and another near the entrance -- that is, in the two places where you might have a turret helping you out. With turrets on your side, the battles shouldn't be too bad, although you'll have to draw enemies to you in the armory (#10) to get the turret there into play.
When you exit the compound, you'll have one more fight. If you protected the smugglers earlier, then you'll have to face seven Humanis members with you on one side and the smugglers on the other side. You'll still need to keep Maxim alive to earn a karma point, so you should press forward to keep the Humanis members focused on you rather than the smugglers. If you killed the smugglers earlier, then all of the Humanis members will come gunning for you, so you should be more careful and defensive.
With Humanis defeated, you'll just need to return to the Kreuzbasar (via Exit A) to complete the mission. At that point, one of two things will happen:
- If you completed this mission after
Loose Ends, then on your way back to the Kreuzbasar, you'll trigger the sub-mission
In Transit.
- If you completed this mission before
Loose Ends, then when you return to the Kreuzbasar, you'll receive a message from Paul Amsel letting you know that he has new information about Harfeld Manor. This will lead to you learning that Feuerschwinge is well funded. You'll also receive another DVD from Maliit Holyey. The DVD will supply you with some rumors about Feuerschwinge, including that she has shed her physical form to become a "ghost dragon," and that she has a cult worshipping her.
Back in the Kreuzbasar, you'll earn 8 karma points for completing the mission, and Sam Beckenbauer will seem happy enough with the results even if Volker Stahl survived. This will earn you 3750 nuyen for yourself and 11,250 nuyen for your Alice fund. You'll see the details for the payment when you check the Mission Computer in your safehouse.
Plus, you can earn numerous other rewards. If you completed Luca Duerr's objective in the mission, then you'll earn 1000 nuyen when you talk to him in Cafe Cezve. If you grabbed the Humanis Donor List (#13), then you'll receive 1 karma point and 500 nuyen when you deliver it to the phone booth. And if you downloaded the Paydata: Humanis Safe House List (also #13), then you'll eventually get 414 nuyen when you post it on the Mission Computer.
As for Dietrich, if you didn't take him with you on the mission, then when you return to the safehouse, he'll be mad at you and he'll stop talking to you, but he won't leave your team. If you took Dietrich with you but couldn't save Alexander, then Dietrich will be disappointed, but he'll continue talking to you. If you took Dietrich with you and Alexander survived, then Dietrich will gain the Dragonslayer's Favor ability, which will allow him to create a ley line for a short period of time (essentially a special version of Mana Charge).
1 - Starting Point
2 - Food Cart Vendor
This vendor will have two items for sale: a sandwitch (for 10 nuyen) and a currywurst (for 5 nuyen). If you buy the sandwich, then the vendor will warn you that it's dangerous where you're heading. In other words, you shouldn't waste your money here.
3 - Phone Booth
Inside the phone booth here, you'll find a request from the Schockwellenreiter asking you for a list of the people making donations to Humanis. You'll find this information in the Humanis Compound (#13). When you deliver it to the Schockwellenreiter (using the phone booth in the Kreuzbasar), you'll get 1 karma point and 500 nuyen.
4 - Gatekeeper
At this spot you'll meet a gatekeeper, but he won't try to block your path. He'll just warn you that the people beyond this point are "bad news."
5 - Maxim
6 - Auto Turrets / Barrels
7 - Defensible Position
8 - Courtyard
9 - Barracks
Inside this room, you'll discover six footlockers labeled 1-6. You'll find the code for locker 3 in the kitchen (#11). You'll find the codes for all of the lockers in the workroom (#13). The contents of the lockers (and their owners and codes) are summarized below:
- Bauer, 3706. Inside this locker, you'll find
Nitro.
- Farber, 1409. Inside this locker, you'll find a note indicating that Dietrich's nephew Alexander isn't fitting in well at Humanis. This will make Dietrich happy (if he's with you).
- Kappel, 2619. Inside this locker, you'll find a note that will give you the Humanis Office Door Code (Pride) when you read it.
- Klein, 4176. Inside this locker, you'll find 250-300 nuyen (the amount is random).
- Schuhmacher, 1106. Inside this locker, you'll find the Armory Door Code (Purity).
- Yomada, 2114. You won't find anything inside this locker.
10 - Armory
The armory will start out locked. To open it, you'll need to learn the code word "Purity" from one of the lockers in the barracks (#9). Inside, you'll find lots of good stuff: two
Advanced Medkits, an
Ares Predator (Smartlink), a
BuMoNA Gold Trauma Kit, a
Cavalier Frag Grenade, an
HE Phosphorus Grenade, a
Mossberg CMDT, and a
Renraku Flashbang Grenade.
You'll also find Turret 1 in the armory. With Drone Control 4, you'll be able to take control of the turret right away. With Decking 4, you'll be able to take control of it later (at #15).
11 - Kitchen
Inside the kitchen, you'll find a note that will give you Recruit Kappel's Locker Code (locker 3, 2619). This will allow you to open up one of the lockers in the barracks (#9).
12 - Storage Room
You'll find Turret 2 in this room. With Drone Control 4, you'll be able to take control of the turret right away. With Decking 4, you'll be able to take control of it later (at #15).
13 - Workroom
Inside this room, you'll find three working terminals. To log into them, you'll need Decking 4, or you'll need to guess that their password is "Humanis," "Forever," "HumanisForever," or "Humanis Forever" (which you might be able to figure out after reading the pamphlets in the room). The terminals will give you some useful information:
- The donor terminal will give you the Humanis Donor List, which you'll need for the Schockwellenreiter (see #3).
- The paydata terminal will give you Paydata: Humanis Safe House List.
- The recruit terminal will give you the Recruit Access Codes, which will allow you to open up all of the footlockers in the barracks (#9). You'll also receive the Humanis Office Door Code (Pride), unless you learned it elsewhere.
14 - Stahl's Office
15 - Server Room
Exits
- Maxim's van.
- Compound entrance.


