 Did we miss anything in this location? Is there something we didn't discover? Let us know!
Background
Aztechnology. A giant in the worlds of technological and magical research. One of the most powerful -- and feared -- corporations on the planet. There are very few places in this world that the tendrils of Aztechnology cannot reach.
Did we miss anything in this location? Is there something we didn't discover? Let us know!
Background
Aztechnology. A giant in the worlds of technological and magical research. One of the most powerful -- and feared -- corporations on the planet. There are very few places in this world that the tendrils of Aztechnology cannot reach.
Germany is no exception. The black glass edifice of an Azzie pyramid dominates the courtyard of the Zitadelle Spandau. And countless other, more innocuous facilities can be found all over Berlin.
The lab that they maintain in the Jewuhl District is one of these. According to your client, the project that the Azzies are working on here is dangerous.
So dangerous that she's paying you to bring the entire building down.
--- Mission Part 2 ---
The glittering halls of the Aztechnology facility stand in sharp contrast to the megacorp's unsavory reputation. Everything in here screams "money," from the mirror-polish on the floors to the obsidian inlays in the walls.
The generators -- and the Bloodline project -- lie somewhere beneath your feet.
--- Mission Part 3 ---
Your stomach lurches slightly as the elevator plummets downward, into the bowels of the Aztechnology facility. A faint but omnipresent thrumming sound raises the hair on the back of your neck.
The deeper you go, the more certain you become: this place is vibrating with power, both from the generators and from... something else.
--- Mission Complete ---
Memories of the explosion that toppled the Aztechnology facility keep you company on your ride back to the Kreuzbasar. You barely managed to outrun the blast. Now the facility lies buried under thousands of kilograms of twisted rebar and reinforced concrete, no doubt a considerable blow to Aztechnology's activities here in Berlin.
Mission successful. It's time to get paid.
Karma Points
- [1] Bribe or intimidate the LTG worker (#2).
- [1] Rescue Danni (#3).
- [3] Free the test subjects (#13).
- [1] Delete the Project Bloodline Files.
- [2] Give the Project Bloodline Files to the Schockwellenreiter.
- [12] Complete the mission.
Walkthrough
After completing the mission
Earwig, you'll need to meet with Paul Amsel in your safehouse. He'll tell you that
Earwig was a success, and that he's now patched into the Knight Errant commlinks -- which means he'll be able to tell you if any of their response teams are called in. He'll also inform you that "Frau Muller" (who hired you for the run) has added your voiceprint to a security door in the Aztechnology facility, which means that you (and only you) will be able to unlock it. And finally, he'll let you know that medevacs won't be available in this run, which means if anybody dies, then you'll fail the mission and have to load your game.
You'll begin the mission in the Jewuhl District next to a phone booth (#1), where you'll find another request from the Schockwellenreiter (see #1 for details). Then as you make your way towards the Aztechnology facility, you'll receive up to two calls on your commlink:
- If you've been working with the Lodge, then Luca Duerr will ask you to deliver the message "We are pleased that Project Vincent is going so well" to an executive inside the Aztechnology facility. You'll find this executive on the Ground Level (#8). He'll react appropriately to what you say. Completing this task will earn you 1000 nuyen from Luca Duerr after the mission.
- Just outside the Aztechnology facility entrance (Exit A), Paul Amsel will encourage you to be as stealthy as possible. This is good advice. If you attack anybody during the mission, then the alarms will sound, and you'll have to fight everybody from that point on. So the longer you can keep the guards fooled, the less fighting you'll have to do.
What's more, fighting will trigger a distress call to Knight Errant response teams. The Knight Errant forces won't be any tougher than what you've faced before, but you'll have to deal with a lot of them, and they'll appear in addition to Aztechnology's security guards, making the battles much more difficult. Luckily, you'll be given 20 turns before the response teams arrive, and this timer won't start until you've entered the facility (by default) or until you've reached the Sub-Basement (if you knock out the facility's power at #3).
The first thing you'll need to do in the mission is get inside the Aztechnology facility. You'll have three options for this:
- You can talk to the guard captain at the main entrance (Exit A) and attack him. You'll have to deal with three guards and two auto turrets at the entrance, plus another guard along the side of the facility. The latter guard will drop an Aztechnology Key Card when he dies. This card will allow you to use the main entrance. This method isn't recommended. It'll make the rest of the mission more difficult.
- You can help the LTG Worker on the southern side of the facility (#2). With Decking 4 (or a decker on your team), you'll be able to talk to her, and with Strength 6, Charisma 6 plus 100 nuyen, or Charisma 5 plus 300 nuyen, you'll be able to convince her to leave. This will earn you 1 karma point. Then when you examine the panel she was repairing, you'll just need Decking 4 (or a decker) to open the side door (Exit B).
- You can help the soykaf shop owners Heimerich and Mira (Exit C). When you first approach them, they'll be watching a hatch, worried about their friend Danni, who went down into the Utility Tunnel to tap into Aztechnology's power grid. As long as you're polite to the couple and don't demand money, they'll ask you to help, and they'll give you a Utility Hatch Access Card so you can find out what happened to Danni.
Inside the Utility Tunnel, you'll find Danni being detained by a pair of security drones. When the drones spot you -- and your weapons -- they'll attack. You'll earn 1 karma point for defeating them and saving Danni. After the battle, when you talk to Danni, you'll examine the tap she made into the power grid, and you'll realize that you could use it to cause a short power outage. Of course, Aztechnology would then be able to trace the sabotage back to the tap, which would get Danni and her friends in trouble, so she'll ask you not to do it. This will give you two options:
- You can leave the tap alone. This will force you to use one of the other two options to enter the Aztechnology facility.
- You can cause the power outage anyway. Danni, Heimerich and Mira will yell at you, but if you have Charisma 5, the Street etiquette, or Blitz on your team, then you'll be able to make amends -- by offering to manipulate Aztechnology's utility logs to obfuscate where the sabotage came from. You'll be able to do this in the Sub-Basement (#11).
Regardless, the power outage will open up the side entrance into the facility (Exit B). On your way there, you might pass by the LTG worker arguing with a guard (#2). This will be the case if you didn't send the worker away earlier. If the guard is there, then whatever you do, don't talk to him. He'll demand to see your identification, and when you don't have any, he'll attack you, which will put you into combat mode for the rest of the mission.
Note: With the power off, the Aztechnology guards won't be able to call for Knight Errant help until you've reached the Sub-Basement. You'll also have an easier time convincing them that you belong in the facility. This is pretty useful, especially if you're not playing a diplomatic character.
Inside the Aztechnology facility, the first thing you should do is jack into the matrix (at #4 or #6). You'll have to fight some White IC, but you'll be able to hack into nodes for the elevator (Exit D), secure doors (#3-6), and security cameras. This will open up the Ground Floor for you, and also allow you to descend to the Sub-Basement.
Next up, if you're sneaking through the level, then you should go to the locker room (#6). With the security cameras under your control, you'll be able to watch the security guard patrolling around the eastern side of the level. As soon as he heads into the lobby (#7), you should be able to walk right to the locker room without being observed.
Inside the locker room, you'll find Knight Errant uniforms for you and your team. If you're fighting your way through the mission, then these uniforms won't help you any. But if you're sneaking through, then the uniforms will fool the Ground Floor guards, provided you also have the Security etiquette, Charisma 4 (if the power is off), or Charisma 5 (if the power is on).
In the Sub-Basement (reached via the elevator at Exit D), you'll immediately run into a pair of guards (#9). To talk your way past them, you'll need to introduce yourself as Muller and mention Central. At that point, if the power is on, then you'll need the Security etiquette or Charisma 6 to fool them. If the power is off, then you'll only need the Security etiquette or Charisma 4.
When you enter the next room (#10), the facility will regain its power (if it was off), and Paul will contact you and tell you that the password for the facility's generators is "Xolotl" (the god of fire and lightning in Aztec mythology). This information will go into your mission inventory under Aztechnology Admin Password.
After your conversation with Paul, you might have to deal with some guards. They'll either be in the cryo lab (if the power never went off) or in front of the cryo lab (otherwise). For the former case, you'll need the Security etiquette or Charisma 6 to fool them. For the latter case, you'll need the Security etiquette or Charisma 4 to fool them. That is, these guards will get fooled by the same things as the previous guards.
The blast door to the cryo lab (#12) will start out locked. To open it, you'll need to jack into the matrix in a nearby office (#11). Inside the matrix, you'll quickly come to a T-intersection. You'll find the Lab Blast Door Node in the first room, the Security Cameras Node to the east, and the Facility Operations Records Node to the west. If you used Danni's tap (#3) to cause a power outage, then you'll be able to use the Facility Operations Records Node to manipulate Aztechnology's logs and keep Danni and her friends safe. If you didn't cause a power outage, then the Facility Operations Records Node won't do anything for you, and you should skip it.
If you've been fighting your way through the facility, then the battle in the cryo lab (#12) might be your toughest in the mission. That's because you'll encounter three Aztechnology guards there for sure, plus up to eight Knight Errant guards, the exact number depending on how long ago you triggered the alarms. So hopefully you have some grenades, shotguns, and / or area-effect spells to help you out. If you've managed to stay peaceful up to this point, then you won't encounter anybody in the cryo lab.
The door to the ritual chamber (#13) will start out locked. This is the door that Frau Muller linked to your voice. So you'll need to use your main character to open the door.
Inside the ritual chamber, you'll encounter three blood mages. Even if you've been peaceful up to this point, they'll be suspicious of you, and they'll want to cast a blood spell to see if you're telling the truth. If you let them, then with the adept spells Magic Resistance or Pain Resistance, or with Body 6, you'll be able to deal with the pain, and with Charisma 4, you'll be able to lie to the mages and fool them.
Of course, at this point it won't make a lot of difference if you initiate combat. You'll have to fight soon anyway, and with so little of the mission left, you should be able to finish everything before the Knight Errant response teams can arrive. So when you meet with the blood mages, instead of fooling them, you might want to use a Brigthlight System or Quickness 6 to get the jump on them and attack them before they're ready. This will give you to move first in the battle, which is useful since two of the blood mages won't be protected by any sort of cover.
Along with the blood mages, you'll meet three test subjects in the ritual chamber. When you talk to the one in the eastern cell, he'll tell you that his purpose in life is to "suffer and die," thus producing research data for Aztechnology. If you have Intelligence 5, then you'll recognize that he's a clone. If you promise to break him out of his cell, the blood mages (if they're still alive) won't notice.
You'll also discover a jack-in point and a locked terminal in the center of the ritual chamber. When you use the jack-in point to enter the matrix, you'll once again appear at a T-intersection. To the east you'll find the East Cell Door Node, to the west you'll find the West Cell Door Node, and to the north you'll find he North Cell Door Node and the Bloodline Terminal Access Node. The cell door nodes will allow you to free the test subjects. If you free all three of them, then you'll earn 3 karma points. The Bloodline Terminal Access Node will unlock the terminal in the chamber.
Note: For some reason, you'll trigger the alarms while you're in the matrix, which will turn the blood mages hostile. So be ready for a fight.
Finally, with the terminal unlocked, you'll be able to access it. You'll find that it contains data on Project Bloodline, but that it's written in a language you don't understand. With the Academic etiquette or Intelligence 6, you'll recognize that the language is Nahuatl (the language of the Aztecs), but you still won't be able to read it. All you'll be able to do is copy the data for later analysis. This will give you the Project Bloodline Files.
When you approach the generator (#14), you'll encounter a pair of guards. If you still haven't triggered the alarms, then you'll need the Security etiquette and Charisma 6 to fool them. But it won't make any difference. When you disable the generator's safety overrides (using the password "xolotl" that Paul gave you at #9) and overload the generator, the guards will realize what you're up to and attack you. Overloading the generator will give you a 7-turn countdown before the facility blows up.
With the counter ticking down, you'll need to escape from the facility. Conveniently, you'll find an emergency exit nearby (Exit E), but it'll be locked. To open the exit, you'll need to use the panel next to it to jack into the matrix and hack the Security Door Access Node. This part of the matrix is small, and you should be able to finish it well before the timer runs out. If working against the timer makes you nervous, tough, you could also unlock the exit door before overloading the generator.
When you exit the facility, you'll briefly stop in the Jewuhl district so you can admire your handiwork, and then you'll return to the Kreuzbasar, where you'll earn 12 karma points for completing the mission. When you check the Mission Computer in your safehouse, you'll also receive your payment for the job: 6000 nuyen for you, and 18,000 nuyen for your Alice fund. You might also earn some other rewards:
- If you completed the task for the Lodge, then when you meet with Luca Duerr in Cafe Cezve, you'll receive 1000 nuyen. If you completed at least two out of the three tasks for the Lodge, then when you return to your safehouse, you'll find a package containing
Prototype Combat Suit and more.
- If you downloaded Paydata: DNA "Donor" List, then posting it on the Mission Computer will eventually earn you 540 nuyen.
- If you downloaded the Project Bloodline Files, then you'll have to decide what to do with them. But before making a decision, you should show the files to Aljernon in his shop. He'll be able to decipher them, and he'll tell you that the blood mages were looking for a way to kill someone through one of their relatives (that is, through their bloodline). He'll call this pursuit "an abomination."
You'll have three choices for what to do with the files. If you post them as paydata on the Mission Computer, then you'll earn 1125 nuyen. If you delete them using the Mission Computer, then you'll earn 1 karma point. If you give them to the Schockwellenreiter (at their phone booth), then you'll earn 2 karma points and 500 nuyen.
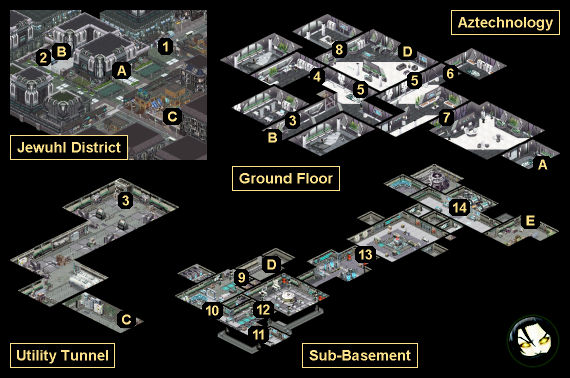
1 - Starting Point / Phone Booth
If you examine the phone booth here, then you'll find a request from the Schockwellenreiter asking for research data from the Aztechnology facility in the district. You'll find this data near the end of the mission in the ritual chamber (#13), but you'll have to decide if you really want to give it to the Schockwellenreiter or not. See if the end of the Walkthrough section for more information.
2 - LTG Worker
3 - Secure Office
Inside this office, you'll learn that Frau Muller isn't the only Aztechnology employee with concerns about the Bloodline project.
4 - Secure Office
The panel next to the office will allow you to jack into the matrix. This is where you can take control of the elevator (Exit D), unlock all of the secure doors (#3-6), and gain access to the security cameras. Inside the office, if you have Decking 4 (or a decker), then you'll be able to download Paydata: DNA "Donor" List, which will eventually earn you 540 nuyen.
5 - Secure Doors
6 - Secure Locker Room
The panel next to the locker room will allow you to jack into the matrix. This is the same as the jack-in point next to the office (#4), so there isn't any reason to jack into both. Inside the locker room, you'll find Knight Errant uniforms for you and your team.
7 - Lobby
8 - Executive's Office
If you're working with the Lodge, then inside this office you'll meet the executive that you're supposed to deliver a message to.
9 - Security Checkpoint
10 - Reception
11 - Side Office
12 - Cryo Lab
13 - Ritual Chamber
14 - Generator
Exits
- Main entrance.
- Side entrance.
- Utility hatch.
- Elevator.
- Emergency exit.


