 Did we miss anything in this location? Is there something we didn't discover? Let us know!
Background
The drive from the Kreuzbasar to the Schonbuch Forest was a long one. For over six hours, you and Glory rode in relative silence, with only the sounds of the road for company.
Did we miss anything in this location? Is there something we didn't discover? Let us know!
Background
The drive from the Kreuzbasar to the Schonbuch Forest was a long one. For over six hours, you and Glory rode in relative silence, with only the sounds of the road for company.
Now you find yourself crouching in the woods, watching, waiting. Off in the distance, the rustic exterior of Feuerstelle looks curiously warm and inviting, but you know what's waiting inside. The anticipation churns at your guts like a living thing.
Eventually, a van pulls out of the compound's driveway and rolls out along a service road before disappearing from view. Glory gives you a nod and begins to scramble forward.
Harrow has left the building. It's time for you to make your way inside.
--- Mission Conclusion ---
You thread your way through the trees of the Schonbuch Forest, tracing your way back to the thicket where you and Glory hid the van. The inferno that consumed Feuerstelle is spreading, and the conflagration casts the forest around you in a sinister orange light.
The heat at your back is intense. Unbearable. Far ahead, Glory blazes a trail for you to follow, shredding the foliage in her path.
The fire is moving fast, but you're faster. You clamber into the van, put the vehicle in gear, and punch the accelerator. The burning ruin of Feuerstelle recedes into the distance, a glowing speck in the rear-view mirror. The peace and safety of the Kreuzbasar lie ahead.
Karma Points
- [2] Complete the mission.
Walkthrough
As you talk to Glory in between missions, she'll slowly reveal her past. You'll learn about her home life as she was growing up, and how she was lured into a cult called Feuerstelle (the "Fire Place") after developing magical talent. The cult was run by a man named Harrow, who acted as a front for no less than Satan -- the Adversary -- himself. But after a while Glory broke away from the cult, and she started wearing bulky chrome cyberware to sap her magical abilities and reduce her connection to the Adversary.
Eventually, Glory will be ready to take action, and she'll ask you whether she should kill Harrow or rescue the kids from the cult. Your answer here won't lock you into anything -- you'll get numerous opportunities to change your mind during the mission -- so go ahead and say whatever feels right to you.
Note: If you pick killing Harrow, then Glory will say, "That bastard has to pay for what he did to me." If you pick rescuing the kids, then Glory will say, "This feels like the path to redemption. This feels right." This is a pretty big clue about which answer is right, at least story-wise.
To leave for the mission, you'll need to use the U-Bahn exit in your safehouse. This will take you to where your van is parked. You'll only be able to take Glory with you on the mission.
You'll start the mission just outside Feuerstelle. You won't be able to do anything there other than have a pep talk with Glory, so after finishing the conversation, head inside.
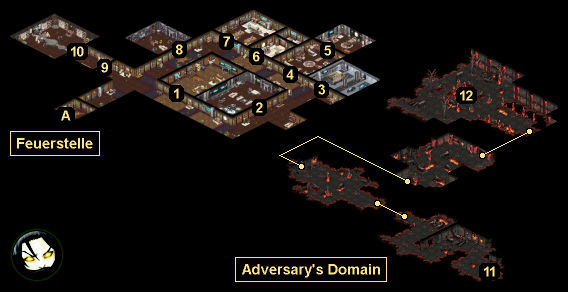
Your main goal in the Feuerstelle compound is to reach the shrine (#10). But to get to it, you'll have to open a warded door (#9). You'll spot the warded door just to your left after you've entered the compound (at Exit A). If you have Wisdom 6, then you'll be able to try and force your way through the door, but it won't work. Glory will tell you that to open the door, you'll need to find a special key, which is likely being carried by a red-headed girl.
So you'll need to search through the compound. If you prefer to solve problems diplomatically, then it's a good idea to search thoroughly, even if Glory tries to convince you to keep moving. Otherwise, you can head straight for the dormitory (#4), where you'll find the key.
There are some useful things you can do and see in the compound: you can rescue a ranger (#1), you can pick up some paydata (#8), and you can find all sorts of evidence that Harrow and his cult are evil (#1, #2, #4, #7, #8).
But eventually, you'll need to head to the dormitory (#4), where you'll hear Marta speaking to some initiates. Glory will realize that Marta must now be Harrow's second-in-command, which means she'll have a key to the shrine. You'll confirm this when you enter her room (#5) and see that she's now a redhead.
When you talk to Marta, you'll have two basic choices. You can either kill her for the shrine key, or you can try and talk her into giving it to you. The former is easy. Just "say nothing" and then "step aside" during your conversation with Marta, and a fight will start up. Marta is a spellcaster, but with two against one, she won't last very long, and she'll drop Marta's Amulet (the key) when she dies.
Convincing Marta to help you is a little more complicated. First, you'll need to prevent a fight from breaking out. You can do this by being polite and discouraging Glory from attacking. Having Glory's Ring (#2) can play a role as well, but it isn't required. Then you'll need to show Marta that Harrow and his cult are evil. The game will keep score during your arguments. Each time you say something that sways Marta, you'll earn a point. But each time Marta dismisses your argument, you'll lose a point.
At the end of the conversation, you'll need to ask Marta for the key. If you have one point or fewer, then Marta will attack you, and she'll drop Marta's Amulet (the key) when she dies. If you shave two points, then Marta will give you the amulet and flee from the compound. And if you have three points or more, then Marta will begin following you, and she'll open the warded door for you when you get to it.
Listed below are the five arguments that will work on Marta. All of the other arguments won't work.
- "Don't you see anything ironic about a cult devoted to freedom and rebellion with a totalitarian leader?" This argument requires the Academic etiquette.
- "When Glory lived here, he had her kill a man for his tri-vid player. How can that be right?" You'll gain this argument if you examine the tri-vid player in the western lounge (#1).
- "Harrow is hurting the runaways that you bring here." followed by "He's going to make the initiates -- the young initiates, like the girl in the next room -- do something horrible." You'll gain this argument if you listen to the female initiate in the dormitory (#4) and see the meat in the dining hall (#7).
- "Glory said that you two spent a lot of time in the lounge back when she lived here. What did you do there?" followed by "Because we found a tattered, bloodstained shirt in there. It looked like it came from an initiate." You'll gain this argument if you spot the bloody shirt in the eastern lounge (#2).
- "I've read Harrow's manifesto. It looks like he spends a long time talking about charity?" followed by "But then, in his Rules of Living, he says that all Free Thinkers are supposed to be selfish." You'll gain this argument if you read as much of the manifesto as possible in Harrow's office (#8).
After dealing with Marta (one way or another), you'll be able to open the warded door (#9). When you do, Glory will give you a special pendant that will protect you against the shrine, and she'll put one on as well. Marta, if she's with you, will just wear her amulet. Then you'll get one last chance to choose between killing Harrow and rescuing the kids -- making this an excellent spot to save your game. If you decide to kill Harrow while Marta is with you, then she'll attack you.
When you enter the shrine room (#10), the shrine will welcome Glory home, and then it'll jettison you into the Adversary's Domain (#11). You'll encounter several demonic spirits in this realm, including maulers (who heal) and seekers (who deal area damage), but eventually you'll meet the Heart of Feuerstelle (#12). The Heart will try to lure Glory back into the fold, but its pitch won't work, and a battle will start up.
The Heart looks like it should be tough, but it's not. At the start of each round, the Heart will summon two mirror images of itself. These images will disappear if you damage them, but the Heart will just take damage. The problem for the Heart is that once you figure out which one it is, nothing will happen to create confusion between it and its mirror images. So you can just attack the Heart and ignore the images (the images are pretty wimpy anyway; they might not even be able to damage you).
The complication in the battle will come from Harrow. Starting in the second round, he'll show up as a projection, and he'll heal and buff the Heart. The buff in particular will make the Heart difficult to kill (since it'll reduce all damage by 15), so you'll need to "kill" Harrow as quickly as possible. However, each time you do, his projection will just return two rounds later. That means you'll need to alternate your attacks between the Heart and Harrow, until you eventually wear the Heart down.
The mission will diverge here, depending on which objective you chose:
- If you chose to kill Harrow, then at the end of the battle, Glory will finish the Heart off, and her razors will burst into flame. This will upgrade her melee weapon from Hand Razors to Hand of Glory, which will cause her melee attacks to deal extra damage over time.
You'll then return to the real world, where you'll immediately run into Harrow. Glory will gut him with her new razors, and she'll seem pretty happy about it (and totally uncaring about the kids). At this point you'll realize that she's no longer wearing her pendant, and it won't be clear if she's been tainted by the Adversary or not. But to complete the mission, you'll just need to exit Feuerstelle (at Exit A).
- If you chose to save the kids, then at the end of the battle, the Heart will be purified, and it'll wish to make amends. Glory will then break her pendant and bind the spirit to her. This will give her the Hearthfire ability, which will allow her to heal an ally's most recent wound (just like the Heal spell).
Back in the real world, you'll still need to rescue the kids. You'll find them in the eastern lounge (#2). You'll have to clear some rubble out of the way to reach them, but nothing will attack you, and Harrow won't be around. When you reach the kids, the mission will end.
Note: You can complete the mission without killing any cultists, including Marta, but you won't gain anything for doing so.
When you return to the Kreuzbasar, you'll gain 2 karma points for completing the mission.
1 - Western Lounge
When you approach the door to this room, you'll overhear a man inside pleading for his life. Glory will recommend that you avoid the room until after you've dealt with the shrine, but this is bad advice. If you wait that long, then you won't be able to enter the room at all. Still, you'll have two choices:
- If you enter the room right away, then the two acolytes inside will attack you. By defeating them, you'll rescue the park ranger they were torturing.
- If you wait until Marta (#5) is following you, then you'll be able to rescue the park ranger without a fight.
Either way, the park ranger will survive, and before he leaves he'll tell you about a cache of supplies in the garage (#3). When you go there, you'll find a
BuMoNA Gold Trauma Kit and two
Premium Medkits.
Also in the room, you'll spot a tri-vid player. When you examine it, Glory will remember killing a man to get it.
2 - Eastern Lounge
If you enter this room with Marta (#5), then you'll meet three acolytes inside, and nothing will happen. You also won't be able to examine anything. But if you enter without Marta, then the acolytes will attack you, and after defeating them, you'll find two things of interest:
- Clothes. When you examine the clothes, you'll spot a bloody shirt that probably belonged to some unlucky -- and now dead -- initiate.
- Photo. The photo will show you Glory and Marta during happier times. You'll spot a ring attached the photo. Glory will tell you that Marta gave it to her. No matter what you try to do with Glory's Ring, Glory will take it, and it'll go into your mission inventory.
3 - Garage
4 - Dormitory
As you approach the doorway to this room, you'll overhear Marta speaking to the initiates inside. When you enter, Marta will already be in her room (#5), so it'll just be you and the initiates. No matter what you say to them, they'll let you pass. The Street etiquette option won't work any better or worse than the others.
Before going to see Marta, you should talk to the female initiate by the door. She'll tell you about eavesdropping on Marta and Harrow, and hearing something about "chopping up meat." If you've already been to the dining area (#7), then you'll know what Harrow has planned. Glory will then ask the girl how long she's been at Feuerstelle, which will lead to her realizing that Harrow is indoctrinating the initiates much more quickly than he used to.
5 - Marta's Bedroom
6 - Bathroom
Inside this room, you'll find an
Advanced Medkit.
7 - Dining Area
Inside the refrigerator here, you'll find human meat, which Glory will inform you is used in the Adversary's rituals.
8 - Office
Inside this room, you'll discover Harrow's manifesto for the cult. It'll take you a while to read through it, and as you turn pages, Glory will feel something "ominous" approaching. If you read all the way to the end, then a demonic spirit will appear, and it'll attack you, but it'll be alone, and you and Glory shouldn't have too much trouble killing it. Reading the manifesto can help you get the shrine key diplomatically.
Note: The Academic etiquette option when reading the manifesto won't actually help you in any way. It'll just explicitly point out some contradictions in the text.
Also in the room, you'll find Harrow's terminal. With Decking 5, you'll be able to pick up Paydata: Harrow's Bribes, which will eventually earn you 270 nuyen.
9 - Warded Door
10 - Shrine Room
11 - Arrival Point
12 - Heart of Feuerstelle
Exits
- Feuerstelle entrance.


