 Did we miss anything on this map? Is there something we didn't discover? Let us know!
This section of the Imperial City is important for two main reasons - you get to add Silk Fox to your party and it's the only place where you can set up a meeting with the Lotus Inquisitor. The encounter with Creative Yukong and confrontation with the Outlander are also worthy of your attention, but they're unnecessary to your primary goal.
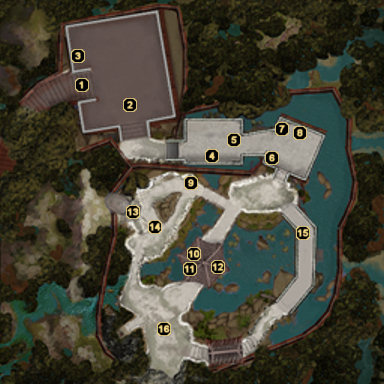
1 - Arrival
Did we miss anything on this map? Is there something we didn't discover? Let us know!
This section of the Imperial City is important for two main reasons - you get to add Silk Fox to your party and it's the only place where you can set up a meeting with the Lotus Inquisitor. The encounter with Creative Yukong and confrontation with the Outlander are also worthy of your attention, but they're unnecessary to your primary goal.
1 - Arrival
After traveling through the
Golden Way, you'll enter the Scholars' Garden at the top of these stairs. During your first visit, you'll run into Silk Fox again. After telling you more about Master Li's capture and revealing her plans to infiltrate the Lotus Assassins, the veiled princess will join your party as a permanent follower.
When you're ready to see her plans through, you'll need to speak with Scholar Dongow here in the Scholars' Garden or reach the silver division in the
Imperial Arena. These two actions will lead to a meeting with a Lotus Inquisitor and Lotus Executioner (respectively), which is the first step toward joining the Lotus Assassins' ranks.
2 - Imperial Guards
Remember those Imperial Guards that first approached you when you reached the Imperial City? Well, now that Princess Lian isn't around (Silk Fox is disguised, remember), the two guards show up once again and this time they're looking for a fight. Even though one of them is a captain, they should go down easy enough.
3 - Bookstand
The text on this bookstand is entitled
The Physical Universe: A Rebuttal.
4 - Scrollstand
Rather than containing the usual experience-giving text, this scrollstand will provide you with the
Configuration of the Snake.
5 - Scholar Dongow
Scholar Dongow is your ticket to a meeting with the Lotus Inquisitor recruiter. Ask him about Inquisitor and he'll assure you that someone will meet you back at your flyer in the
Market District. When the conversation is over, Dongow will move into the east room and stand next to the Philosopher.
6 - Scrollstand
The text on this scrollstand is entitled
The Physical Universe: The Scholar's Hypothesis.
7 - Jar
A small amount of silver and a random essence gem (such as a
Warrior's Gem of Fate or a
Gem of Irresistible Spirit) is yours simply by smashing this jar.
8 - Focus Shrine
Meditating at a Focus Shrine will restore all of your character's Focus.
9 - Scholar Kongyu
This scholar is not what he appears to be. If you're pursuing the criminal bounties for Imperial Captain Sen in the
Market District, you can quiz him about his studies and eventually call him out for being Creative Yukong in disguise. Once you've found him out, Yukong will tell you that he simply petitioned for some silver from Lady Rento for his acting career. Lord Rento flew into a rage and put a bounty on the aspiring actor's head.
You have three options here. You can genuinely help Creative Yukong sneak out of the city for Open Palm points, you can act like you're going to help Creative Yukong and then turn him in to the captain during the escape for Closed Fist points, or you can discard his excuse and just kill him for Closed Fist points. If you choose to help him, you'll have to keep Imperial Captain Sen busy while Yukong sneaks out the gate in the
Market District. You won't get the bounty this way, but Yukong will offer to pay you half of what Sen is offering. If you choose to kill him, you'll be spilling blood right here in the Scholars' Garden. Once he's dead, you can return to Sen for your bounty.
10 - Spirit Font
Meditating at a Spirit Font will restore all of your character's Health and Chi.
11 - Bookstand
The text on this bookstand is entitled
The Long Drought.
12 - Bookstand
The text on this bookstand is entitled
The Physical Universe: A Final Word.
13 - Tong Wei
Tong doesn't have any real significance in the game, though he will tell you about the Valley of the Sprightly Stones. These stones are capable of hovering and were used in the construction of the Imperial Palace, which is why it's suspended far above the ground.
14 - Scholar Songtao
If you brought the
Slaver Documents to Prefect Jitong in the
Market District, then Scholar Songtao will have been exonerated of any slave trading crimes. He will then show up here and will be more than happy to sell you some of his goods. Interestingly, he has the exact same essence gems for sale as Chandler Ling (the other merchant that you could have freed with the
Forged Slaver Documents). Some of the more notable gems he's selling includes a
Superior Charm Gem, a
Superior Intuition Gem, and the
Lucky Hand gem.
15 - Scrollstand
The text on this scrollstand is entitled
The Physical Universe: The Philosopher's Viewpoint.
16 - Sir Roderick Ponce Von Fontlebottom the Magnificent Bastard
Yeah, that's his full name. This arrogant chap has crash landed in the Jade Empire and has decided to amuse himself by insulting your people and their culture. After witnessing him blasting yet another contender with his rifle, you can step up and be his next challenger.
Roderick proposes that the two of you participate in a philosophical debate and, afterward, a round of combat. The four nearby scholars and the Minister of Culture are chosen to judge the debate, so you'll want to speak with each of them to learn what sort of arguments they favor.
Of course, you're reading a walkthrough, so making the rounds isn't necessary if you're just looking for an answer. There are two specific sets of dialogue choices that will beat Sir Roderick in just three rounds of debate - Factual, Mocking, Raging or Factual, Sympathetic, Dimissive. The debate can last a maximum of six rounds, so it's still possible to beat him even if you don't use the two previous orders. Once you're able to get most (or all) of the judges in your favor, you will be declared the victor and will receive 1000 experience points.
Your task isn't over yet, though. You still have to defeat Sir Roderick in battle, and that can be somewhat difficult if you give him a chance to get a couple of shots off with his rifle Mirabelle. The battle itself takes place back at the entry platform of the Scholars' Garden, so you do have some room to move around. Hit Roderick with a flurry of attacks and then jump behind him before he can get a shot off with his rifle. Repeat this method until the Outlander falls.
When Sir Roderick has been beaten, you'll be returned to your previous location and the Outlander will admit defeat. Lucky for you, the Outlander upholds his country's customs and offers a worthy gift to his victor. You get to pick from a selection of rewards, so choose carefully. Up for grabs is the
Mirabelle weapon style (I prefer something useful...), the
Fitness for the Upright Gentleman technique (Physical strength is...), the
Duchess of Ulmsbottom's Rules of Engagement technique (I am interested in improving my mind...), the
Manual of Trepanation technique (I am concerned with spiritual matters...), or
The Silver Tongue essence gem (Have you encountered any interesting gems...). Personally, I'd recommend taking his rifle or the gem, as the three techniques aren't that spectacular.


