 Did we miss anything on this map? Is there something we didn't discover? Let us know!
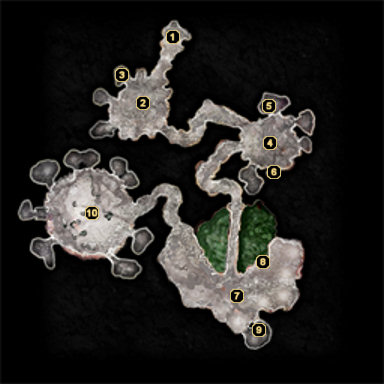
The Forest Shadow has lifted the seal on these caves (either by choice or through her death), allowing you to finish off the remaining cannibals and The Mother herself. This is a linear dungeon with four large rooms, three of which feature regular battles with the cannibals and the last featuring your final confrontation with The Mother.
1 - Arrival
Did we miss anything on this map? Is there something we didn't discover? Let us know!
The Forest Shadow has lifted the seal on these caves (either by choice or through her death), allowing you to finish off the remaining cannibals and The Mother herself. This is a linear dungeon with four large rooms, three of which feature regular battles with the cannibals and the last featuring your final confrontation with The Mother.
1 - Arrival
Having allied with the Forest Shadow or outright killed her, you can now access these caves hidden beneath the
Pilgrim's Rest Inn.
2 - Butcher's Room
After a short bit of dialogue, you'll find yourself up against a Butcher and ten cannibals, which you'll find to be fairly similar to the fight upstairs with the Innkeeper. When the battle concludes, a nearby survivor will begin the transformation into a cannibal. If you consent to his request to kill him, you'll receive experience points but won't shift in alignment either way. If you allow him to transform, you'll receive Closed Fist points. If you specifically choose the "If you're too weak to resist them...", "I don't have the time...", and "I'd rather watch you suffer..." lines, you'll gain Closed Fist points and receive the
Snake Mantra technique.
3 - Chest and Corpses
The chest in this small alcove contains 250 silver pieces and a randomly placed essence gem (such as a
Flawed Scholar Gem, while the corpses contain another 50 silver pieces and a random essence gem (such as an
Inferior Monk Gem or a
Scholar's Gem of Fate).
4 - Handler's Room
Another round of combat is in store for you in this room, and this time you'll be facing a Handler and seven Rat Demons. Use your standard tactics to bring the group of them down, then search the nearby alcoves for more treasure.
5 - Bones
These bones can be sifted through for 300 silver pieces and a randomly placed essence gem (such as a
Flawed Scholar Gem.
6 - Bones
Both sets of bones can be searched here for a total of 51 silver and the potential for two randomly placed essence gems (such as a
Flawed Scholar Gem or even a
Greater Warrior's Gem of Fate).
7 - Cannibals
Surprisingly, here's where the most action takes place in these caves. You'll be rushed by a small army of cannibals, though they're all of the same difficulty as what you've went up against before. It's basically an endurance test, so use your area effect attack to keep them at bay if you get mobbed. You may want to use this opportunity to practice your Harmonic Combos if you're able to get one or two of them singled out at a time.
When the fight is over, Henpecked Hou and The Black Whirlwind will approach you and offer their assistance when you're ready to face The Mother in the next room. Don't leave just yet, though, as there's some loot to be had while you're here.
8 - Chest
This trapped chest contains a small pile of silver and a randomly placed essence gem (such as an
Inferior Scholar Gem.
9 - Bamboo Cask
The bamboo cask behind these wooden planks contains 250 silver pieces and a random essence gem (such as an
Aura of Calm Gem or a
Flawed Scholar Gem).
10 - The Mother
After a short cutscene, you'll finally find yourself up against The Mother. Don't try and attack her directly, as it's useless. Instead, focus on destroying each of the three pillars in the room. The Mother packs a serious punch if she closes into melee range, so move on to a different pillar if she gets too close. Keep switching until they're all destroyed (not too difficult) and then watch as you and your followers escape the collapsing network of caves and emerge at area #23 in the
Great Southern Forest.


