 Did we miss anything on this map? Is there something we didn't discover? Let us know!
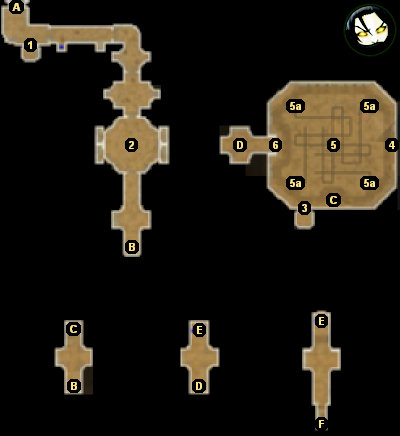
1 - Secret Door
Clicking on the bas relief next to the door will open it. In the secret room beyond, you'll find a
lectern with the
lesser chant of purity (Chant 19) on it.
2 - Treasure Room
The treasure room features one central chest, four chests along the walls, and four secret rooms. The
secret rooms mostly contain urns and enemies, but one also has a lectern with a
mysterious chant
(Chant 20) on it. If you open the central chest, then all of the secret rooms will open, and you'll
have to fight all of their defenders at once. To open the secret rooms individually, open the chests
along the walls. One of the chests (the southeastern one) is actually a mimic, but otherwise opening
a chest will open the secret room next to it.
Note: Mimics are tough, but there's an easy trick to killing them. Lightning spells travel through
walls, but the mimic's ranged attack doesn't. So just place your combat mage behind a wall and let
it solo the mimic.
3 - Sanctuary Door
You'll need a character with Ranged 13 to open the door.
4 - Lectern
On the lectern you'll find the
lesser chant of melee awareness (Chant 18).
5 - Shrine Puzzle
When you place the four
stelae from the Azunite Desert
(
The Azunite Desert, #5) into the
four sockets here (#5a), then two objects will appear on the pedestal in the center of the room (#5):
a
silver mirror (Quest Item 21) and a
map of the lost vault of the Azunites (Map 4).
When you pick up the objects, the locked door to the west (#6) will open.
6 - Locked Door
This door will open after you've completed the puzzle at #5.
Exits:
- Exit to the
Azunite Desert.
- Elevator.
- Elevator.
- Elevator.
- Elevator.
- Exit to the
Lost Valley of the Azunites.