 Did we miss anything in this section? Is there something we didn't discover?
Let us know!
Background
Did we miss anything in this section? Is there something we didn't discover?
Let us know!
Background
You'll trigger this quest when you enter the
Source Temple.
Walkthrough
When you enter the
Source Temple, you'll discover that Leandra beat you there and destroyed the mirror portal (#2) that would have let you skip directly to the end. So you'll have to take the long way, first removing some boulders (#3), and then passing through a talking door (#4). Getting that far will earn you 5700 xp. Then in the main part of the temple, you'll have to pass two tests, described below.
Test of Self-Awareness
The Test of Self-Awareness is complicated. You'll have to do several things in order to complete it. The first thing you'll need to do is open some doors. If you step onto the pressure plate in the central chamber (#5), then nothing will happen, but when you get off of it, the door to the north will open, giving you access to another pressure plate. When you step onto this new pressure plate, the door you just opened will close, but the door to the poison trap room will open.
Inside the poison trap room (#6), you'll find another pressure plate. Standing on it will close the door you just came through and cause a poison gas trap to trigger, but stepping off of it will open the door leading to the Air Gate (#15). To remove the poison gas, you can either disarm the vent releasing the gas, or you can pull the demon head lever in the back of the room. To open the western exit from the room, you'll need to press the button on the right side of the door.
Past the poison trap room, you'll come to a broken bridge (#7). On the far side of the bridge (which you should be able to reach by using your
Teleporter Pyramids or a spell), you'll have to dodge a pair of explosive traps, but you should notice a door behind some rocks. Even without the Telekinesis skill, you should be able to open the door, which should trigger the waypoint portal on the other side (Exit W). This will add the Source Temple Vault to your rift travel menu.
Inside the vault, you'll discover a pair of statues (#8). They represent the Pragmatic and Romantic traits. From
The Trial of Ascension Logs (found at #19), you'll get a hint for the statues, and you'll learn that the player attacking them should destroy the statue that is the opposite of his beliefs. When you do this, you'll get a success message. If you destroy the wrong one, then you'll be sent back to the entrance of the temple (Exit A), and you'll have to start again.
Before leaving the vault, you should teleport through the grate to the treasure room on the western side (#9). Inside the treasure room, you'll discover a mirror portal. Approaching it will give you an exploration bonus. Going through the mirror will take you to the Earth Gate Key (#11). To escape the room with the key, you'll just need to press the button to the right of the exit door.
To reach the Earth Gate (#12), you'll have to go through the poison trap room (#6) again, but this time you should head to the end of the passage where you'll find a grate leading to a room half filled with lava (#10). If you teleport yourself to the safe part of the room, then you'll discover that the room contains a chest plus a hidden pressure plate. If a character with over 25 weight stands on the pressure plate, then three doors will open: the exit door to the room, plus two doors leading to the Earth Gate.
Note: To open the chest in the room, you'll need to have the pressure plate weighted down when you approach it. If the pressure plate isn't weighted down, then approaching the chest will cause it to disappear.
Another Note: If you don't have a character with at least 25 weight, then you can just have somebody pick up the chest in the room (which has 50 weight) or some vases (which have 5 weight) to reach the required amount.
Past the Earth Gate (#12), you'll encounter a pair of invulnerable sentinels that will trigger lava traps when they see you. So you'll either need to sneak past them, or you'll need to use the Death Knight Bane skill (which you should have gained at the end of the quest Infiltrating the Immaculates) to make them vulnerable so you can kill them.
Past the sentinels you'll come to a locked door with a pressure plate in front of it. Stepping onto the pressure plate will open the door but also cause fireballs to start falling out of the sky. So open the door and then quickly run into the room beyond it (#13). In that room you'll find a lever that will turn off the fireballs.
In the room beyond the fireballs you'll also find statues representing the Altruistic and Egotistical traits. Like before, you should destroy the statue with the opposite trait of the character who attacks it. If you're right, then you'll get a message to that effect. If you're wrong then you'll get sent back to the start of the temple (Exit A) and have to try again. Near the statues you'll find the Air Gate Key.
The way to the Air Gate (#15) should be open. If it's not, then you'll need to step onto and off of the pressure plate in the central chamber (#5) to open the door to the north, then step onto and off of the pressure plate in the room beyond it to open the door to the poison trap room (#6), and then step onto and off of the pressure plate in the poison trap room to open the door leading to the Air Gate.
Past the Air Gate, you'll come to a hatch (#16) that will lead you to series of rooms, each of which will have a hatch leading to the next room. If you wander through all of these rooms, then you'll find two locked treasure chests and their keys, you'll find a
Medium Perception Potion (which might come in handy coming up), and you'll also find some rooms connected to the hatch rooms by grates. Remember that you can teleport through grates, so you'll be able to reach these rooms as well.
Eventually, you'll find your way to the exit room (#17). Going through the hatch in this room will take you back to the first hatch (#16). But if you examine the walls in the room, and if you have at least 9 Perception, then you'll detect a button that will remove the statue in the room. With the statue out of the way, you'll gain access to a new hatch, which will take you to the far side of the puzzle area, where you'll find statues representing the Bold and Cautious traits (#18). After destroying the statue with the opposite trait from the character doing the attacking, you'll discover a mirror portal nearby that will take you back to the room where you found the Earth Gate Key (#11).
Destroying the three statues will complete the Test of Self-Awareness and earn you a paltry 5700 xp. The three pillars in the central chamber will also light up, and they'll provide you with three books:
The Three Aspects of Man: Body,
The Three Aspects of Man: Mind, and
The Three Aspects of Man: Soul. These books will give you hints for the Ritual of Devotion.
Note: The Test of Self-Awareness is optional. It will just give you hints for the Ritual of Devotion. So if you already know how to complete the ritual, then you can skip the test.
Another Note: If you get stuck behind closed doors while trying to complete the test, then you can always use your rift travel menu to return to the central chamber (#5).
Ritual of Devotion
To complete the Ritual of Devotion, you'll have to figure out how to light the candles in the center of the library (#19). The book
The Ritual of Devotion (#19) will tell you the order of the three steps in the ritual. The
Aspects of Man books from the Test of Self-Awareness (#5) will tell you which candles to light for each step.
If you can't figure out the ritual from the hints, then we'll give you the solution here. First light the eight candles on the outer edge of the stone circle and wait for a lightning bolt to strike. Then light the central candle only and wait for the lightning bolt to strike again. Finally, light any three candles and wait for the lightning bolt to strike one last time. Completing the ritual will earn you 28,500 xp and move an empty bookshelf out of the way, which will allow you to continue exploring the temple.
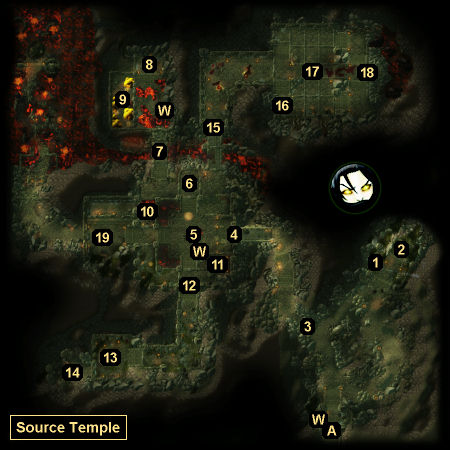
1 - Hidden Mound
With enough Perception, you'll detect a hidden mound here. Digging it up will reveal a Star Stone, which will instantly trigger, healing your party and granting you some xp.
2 - Broken Mirror
With this mirror broken (by Leandra), you'll have no choice but to take the long way through the temple. After noting this, your main characters will be able to have a conversation, where you'll get to choose between being Bold (initiative +1) or Cautious (sneaking +1).
3 - Boulders
To move these boulders out of the way, you'll just need to push the button next to them (on the right).
4 - Talking Door
This door won't allow you to pass until you've triggered enough Star Stones /
Blood Stones (such as the one at #1). "Enough" is when you've unlocked the Chapel in the
Homestead.
5 - Test of Self-Awareness
6 - Poison Trap Room
7 - Broken Bridge
8 - Pragmatic and Romantic Statues
9 - Treasure Room
10 - Pressure Plate
11 - Earth Gate Key Room
12 - Earth Gate
13 - Altruistic and Egotistical Statues / Air Gate Key
14 - Hidden Room
If you walk through a cobwebbed archway, then you'll end up in this room where you'll find a treasure chest to loot.
15 - Air Gate
16 - First Hatch
17 - Exit Room
18 - Bold and Cautious Statues
19 - Library / Ritual of Devotion
Inside the library, you'll find two books of interest:
The Ritual of Devotion and
The Trial of Ascension Logs. These books will be sitting out in plain sight -- not in the "rows of books" in the shelves -- so you should be able to spot them easily by pressing the alt key.
The Ritual of Devotion will give you a hint for the puzzle in this room.
The Trial of Ascension Logs will give you a hint for the Test of Self-Awareness (#5).
Exits
- Exit to the
Phantom Forest.
- Waypoint portal.


