 Did we miss anything in this section? Is there something we didn't discover?
Let us know!
Background
Did we miss anything in this section? Is there something we didn't discover?
Let us know!
Background
There are two ways to trigger this quest. You can receive it from Jinxika the cat, who can be found either at the farm outside
Hunter's Edge (#1) or by the fountain inside
Hunter's Edge (#2). Talking to Jinxika will require you to have the Pet Pal talent. You can also receive the quest from Jahrl in the warehouse in
Hunter's Edge (#4).
Walkthrough
When you receive the quest, you'll learn that the Immaculates in the village are trying to enter the house of the local wizard (#6). However, the wizard's traps and protection spells have foiled them thus far, and so they've turned their attention to the wizard's servants, who might know the trick to getting inside -- but who are currently hiding at some unknown location.
Jinxika will tell you about the Ratcatcher and his rats, who are trying to sniff out the hiding place of the servants, and Jahrl will tell you about some prisoners in the warehouse cellar, who might know something. These two avenues will give you two ways to continue the quest.
Rats
Jinxika will tell you that she's friends with the servants, and she'll offer to tell you where you can find them if you agree to kill off all of the rats who are hunting for them. You'll encounter rats all over the place in
Hunter's Edge, but if you try to kill one, then the Immaculates will warn you to desist. If you kill another one, then they'll attack you.
After killing one rat, your main characters should comment on the situation, including saying that "poison ought to do the trick, but I'm fresh out of cheese-flavored deadly nightshade." To create something similar, you'll need
Cheese and a
Poison Flask. You can find both of these in the basement of the tavern (#5). When you combine them, you'll create
Poisoned Cheese. This mixture doesn't require any Crafting skill.
Next, you should place the
Poisoned Cheese next to one of the (numerous) rat holes in the village. This will cause a rat to come out, eat the cheese, and die. Immediately afterwards, the Rat King himself will come out and lament the death of poor Ratthew. When you talk to the king, he'll ask you to remove the cat who has been killing his men, and he'll tell you to meet him in the cellar of the tavern if you wish to meet with him again.
Your conversation with the king will give you two ways to proceed:
- You can side with the king. For this, you should return to Jinxika and ask her to leave the village. You'll have to beat her in a game of rock-paper-scissors to convince her to do this. Winning the game will also earn you 5100 xp. To let the Rat King know the good news, you'll need to go to the tavern basement and click on the "rat palace," which will cause him to make an appearance. For your reward, the Rat King will show you the location of the hatch leading to Grutilda's treasure stash (by marking it on your Hunter's Edge map). Of course, it's much easier to reach the stash via the "window" in the tavern basement than through the hatch in Grutilda's office, so the Rat King's information isn't very useful. This option also won't tell you where the servants are, so you'll have to follow the "Prisoners" path below.
- You can side with Jinxika. For this, you should go to the tavern basement and click on the "rat palace" there. This will cause the Rat King to show up. You won't be able to tell him that you're going to attack him. You'll just have to force-attack him. When you do this, two Slain Cat ghosts will show up to help him out, and you'll have to defeat all three, which will earn you about 10,000 xp. When you return to Jinxika to tell her the good news, she'll tell you where to find the servants: in a cellar located underneath a black boulder behind the house next to the entrance gate (#3). Jinxika will also tell you where you can find a key to the cellar: in a beehive (#7) behind the wizard's house (#6).
Note: After killing the Rat King, you'll have the option of telling Grutilda that the Ratcatcher has lost control of his rats. This will give your main characters a chance to become more Blunt (immunity to charm) or Considerate (charisma +1). If you tattle on the Ratcatcher, then Grutilda will head over to him and kill him.
Prisoners
After talking to Jahrl, the tribesman guarding the hatch to the warehouse cellar will allow you to descend. In the cellar, you'll run into Kansada and Lorr torturing a prisoner named Nolan. No matter what you say when you meet the torturers, you'll eventually have to fight them, but if you win a game of rock-paper-scissors against them, then you'll earn 6800 xp first. You can also take a nonsensical test from Kansada (the answers are 1, 1, 2, and 2) but you won't get any xp for passing it.
When you talk to Nolan, he'll recognize that you're not evil, but he'll start ranting so loudly that you'll worry that he might blow your cover. This will give you a choice between being Altruistic (reputation +2) or Egotistical (bartering +1). If you kill Nolan to keep him quiet, then he won't tell you anything, and you'll have to follow Jinxika's path above. But if you allow Nolan to live, then he'll promise to tell you about the servants if you help him to escape, but his voice will get so loud that everybody in the cellar will realize what you're up to, and you'll get attacked. This battle will earn you over 30,000 xp.
To escape the prison, you'll need to find the secret exit. Nolan will give you a hint for this. He'll tell you to "explore the back wall of the farthest room." The "farthest room" is the one with the table and cabinet in it. If you examine the wall next to the cabinet, then you should spot a button there hidden by cobwebs. When you press the button, the cabinet will move out of the way, revealing a break in the wall leading to the Forlorn Tunnel.
However, when you return to Nolan, he'll tell you that he won't leave without the other prisoners. To free them, you'll need to pick up the key dropped by one of the guards, and use it to open their cell. When you tell the prisoners that they're free, they'll run for the tunnel. Then when you return to Nolan, he'll run to the tunnel as well.
But you won't be done yet. In the middle of the tunnel, you'll have to defeat two Spore-Infested Guards and five Night Caps. The guards shouldn't present much of a problem, but the Night Caps will have high enough resistances that damaging spells will heal them, and so you'll need to attack them using weapons without elemental bonuses. You'll earn over 45,000 xp for completing the battle.
With the way clear, when you talk to Nolan, he'll reveal that the servants are hiding in a cellar behind their home, and that the entrance can be found under a black boulder (#3). He'll then add that to reach the cellar, you'll need to destroy the boulder, and you'll also need to pick up a key from a beehive (#7) behind the wizard's house (#6). Nolan will then flee.
When you talk to the other prisoners, they'll reveal where you can find the entrance to Grutilda's treasure stash -- a hatch located next to the fireplace in her office. They'll even mark the location on your map. Then they'll flee as well, and you'll earn 4080 xp for helping them.
The Servants
To meet the servants, you'll need to destroy the massive boulder behind one of the houses (#3), which will reveal a locked hatch. The key for the hatch can be found in one of the beehives next to the wizard's house (#7). When you go through the hatch, you'll find yourself in a hidden cellar.
Inside the cellar you'll meet the wizard's servants. When you talk to them, they'll tell you that Zandalor is the wizard they work for, and that he's made his way to the
Source Temple in the
Phantom Forest. They'll also tell you that they have a message for Icara the White Witch. This will trigger the quest
Follow the Wizard. During that quest the servants will give you a
Portal Activation Crystal, which will allow you to use the mirror in the cellar to travel to the interior of the Wizard's House.
Note: If for some reason you decide to kill the servants instead of talk to them, then they'll drop the
Portal Activation Crystal.
Before you leave, the servants will warn you that Zandalor filled his house with traps, and that you'll need to be careful. They'll also inform you that Zandalor has a waypoint portal in his house, and that if you were to disable all of the traps, then they'd be able to use it to escape the village.
Wizard's House
When you enter the Wizard's House, you'll discover that it is indeed filled with traps, and not the friendly type that are easy to disarm. So you might want to send only one character into the house -- preferably one who has good resistances. Inside the house, you should immediately head upstairs (the static cloud at the foot of the staircase might delay you, but you can quaff an
Air Resistance Potion before trying to go through it).
Upstairs you'll discover more traps that will "disappear" when you get too close to them. You won't be able to disarm them, but you should be able to carefully walk past them. Or you can just shoot them and take the damage, and not have to worry about them.
In the southeastern room you'll discover a mirror portal like the one that brought you into the house, only it will be deactivated. To turn it on, you should light the four candleholders in the room with it. Then when you go through the portal, you'll end up in another room on the upper floor, but this one will have a lever in it. Pulling the lever will remove the two magical barriers on the upper floor, which will allow you to enter the master bedroom.
Inside the master bedroom, you'll find a waypoint portal and another lever. Pulling this lever will turn off all of the traps on the ground floor and also earn you 5100 xp. With the traps disabled, the servants will now be able to escape the village. When you return to them to tell them the good news, you'll earn 10,200 xp plus a point of reputation. One of the servants will also tell you the password to use to open up one of the chests in the Wizard's House.
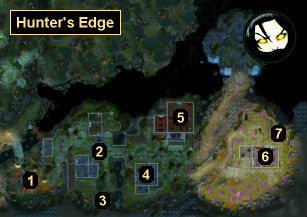
1 - Farm
2 - Fountain
3 - Boulder
4 - Warehouse
5 - Tavern
6 - Wizard's House
7 - Beehives


