 Did we miss anything in this section? Is there something we didn't discover?
Let us know!
Intel
Did we miss anything in this section? Is there something we didn't discover?
Let us know!
Intel
- Additional supplies added to the mission map. One of Nasri's captors is offering intel on hidden caches in the Al-Samad airfield.
Note: This intel will only be available if you arrested Nasri at the end of the mission
Intercept Nasri the Arms Dealer.
From what we can tell, purchasing this intel won't actually add any supplies to the mission; it will just mark the locations of cash and ammunition on the map.
- Mission map for the mission. For a small fee, a surveillance company will provide you with a detailed map of Al-Samad's airfield.
If you purchase this intel, then surveillance cameras, computer terminals, and some other key locations will be marked on the map.
Walkthrough
When the mission starts up, you'll find yourself in the airfield that you infiltrated during the mission
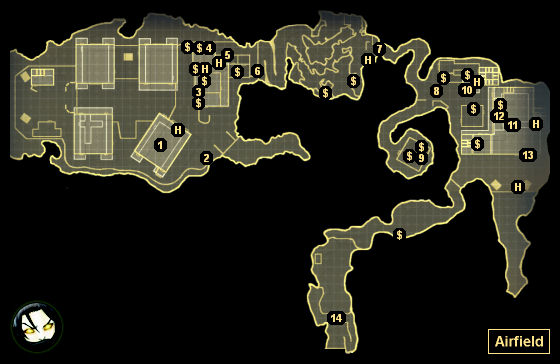
Bug Al-Samad Airfield, but this time you won't have to worry about the western half of the airfield; you won't even be able to get there. You'll start out in the hangar just to the southwest of the control tower (#1). You won't have any way to reach the upper level of the hangar in this mission, so you'll only have two options for reaching the control tower: a frontal assault, or by using the zip-line attached to the nearby sentry tower (#2).
Inside the control tower, you'll need to make your way to the top so you can hack the computer that you'll find there (#4). When you do, you'll learn that the Halbech missiles are being stored in a munitions depot in the mountains. At the same time, the back door to the tower (#5) will open, giving you a route to the airplane graveyard (#6).
Past the graveyard, you'll come to the munitions depot, but it'll be blocked by a big gate (#8). To get past the gate, you'll have two choices:
- You can infiltrate the guard station to the south of the gate. Inside, you'll find a computer (#9) that you can hack to open the gate.
- You can infiltrate the guard station to the north of the gate. Inside, you'll find a computer (#10) that you can hack to blow up the power generators inside the depot, which will allow you to use a zip-line to sneak into the depot while the guards are distracted.
The northern route is the easier route, because it will give you a better angle on the guards. If you enter the depot through the front gate, then you'll have to deal with several guards above you on roofs and platforms, and you won't be able to tell where they are or where they're looking. So for the latter route, you should stay indoors as much as possible (all of the guards will be outdoors) and get to the high ground as quickly as possible (or just head straight for the locked door in the northeastern corner of the depot, which will put you in the main depot building).
When you enter the main depot building (using either the ground level or the upper level doorway), the door will close and lock behind you, preventing you from returning to the rest of the depot. So only enter the main depot building once you've explored the rest of the depot. Defeating the guards inside the building will be easier if you enter through the upper doorway, since that will put you right next to the computer that controls the cameras (#12).
When you exit the main depot building (#13), you'll witness Shaheed, but he'll leave with a convoy and head south. You'll then need to take the trail to the southwest, dealing with any guards who get in your way. The game will make it sound like you'll need to hurry to catch up to the convoy, but you can actually take all the time you need.
Eventually you'll reach the bridge (#14), where you'll find Shaheed's lieutenant. Unlike most bosses, the lieutenant won't start out aware of you, and so if you can sneak up on him, then you'll be able to kill him with one melee hit (plus earn 350 xp for completing the "Avoid Detection" objective). Otherwise, you'll have to fight him normally. The lieutenant, while a boss, isn't one of the tougher bosses in the game, and it'll only take about twice the normal number of bullets to kill him. The lieutenant will drop a
Gold-Plated AR when he dies.
When the lieutenant goes down -- literally -- Shaheed and his convoy will show up. No matter where you killed the lieutenant, you'll start out behind some crates at the top of the bridge (#14), and Shaheed in his armored "stryker" vehicle will be to the north. The stryker won't be able to hit you while you're behind the crates, so it's a good idea to stay there until you've eliminated all of the enemy soldiers in the area. You'll also find some supplies near the crates.
Because Shaheed's stryker is armored, punching it or shooting it with a pistol won't help you very much. If you have an assault rifle, then that will do some damage for you, but your best option is to use the four missile launchers that you'll find on the ground level between you and the stryker (compliments, no doubt, of the convoy). You'll also find a box of replenishing Explosive Grenades near the missile launchers, and they can help you out as well. You'll only need to hit the stryker three times with missiles to finish it off.
Note: The grenades will replenish ten times, so even if you're not planning to use them, you might want to crouch down next to them and pick some up.
Once you've done enough damage to the stryker, Shaheed will exit the vehicle and surrender. You'll then have three options for what to do with him:
- You can listen to Shaheed or not, and then execute him. You'll end up with his PDA, which will tell you everything he would have said. This option will earn you the
Desert Spear perk.
- You can listen to Shaheed and then arrest him. This option will earn you the
Stay of Execution perk, and you'll also learn Shaheed's secret dossier fact.
- You can listen to Shaheed and then let him escape. This option will earn you the
Stay of Execution perk, and you'll also learn Shaheed's secret dossier fact. Shaheed will survive if (and only if) you make this choice, and it will allow you to meet him again later in the game.
Regardless of what you decide to do with Shaheed, you'll learn from him or his PDA that Al-Samad didn't steal the missiles from Halbech; Halbech sold them the missiles, and is now trying to cover its tracks. However, before you can learn much more, missiles will come flying in and destroy the Al-Samad base -- and almost kill you. If you arrested Shaheed then he'll die in the blast.
Once you've composed yourself, Mina will contact you, and you'll learn that not only did Halbech send the missiles, but that it probably has somebody working inside Alpha Protocol (if you try to guess who, nothing will come of it, unless you guess Mina, and then you'll lose 2 reputation points with her). Mina will then tell you that you'll need to leave Saudi Arabia right away, and you'll have to pick your next destination, either Moscow, Rome, or Taipei. On your trip to this location, you'll meet Scarlet Lake, a possible romance option in the game. For best results, you should be professional and suave with her.
Finally, for completing the Saudi Arabia portion of the campaign, you'll receive the
Tour of Duty perk, and you'll be allowed to specialize your character. This means you'll get to pick three skills, which you'll then be able to raise to rank 15 instead of just rank 10. You'll also be allowed to re-allocate your AP, just in case you made some poor decisions along the way.
"Mike, you're on your own -- Alpha Protocol's the only thing protecting you right now."
1 - Starting Point
2 - Sentry Tower
You'll find a zip-line attached to the tower, which you can use to bypass the guards in front of the control tower.
3 - Computer (Lower Level)
If you hack this computer, then you'll complete the "Upload Data" objective and earn $5000.
4 - Computer (Upper Level)
5 - Control Tower Back Door
6 - Entrance Gate to Graveyard
7 - Exit Gate from Graveyard
8 - Gate to Munitions Depot
9 - Computer
You'll need to hack this computer to open the gate to the munitions depot (#8).
10 - Computer (Upper Level)
Hacking this computer will blow up the generators in the depot and distract the guards for a while. Next to the computer, in a shelf, you'll find a random armor mod. In the window next to the computer, you'll find a sniper rifle that you can use on the guards while they're looking in the wrong direction.
11 - Weapon Mod (Ground Level)
You'll find a random weapon mod here.
12 - Computer (Upper Level)
Hacking this computer will turn off the cameras in the depot and complete the "Disable Security" objective.
13 - Depot Building Exit
14 - Bridge / Lieutenant
H - Healing Supplies
$ - Money


