 Did we miss anything in this section? Is there something we didn't discover?
Let us know!
Intel
Did we miss anything in this section? Is there something we didn't discover?
Let us know!
Intel
- SIE is willing to put you in touch with one of Marburg's less loyal henchmen. This turncoat is in the position to sabotage the effort to destroy the museum.
Note: This intel will only be available if you've already met SIE (in Moscow), and if you have a high reputation with her.
Purchasing this intel will give you an extra minute to disarm the bombs (#12), if you choose to disarm the bombs.
- Mission map for the mission. For a small fee, a surveillance company will provide you with a detailed map of the museum where you must confront Marburg.
Purchasing this intel will show you the museum's security details (cameras, computers, turrets, and so forth) on your mission map.
Walkthrough
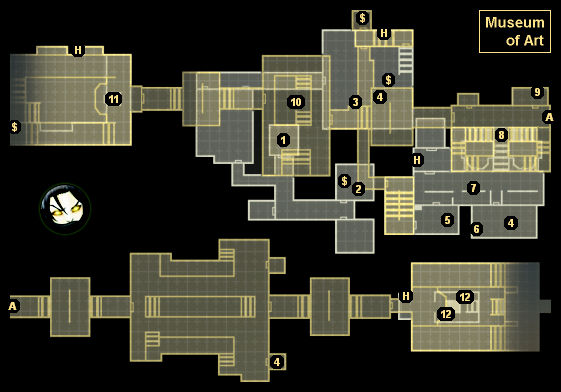
You'll begin the mission in the basement of the museum (#1), and you'll need to evade or dispatch a bunch of VCI agents as you make your way to the main lobby (#7). Your mission map might be a little confusing because of all of the overlapping levels, but the basement walls are white, and the west wing walls are yellow, and you'll (mostly) only have one way to go, so you shouldn't get lost.
When you reach the main lobby, you'll find the museum's security guards in a shootout with a group of VCI agents. Once the dust has settled, you should head up the stairs (#8). When you get to the top, you'll learn that Marburg's men have Madison in the west wing -- with orders to kill her -- but that the bombs are in the east wing, and you won't have time to reach both. So you'll have to make a choice.
Rescuing Madison
For this case you'll need to head west into the west wing. You'll have to deal with some VCI agents, turrets, and proximity mines, but none of these things should do much to slow you down. In fact, the easiest way to "disarm" the mines is simply to run past them, but you can also deactivate them by hacking a computer (#10).
Eventually you'll come to the elevator where Madison and her captors are (#11). Two of the captors will immediately leave the elevator, and you can deal with them any way you like. But one of the captors will stay behind in the elevator with Madison, and he'll use her as a hostage / shield. If you get too close to him, or if you damage him in any way (without killing him), then he'll execute Madison, and you'll have to load your game.
We've only seen two ways to save Madison: shoot the last captor in the head with a carefully aimed assault rifle shot, or shoot him in the head with a pistol loaded with Tranquilizer Rounds (if you shoot him with regular ammo, then he'll probably survive, even if you have Chain Shot maxed). When you defeat the last captor, Madison will escape from the museum, and the objective will be complete.
Note: No matter what your reputation with Madison is, she'll leave you (via a message on your television) when you return to your safehouse.
Disarming the Bombs
For this case you'll need to head east into the east wing (via Exit A). As you make your way through the wing, you'll encounter VCI agents, turrets, and proximity mines, but none of these things should cause you any problems. Eventually you'll reach the final room in the wing, and when you enter it, a three (or four) minute countdown will begin. You'll then need to fend off some more VCI agents plus hack into a pair of computers (#12) before the timer expires, or else the bombs will go off, and you'll have to load your game. If you have a couple of
EMP Charges on you, then this objective should be fairly easy to complete, as the
EMP Charges can save you a lot of time. Otherwise, you'll have to finish off the VCI agents quickly so you'll still have enough time to do the required hacking.
Defeating Marburg
After rescuing Madison or disarming the bombs, Marburg and two VCI agents will show up in your wing of the museum, and they'll attack you. Marburg will use a laser-sighted pistol on you, and the agents will use regular weapons. If you kill the two agents, then the battle will start cycling through a pair of stages:
- In the first stage, Marburg and the agents will shoot at you. Marburg can do a lot of damage if he gets you lined up in his sights, but otherwise this stage should be fairly straightforward.
- In the second stage (triggered by the death of the two agents), Marburg will charge at you and try to engage you in melee combat. Marburg is old but his fists pack a wallop, so you should strive to keep away from him (by running around the edge of the room if necessary). Eventually Marburg will stop chasing you, and two more agents will show up, causing the battle to return to the first stage.
Obviously, the best strategy for the fight is keep it in the first stage. So try to avoid killing the agents as much as possible. If you have Chain Shot plus Brilliance, then you might be able to defeat Marburg in a few seconds.
Incendiary Bombs are also good against him because he'll sometimes stay stay behind cover and not move. Otherwise, just keep whittling away at his health while protecting yourself.
Once you've done enough damage to Marburg, he'll stop the fight and talk to you. In most cases, this will lead to Marburg retreating from the museum. But if you have a low enough reputation with him (at least -3), and if you used the suave stance more than the aggressive or professional stances, then Marburg will stay and fight, and if you're able to finish him off, then you'll receive
Marburg's Pistol. Regardless, defeating Marburg will end the Rome section of the campaign, and, depending on how far along you are, you'll receive one of the following perks: Seasoned, Experienced, or World Traveler.
1 - Starting Point (Lower Level)
2 - Computer (Lower Level)
Hacking this computer will shut down the cameras in the museum.
3 - Briefcase (Lower Level)
Picking up this briefcase will give you dossier information on Alpha Protocol.
4 - Email Computers
If you hack any two of these three computers, then you'll complete the objective "Find Evidence," and you'll get to read some of the emails between the VCI agents involved in the mission.
5 - Halbech Data
If you pick up the data disk here, then you'll gain some Halbech data, which will result in you receiving the "Shipping Losses" email when you return to your safehouse.
6 - Safe
Inside the safe you'll find $8000.
7 - Main Lobby
8 - Top of Stairs
9 - Briefcase
Picking up this briefcase will give you dossier information on Conrad Marburg.
10 - Computer (West Wing)
Hacking this computer will disarm all of the proximity mines in the west wing.
11 - Elevator (West Wing)
12 - Bomb Computers
Exits:
- Entrance to the east wing.


