 Did we miss anything in this section? Is there something we didn't discover?
Let us know!
Walkthrough
Did we miss anything in this section? Is there something we didn't discover?
Let us know!
Walkthrough
The first thing you'll need to do in this mission is pick a handler -- either Albatross, Heck, or SIE. This choice won't change much, but if you want to have sex with SIE, then you should pick her. After making your decision, you'll surrender yourself to Darcy, who will then deliver you to Graybox.
When you reach Graybox, it's possible that Leland will try to recruit you into Halbech (if your reputation with him is high enough). "Mike, you already work for me. I'd just like to make if official." This decision won't change the broad strokes of the mission, but it will change a couple of the details. If you agree to work for Halbech, then you'll have to kill Mina, and you'll face Westridge at the end. If you decline Leland's invitation, then you'll be able to rescue Mina, and you'll face Leland at the end (unless you agreed to work with Shaheed in the mission
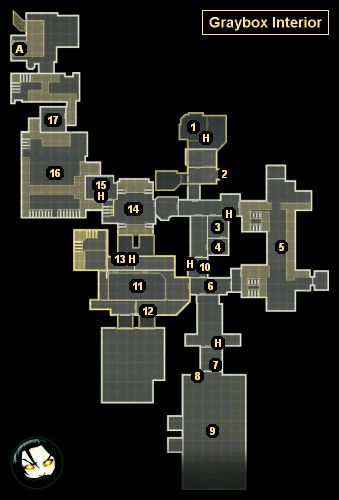
Contact Sheikh Ali Shaheed, and then you'll still fight Westridge). But regardless, at the end of your conversation with Leland, a pair of marines will come into the interrogation room and escort you to the medical bay (#1).
On your way to the medical bay, you might run into Conrad Marburg (if he's still alive). If you have a high enough reputation with him, and if you have enough dossier information on him, then you'll be able to convince him to leave Halbech (by selecting the "dossier" dialogue option). If you do this, then you won't have to face Marburg at the end of the mission, and you'll gain the
Agent of Change perk.
When you reach the medical bay (#1), you'll be strapped into a bed. Depending on who you chose as your handler, you'll escape in different ways. If you chose Albatross, then Sis will free you. If you chose Heck, then he'll free you remotely. If you chose SIE, then she'll free you -- but not before trying to take advantage of you (if your reputation with her is high enough). If you acquiesce to SIE's advances, then you'll gain the
Savage Love perk. If you refuse, then you'll gain the
Thanks But No Thanks perk. Regardless, once out of bed, you'll find your gear in a dufflebag somewhere in the room.
Note: You might need to call up your inventory page to reset your endurance properly.
As you make your escape from Graybox, you'll witness the facility being "sanitized," which of course will involve explosions and flooding, but no paper shredders. When you reach the hallway in the middle of the building (#6), you'll hear from either Westridge or Leland, and you'll learn that Mina is in the shooting range (#9). If you decided to work for Halbech, then you should make your way to Mina and execute her. Otherwise, you should rescue her.
Note: It's likely that the "Rescue Mina" objective will never show up as completed on your intel page. This is a bug.
When you reach lobby (#11), you'll find your handler in a shootout with Alpha Protocol guards -- and then the hallway behind you will explode, preventing your return. So make sure you've explored the other rooms attached to the hallway first, including the shooting range where Mina is being held (#9), before continuing on.
Past your handler, and after making your way through a pair of labs (#14 and #15), you'll come to the main server room (#16). Depending on what you said to Parker earlier in the mission (in the lab at #1), your objective in the room will be different:
- If you told Parker about Marburg killing Madison, then you'll have to fight Marburg and his men (even if you gained the
Agent of Change perk). Marburg will fight you just like he did in Rome, charging at you every time you've killed enough of his men.
If Marburg is already dead, then Parker will commit suicide, and you'll just have to deal with some
Alpha Protocol guards.
- If you convinced Parker that his analysis was flawed, then you'll need to protect Parker by defeating all of the guards in the server room.
- If you didn't convince Parker of anything, or if you didn't talk to him at all, then you'll need to kill Parker in the control room (#17). Parker is a pushover to kill.
Regardless, you'll only have six minutes to complete your objective. If you stay on the upper level of the server room (where you arrive), then the guards will just keep on spawning, so you should make your way down into the server room as quickly as possible. You might have to deal with a few turrets as well, and, if so, you'll be able to deactivate them through the use of a computer on the lower level (or you can just shoot the turrets, which is probably easier). Your handler will help you in the battle.
Once you've gained the Alpha Protocol evidence (by hacking the computer in the control room), you'll need to escape the facility by taking the elevator to the north (Exit A). Once outside, you'll move on to the
Exterior portion of the mission.
1 - Medical Bay (Upper Level) / Lab (Lower Level)
You'll begin the mission in the medical bay, but after escaping from it and taking the elevator (#2), you'll be able to enter the lab. You'll find a few things of interest inside the lab: a safe containing dossier information on Alpha Protocol, an
EMP Charge, a file containing $2000 and dossier information on Alan Parker, and a computer. When you access the computer, you might
be given a choice -- to contact Parker (this will always be available) or to download files to your PDA (this will only be available if Omen Deng is still alive):
- If you contact Parker, then you'll complete the "Contact Alan Parker" objective. During the ensuing conversation, you might be able to inform Parker that Marburg killed his daughter Madison (if you gained enough dossier information to learn this) or that his analysis is flawed (which will gain your the
Logical Deduction perk). Either way, Parker will turn away from Halbech, and he might even attack Marburg when you reach the server room (#16).
- If you download the files, then you'll complete the "Access PDA" objective. Omen Deng will then send you a recording, and he'll let you know that Scarlet Lake is the one who tried to (or did) assassinate Richard Sung in Taipei. This will result in you receiving Scarlet's secret dossier fact.
2 - Elevator
3 - Observation Room
You'll find four things of interest inside this room: a safe containing a random mod plus dossier information on the U.S. Military, a
Shock Trap, a file containing dossier information on the U.S. Military, and a computer. Hacking the computer will net you $1500 plus a regular and secret dossier fact about Conrad Marburg.
4 - Interrogation Room
If you completed the mission
Contact Scarlet Lake, then you'll find Scarlet in here, and she'll reveal (if you didn't know already) that she was the assassin who was hired to kill Richard Sung in Taipei. Depending on how you learned about Scarlet's true profession, you'll be given some options for how to deal with her -- kill her, leave her, or join forces with her. If you kill or leave Scarlet, then that's how her story will end, and nobody else in the game will mention her. If you join forces with Scarlet, then she'll become your handler for the mission, and you might end up with her at the conclusion of the game.
5 - Garage
6 - Hallway
7 - EMP Charges
You'll find a pair of
EMP Charges sitting out on the counter here.
8 - Safe
Inside the safe you'll find a random mod plus possibly dossier information on the U.S. Military (if you didn't pick it up earlier).
9 - Shooting Range
This is where you'll find Mina.
10 - Computer
Hacking this computer will net you $2000 plus a regular and secret dossier fact about Westridge.
11 - Lobby
12 - File (Lower Level)
Inside this file you'll find $1500 and possibly dossier information on the U.S. Military (if you didn't pick it up earlier).
13 - File (Lower Level)
Inside this file you'll find $1500 and the secret dossier fact for the VCI.
14 - Lab
Inside this lab you'll find two hackable computers. One will net you $1500 plus a regular and secret dossier fact about Alpha Protocol. The other will net you $2000 plus a regular and secret dossier fact about Henry Leland.
15 - Lab
Inside this lab you'll find a pair of
Incendiary Bombs.
16 - Server Room
17 - Control Room
Exits:
- Escape elevator.


