 Did we miss anything in this section? Is there something we didn't discover?
Let us know!
Walkthrough
Did we miss anything in this section? Is there something we didn't discover?
Let us know!
Walkthrough
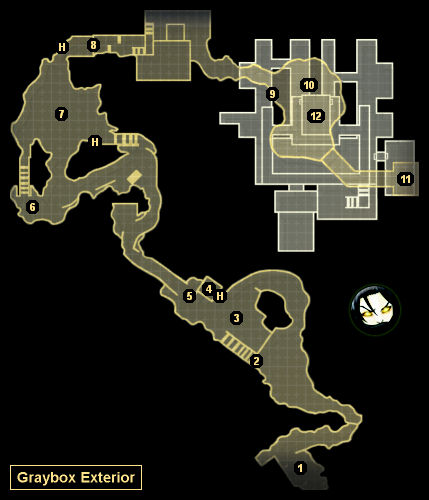
When you exit Graybox, you'll witness your escape helicopter being shot down. That means you'll have to do some extra work to get away. In particular, you'll have to survive three more major battles, which are described below.
Note: For some reason, for most of the mission you'll see the mission map for
Investigate Jizan Weapon Stockpile rather than the correct map. This is a bug.
Defeating Darcy
Not far from your starting position, you'll run into Darcy. Regardless of what your reputation is with him, he and his men will attack you. Darcy will sit in his tower (#4), and he'll shoot at you with a sniper rifle if you're visible to him, and he'll throw handfuls of grenades at you if you're not. Both attacks will kill you pretty quickly, and so you'll need to avoid them. Meanwhile, Darcy's men will appear in the area in waves of three, but they'll stop showing up after a while.
We've seen two main ways to deal with Darcy:
- You can run behind the other tower in the area (#2), and hide behind it. Neither of Darcy's attacks will be able to hit you there, and you'll be able to use that spot to take out Darcy's men. Then, once it's just you versus Darcy, you can use Chain Shot to kill him, or you can try to enter the tower and climb up to the top, and use the sniper rifle there to shoot him. For the sniper rifle to work, you'll have to be very fast. Chain Shot is easier.
Note: The tower will start out locked. To get into it quickly, you might want to use an
EMP Charge. Otherwise Darcy will probably kill you while you're fiddling with the lock.
- The other option is to run right up to Darcy's tower, and stand next to the exit from the area (#5). From this spot, you should be able to see the top of Darcy's head, but he won't be able to hit you. Then you'll just need to shoot him several times to kill him.
After killing Darcy, you should take the time to scour the area. You'll find a random weapon mod (#3), five
Incendiary Bombs (at #2 and #4), and probably lots of drops from the dead guards. Once Darcy dies, the exit gate from the area (#5) will open up, allowing you to continue on.
Note: Sometimes Darcy will disappear from the game during the battle, and you'll have to load your game.
Defeating the Helicopter
Past Darcy you'll enter a region being guarded by a few Alpha Protocol guards -- plus a helicopter (#7). The helicopter will fire rockets at you every so often, but you'll get an audio cue whenever this happens (some rapid beeps), and so you'll know when you're in danger. The helicopter will always fire at your current position, so as long as you keep moving, you should be okay. There are also some safe spots in the area, including the road where you start out, and the base of the steps (#6), where you can stand still and duke it out with the guards.
To defeat the helicopter, you'll need to pick up and use the rocket launchers in the area. The easiest way to do this is to first defeat the guards, and then run from launcher to launcher taking shots at the helicopter. You'll find seven launchers in the area, and this will usually be enough to down the helicopter. If not, then you'll have to shoot it using your regular guns. From what we can tell, you'll do more damage to the helicopter if you shoot it in the side rather than head on.
When the helicopter crashes, it will blow open a gate (#8), allowing you to continue on to the final battle.
Defeating Westridge / Leland
For the final battle, you'll face off against Westridge or Leland at the boat pens (#12). Your opponent will be on a raised platform with a some turrets (Westridge) or a bazooka (Leland), and some Alpha Protocol guards will be helping him out, but the battle shouldn't be too tough. You'll have all sorts of columns that you can hide behind, and you'll probably be able to find an angle where you can shoot your opponent, but not be hit in return.
Once you've done enough damage to your opponent, he'll surrender, and you'll get the choice of killing him or arresting him. If you agreed to work with Shaheed during the mission Contact Sheikh Ali Shaheed, then after facing Westridge, you'll get to have a chat with Leland as well, and you'll get to make the same choice with him. You might also see Scarlet or Marburg during this confrontation, but as far as we can tell, their appearance won't really change anything.
After dealing with Westridge or Leland, the game will end in one of two ways. If you agreed to work for Halbech, and if you kept your word, then you'll share a quiet moment with Leland at the boat pens, and you'll light a cigar. Otherwise, you'll steal a boat and sail away. By default, Mina will leave with you on the boat, but you can also possibly leave with Scarlet, Heck, or by yourself.
"It's my world now. I helped shape it -- it was easier than I thought. And it's time to make some changes, I think."
1 - Starting Point
2 - Tower
3 - Random Weapon Mod
4 - Darcy's Tower
5 - Exit Gate
6 - Safe Spot
7 - Helicopter Battle
8 - Exit Gate
9 - Sentry Tower (Outside)
At the top of the tower you'll find a random weapon mod.
10 - Helicopter Crash Site (Outside)
You'll usually find some ammunition near the downed helicopter.
11 - Elevator
This elevator will take you into the boat pens.
12 - Final Battle (Inside)
You'll face Westridge or Leland here.


