 Did we miss anything in this location? Is there something we didn't discover? Let us know!
Walkthrough
Did we miss anything in this location? Is there something we didn't discover? Let us know!
Walkthrough
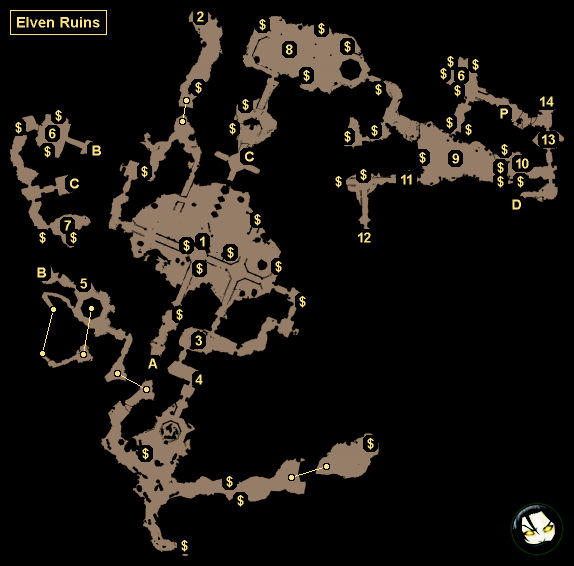
When you tell Keira Metz that you're ready to meet the elven mage who was looking for Ciri, she'll lead you to the ruins where he has been staying. However, shortly after going inside, you'll witness the Wild Hunt across a chasm. Keira will create a portal (#1) so you can reach them quickly, but it will be flawed. You'll end up with drowners to the northwest (#2), and Keira will end up with rats to the southeast (#3).
Note: You're not required to enter the portal, so you can skip the drowners if you want.
As you explore the ruins, you'll discover several bricked doorways and stalagmites. Both can be destroyed using the Aard sign. The doorways should be easy to spot because the mini-map will show you rooms or passages beyond them. The easiest way to spot stalagmites is to turn on your witcher senses, since that will make them glow. In some locations, destroying stalagmites will reveal treasures, but in the ruins they only seem to be for decoration. You'll also encounter pockets of poison gas. Try to stay out of them so you don't get poisoned. Also avoid using a
Torch near them, or you'll blow yourself up.
When you reach Keira (#3), you'll find out that she's afraid of rats. So you'll have to deal with the rats around her while she hides behind a shield. To kill off the rats, you'll have to destroy their two nests. Unlike regular nests, the Igni sign will work on them, but you can also use bombs if you want. You won't find anything to loot inside the nests, but you'll earn 200 xp total when you destroy them.
After you've rescued Keira, she'll want to go home, but you'll convince her to stay with you and continue pursuing the Wild Hunt. Soon after that, you'll run into a projection of the elven mage (#4). He'll have a message for Ciri -- to follow her sword -- but you'll figure out that he means for you to follow swallow symbols.
The swallow symbols will lead you to another projection of the mage (#5), where you'll earn 100 xp. This time the projection will tell you to find Kelpie, which is what Ciri named her horse. You'll see a few symbols near the projection. If you examine the sea creature, then you'll get attacked by a pair of wraiths that look like you and Keira. If you examine the dog, then you'll trigger an explosion. You'll find one Kelpie symbol on the wall of the pool in the center of the room. You'll have to jump down to it. You'll find the second Kelpie symbol as you make your way back to Keira. Examining both symbols will cause the door next to the projection to open, allowing you to continue.
Past the door, you'll come to a deactivated portal (Exit B). To activate it, you'll just need to examine the swallow symbol next to it.
When you go through the portal, you'll end up on a large room guarded by a golem (#6). The golem is big and hard-hitting but slow, and Keira will help you against it. Keira won't do a lot of damage with her lightning spells, but she'll distract the golem enough that you should be able to hit it with signs or roll up to it, attack it a couple of times, and roll away without taking much damage in return. Golems are elementas, so if you have
Elementa Oil, this is a good place to use it.
Past the golem, you'll come to another deactivated portal (Exit C), and once again you'll just need to examine the swallow symbol next to it to activate it. This portal will take you to where you wanted to go originally, where you first saw the Wild Hunt.
In the chamber past the portal, you'll finally encounter the Wild Hunt (#8). They'll be in a hurry, so they'll leave their mage Nithral behind to slow you down. To that end, he'll create three rifts to fill the chamber with White Frost. Keira will counter by casting Demetia Crest's Surge, which will shield you from the cold, but you'll need to protect her from Hounds of the Wild Hunt as she dispels the rifts. The hounds should be easy enough to kill; you'll probably have more trouble trying to stay inside Keira's shield. You'll earn 100 xp for completing the sequence.
After dealing with the White Frost, you'll quickly catch up to Nithral again (#9), and this time he'll stay and fight. He'll start off like a regular warrior, but then every so often he'll kneel down, protect himself with a shield, and create a rift. Like before, the rift will produce Hounds of the Wild Hunt, and while you're fighting them, Nithral will regenerate his health. The hounds won't do much when they first arrive, so for the quickest and easiest battle, just stand in the rift itself and swing your sword. Then when Nithral becomes vulnerable again, start whacking him with your attacks. Keira will help you in the battle, but once again her spells will do more to distract than damage. You'll earn 250 xp for defeating Nithral.
On the eastern side of the chamber, you'll see another projection of the mage (#10). This time he'll warn Ciri about the witches of Crookback Bog, and he'll encourage her to go to "the place where last we were together." You won't have any idea about the latter part, so you'll focus on the witches. This will trigger the main quest
Ladies of the Wood.
To escape from the ruins, you'll need to examine the bricked doorway next to the projection. It'll waver a bit, and Keira will inform you that it's an illusion. She'll then give you
The Eye of Nehaleni, which will allow you to dispel illusions. To dispel this illusion (and other illusions) you'll just need to interact with it while carrying the Eye.
Slightly past the illusionary door, Keira will detect fresh air coming from the back exit (Exit D). She'll then ask you to help her retrieve the lamp that the elven mage promised her. If you agree then you'll trigger the quest
Magic Lamp. But either way, you'll conclude this quest, which will net you 350 xp.
1 - Keira's Portal
2 - Drowners / Treasure Chest
3 - Rat Nests
4 - First Mage Projection
5 - Second Mage Projection
6 - Golem
7 - Gargoyle
8 - White Frost Battle
9 - Nithral
10 - Third Mage Projection
11 - Illusionary Rocks
Once you've gained
The Eye of Nehaleni (at the door at #10), you'll be able to interact with the rocks here to make them disappear.
12 - Treasure Chest
Inside this chest you'll find a leveled version of the silver sword Maugrim, plus more.
13 - Statue Room
This room is involved in the quest
Magic Lamp.
14 - Sepulcher
This sepulcher is involved in the quest
Magic Lamp. You'll find a treasure chest next to it.
Exits
- Main entrance.
- Portal.
- Portal.
- Back exit. You'll have to dispel the illusion here (using
The Eye of Nehaleni from #10) in order to use the exit.


