 Did we miss anything in this section? Is there something we didn't discover?
Let us know!
Walkthrough
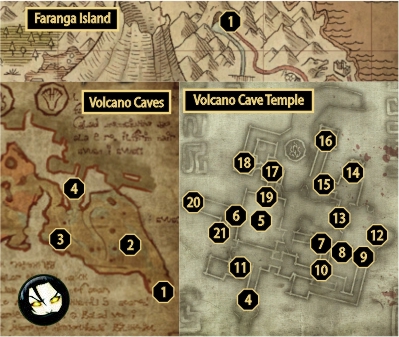
The titan shield is located at the Eastern Volcano Caves whose entrance (
#1) is to the far north-east of the island. To get the map of the volcano caves, you'll have to loot the skeleton that's found at
#2. It can be reached after battling some ogres and scorpions. Note that you'll need a few levitation scrolls to navigate around comfortably.
 The Titan Shield
Make your way to the eastern entrance (
#1) of the Volcano caves by battling ogres. After getting inside, you'll encounter scorpions as well. Look around the pillars to find a skeleton corpse (
#2) which has a map of the place. Proceed to explore the place and you'll find a lizardman who drops an Eastern Volcano Cave teleport stone at
#3 (that is, if you didn't already take it in previous chapters).
Now head to the blue barrier at
#4 after defeating the ashbeast that guards it. Proceed into the big room and kill the attackers. Read the map column at
#5 to receive the region map of this temple. The goal is to open the door at
#6 by placing the correct busts on the nearby altars.
Go through the door at
#7 first. Use the lever to pass the grate. Jump over the trapdoor (
#8) and loot the bust (
#9). Before heading to the lower level through the trapdoor, you might wish to explore the other parts past the spike trap at
#10. The ring on the wall beside it will disable it.
Be careful around
#11. To pass the fire trap, pull the lever with telekinesis. That will however, lock the grate behind the corner, so use it again. Once you explore that room, use it once more upon leaving to avoid getting killed by the fire. Once you've explored all the nooks, return to the trapdoor at
#8.
You'll find a particularly wealthy Saurian at
#12. He has a nice ring (+5 dexterity) and some other minor loots. There's a treasure to dig out at the same spot as well. You'll find a Titanwing sword inside (120 damage) and a few hundred gold coins. Continue through the passage at
#13 afterwards.
You'll encounter another thin wall at
#14. There's a sarcophagus on the other side with a skeleton in it. Explore the corners of the room for some minor loot. You can do the same at
#16, however, you'll have to pass the trap at
#15 by using telekinesis on the lever.
You'll have to levitate to the area at
#17. There's an ashbeast on that platform so be careful. Use nautilus then to cross the small hole. The bust is in the room at
#18. There's a lone undead warrior in there. The sarcophagus has a few items and after you take the bust, use the lever to raise the grate.
Head back to the altars at
#6 by going through the door at
#19 (there's a lever nearby). The shield is floating at
#20. You'll need to defeat a few more lizardmen to reach it. Another 1000 experience are yours. The lever at
#21 guarded by a high priest raises the door again.
 1 - Eastern entrance
2 - Skeleton with the region map
3 - Saurian with the teleport stone
4 - Blue barrier, Temple entrance
5 - Map column
6 - Door with the altars
7 - Grate with a lever
8 - Trapdoor
9 - Bust
10 - Spike trap
11 - Fire trap
12 - Titanwing
13 - Narrow passage
14 - Sarcophagus
15 - Wall trap
16 - Sarcophagus
17 - Ashbeast, nautilus hole
18 - Bust
19 - Door (opened from the inside)
20 - Titan shield
21 - Lever