 Did we miss anything in this section? Is there something we didn't discover?
Let us know!
Overview
Did we miss anything in this section? Is there something we didn't discover?
Let us know!
Overview
Once you've given the crystal disks to the Inquisitor, he'll open the massive gate leading into the volcano. Another conversation with him marks the beginning of Chapter 3. Note that before continuing to here, you'll need to get some levitation, telekinesis and nautilus transformation spell runes or spell scrolls. Also, the volcano area is uncharted, but it's fairly straightfoward so you shouldn't have trouble navigating around.
 The Gate to the Volcano
This mini-quest will auto-complete itself once the gate's opened. You'll receive 500 experience and a dozen of lizardmen warriors will pour out from the door. With the help of all the Warriors of the Order and the Inquisitor, they won't really be hard to defeat.
Once ready, talk to the Inquisitor and follow him into the opened passage. After fighting a group of lizardmen and a beast named brontok, you'll be stuck in front of another big, albeit different gate. Talk to the Inquisitor to receive a quest called
Open the Great Gate.
Open the Great Gate
Having taken the quest from the Inquisitor, there are two ways you can go, either left (south) or right (north). For now, do as Mendoza said and take a turn right, past Rufus and Kato.
After defeating a pair of war crickets, you'll come across some rocks you can jump onto. The appearance of nautili will hint at using the transformation nearby at a mouse hole. Do so and continue exploring until you find an area with a broken wall and two ghouls.
As soon as those two are dead, head left through the door and defeat another pair of ghouls. At the end, you'll see a mud hill and broken ceiling. Climb on top of those to reach the floor above.
Be careful not to fall into the trapdoor to the floor below. Just jump over it and prepare to fight two lizardmen. There will be another trap ahead (this time the spikey one) which you'll have to jump through. In the next room, there's a floor trap and two brontoks will be waiting below.
The only way to go seems to be up the stairs. Two more lizardmen warriors await there. You'll also find a stone plate on the sarcophagus and a winch in the same room. Use it and then jump into the cave below to return back to the Inquisitor. Tell him about the winch. This time he'll send you south (left) where he sent Rufus. Simply continue that way and you'll fight a few ghouls.
After killing a scorpion, search for a passage that leads upwards on the left. There will be a few more ghouls and you'll soon find yourself on a level equal to the temple opposite of your side which has three lizards on it. Defeat them with magic/ranged weapons and use levitation to cross the gap. Sadly, enough Rufus is dead. You can loot the corpse for some minor items.
There are two doors in that room. The one closer on the right has a Watchman lizardman in it who has an old bust in his inventory. Keep this item for later and use the lever in the same room. The lever disables a fire trap encountered later on. Now head through the other door.
After crossing the initial (disabled) trap, there will be a few more up ahead. Turn right and break down the thin stone wall with your pickaxe (just left-click the wall). Another lizardman is there with a lever that disables the next trap.
There's another lizard warrior and a watchman in the next room. Loot the bust from the latter and continue forward. Place the two busts you found onto the altars. The grate will be opened and finally, you'll reach another winch. This time the great gate will be opened.
Return to the Inquisitor by jumping through the openings. Tell him about Rufus (50 experience) and that the gate is opened. This ends the quest and give you 1000 experience.
Inquisitor will also tell you to look at the inscribed column he's been inspecting. You'll need to read five of those to complete another quest -
Report to the Druid about the Temple (received in chapter 2 from Eldric once he repaired a crystal disk for you).
After reading the first column, talk to the Inquisitor to receive the next quest,
The Tunnel.
The Tunnel
After opening the grand gate and talking to the Inquisitor about it, continue further inside. Since it's suspected by you and Mendoza that there might be a trap ahead, carefully continue until the walls with while stripes on them. Then use the telekinesis spell on the lever in the distance.
This completes the quest with 500 experience. Mendoza will then continue with his warriors onward. After you pass the trap, there's another inscribed column on your left. After defeating the lizardmen, you may wish to explore the rooms around. There's only one stone plate (+4 wisdom) to be found around and another inscribed column will be by the drawbridge. Talk to Mendoza to receive the next quest.
Open the Large Drawbridge
After disabling the big trap, you'll soon come across a drawbridge. Talk to the Inquisitor and he'll suggest that it can only be opened from the inside. Head to the right a bit, until you reach another smaller drawbridge. Use telekinesis to pull the winch.
As you cross that one, to your great surprise, you'll find another human being there, Brent. If you ask him about the temple, Jorgensen and a map of the place, you'll receive the quest
The Search for the Map. It is highly recommended that you do this quest now, as you'll get a map of the place, which makes navigating a bit easier.
If you feel like exploring a bit further, immediately behind Brent (past the torches) is a large passage that leads into a complex filled with Saurians and their buildings. Explore all of them and you'll find large amount of scrolls, a permanent life increase potion and several other goodies including a few hundreds of gold as well.
After finally entering the insides of the temple (by doing the quests below) and reaching
#15, you'll be able to pull down the drawbridge. This ends the quest with 1000 experience.
The Search for the Map
After talking to Brent about going deeper into the temple, he'll suggest getting a map first off a lizardman hunting party that is roaming somewhere outside. Follow the purple-blue mushrooms and you'll reach a swampy area. Immediately to your left you'll hear a ghoul who guards a powerful blade called Runesword.
A bit further down you'll get to meet Jorgensen. He won't be able to tell you a whole lot though. Simply continue past Jorgensen up the ramp. Once you reach a fork, the way to the left has a brontok and a stone plate.
The way to the right (after going past the purple crystals) has a few lizardmen and a watchman. Loot him for the cell key and free an ogre nearby, who'll be glad to help you out against the lizardmen. That's the same ogre you saved earlier in chapter 2, Drok. He'll join your party this time and he can be great help against the Saurians.
Finally, outdoors again (
#1). Head towards Jasmin's hut at
#3. You'll meet several groups of Saurians on the way, but with Grok they should pose no threat. You'll also meet Eldric at
#2. He'll tell you that the lizardmen are attacking Jasmin's hut. After killing the Saurians there, loot the leader and you'll find the map. Obtaining it nets you 750 experience. Grok will also leave your party for 100 experience and wish you luck with the lizardmen.
Return to the Inquisitor (
#4) with the map. The best way would be to use the teleport stone to Volcano Keep and then run through the caves. After consulting with him, you'll go to a room at
#5, defeating lizards on the way. There's another inscribed column here, make sure to read it. It should be your fourth.
Follow the Inquisitor until you reach room at
#6. He'll point out that the wall is the thinnest in here and that you should bring Ethan (
#5) to break it down.
Lizard Invasion
This mini-quest completes itself once you defeat all the lizardmen in the area around Jasmin's hut (
#3) while doing the previous quest. You'll receive 200 experience in the end.
The Opening to the Crypt
Once the Inquisitor identifies the weakest defense in the architecture of the temple (
#6), he'll want Ethan to break it down.
Visit Ethan who's in the room at
#5 and send him to chop down the wall with the pickaxe. The quest ends with 100 experience. Once Ethan is on his job, report to the Inquisitor to earn 100 experience. Afterwards, he'll take you to another place. Be sure to follow him.
Once you reach
#7, he'll give you a bust to place on the altar nearby, which opens the door. Expect several lizardmen and brontoks. Another inscribed column is located in the priest's chambers (
#8). This should be your last one. After reading it, you should receive 300 experience for completing the quest at the bottom of the page,
Report to the Druid about the Temple.
The Crypt Has Been Reached
After inspecting the last inscribed column, Inquisitor (
#8) will want to check up on Ethan, to see how he's doing with the wall (
#6). Head over there and you'll see that he's managed to make an opening big enough for nautilus.
Talk to Inquisitor and he'll suggest using the transformation spell to enter the other area and access the drawbridge winch. After crossing through the tiny hole, you'll receive 1000 experience for completing this quest.
After getting out of that initial room which has an emerald and a stone plate (
#9) you'll found yourself in a broad place with a lot of rooms. Be careful when exploring them as you'll be attacked by lizardmen and there's a lot of them around. The rooms
#10,
#11 and
#12 will be blocked by grates which can be opened by placing the correct items on the altars.
This is done a bit later, so head upstairs at
#13 first. The room at
#14 has a few Saurians defending a nice amulet. The objective for the quest
Open the Large Drawbridge is located at
#15. Defeat the gatekeeper and get the key that is going to be used a bit later. Use the winch to let Mendoza and his warriors enter the inner temple.
Talking to Mendoza suggests that you reach Ursegor by going through the door at
#16.
Free the Ghost of Ursegor
Using the key from the gatekeeper, open the grate at
#16. You'll meet Ursegor at
#17. He'll be relieved to see a human after all the years. He's the current Titan Lord and he'll tell you a long story about his history with the titans, gods and humanity. After a while, he'll agree to help you reach the titan entrapped behind the golden gate if you free his spirit. Take the lizard bust from the altar nearby. Your mission is to defeat three beings that hold him imprisoned: Zul Utur, Zel Zerat and Zal Zaran.
They are located somewhere behind the doors at
#10,
#11 and
#12. You can talk to Inquisitor as well for 100 experience. He'll also head to Ursegor and talk with him himself.
Behind
#10 you'll find Zul Utur at
#18. He's a spellcaster, but goes down fairly easily. Be sure to loot him for a soul-splinter, Inferno spell rune and a few other goodies. Take the lizard bust from the altar on the way out.
The door at
#11 hides the lair of Zel Zerat, an ashbeast (
#19). Loot him for his soul-splinter and head onto the last warden. Don't forget the bust.
The last one at
#12 contains Zal Zaran, an undead lizard elite warrior (
#20). Dispatch him and head back to Ursegor (
#17). This ends the quest with 1000 experience.
Mendoza will tell you about how he can control the titan. This starts the quest
The Titan Trap. Be sure to loot his skull from the sarcophagus nearby.
The Titan Trap
The last quest in chapter 3 starts at
#17 once the ghost of Ursegor has been freed and Mendoza learnt that he can control the titan instead of destroying it.
Head to the main room (
#21). You'll need to place the skulls on the altars from the priest, beast and the warrior you found in the previous quest. From left to right (facing the door), correct order is skull of an undead beast, skull of an undead priest, skull of an undead guardian and finally, Ursegor's skull.
The door will open and after a long speech, Inquisitor will enter it, closing it behind him. He wants to take control of the Titan and sacrifice the whole island. Since that's not an option for you, you decided to stand up against him. In return, his warriors will attack you.
Speaking to Ursegor starts Chapter 4.
Report to the Druid about the Temple
This quest is initially received in chapter 2, however it's done in chapter 3. Once you start exploring the volcano caves and the temple, you'll come across inscribed columns which you can read. They are about Saurians and Ursegor.
After reading all five columns (their locations are described in the previous quests), you'll receive 300 experience. Be sure to report to Eldric (
#2), who's eagerly awaiting your news. Tell him about Inquisitor's mad plans and the titan lord legend and you'll receive two Speed scrolls and two Ashbeast transformation scrolls.
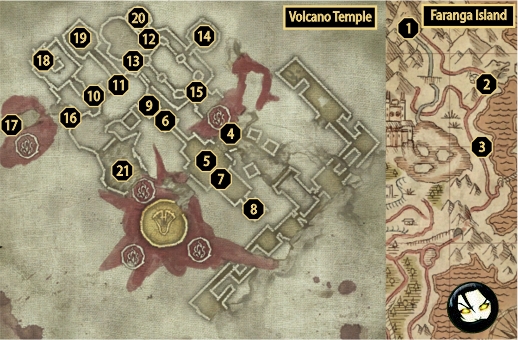
1 - Back entrance
2 - Eldric
3 - Jasmin
4 - Inquisitor Mendoza
5 - Room with inscribed column, Ethan
6 - Ethan, nautilus hole
7 - Altar and stone door
8 - Room with inscribed column
9 - Room with emerald and stone plate
10 - Altar and grate
11 - Altar and grate
12 - Altar and grate
13 - Stairway
14 - Treasury
15 - Winch, Gatekeeper
16 - Ursegor's lock
17 - Ursegor
18 - Zul Utur
19 - Zel Zeret
20 - Zal Zaran
21 - Titan's archchamber, altars


