 Did we miss anything in this section? Is there something we didn't discover?
Let us know!
Enemies
Did we miss anything in this section? Is there something we didn't discover?
Let us know!
Enemies
- Bruiser the Blacksmith
- Daedrotha
- Deathbringers
- Goblin Archers
- Scrylexus
Notable Loot
Secrets
Overview
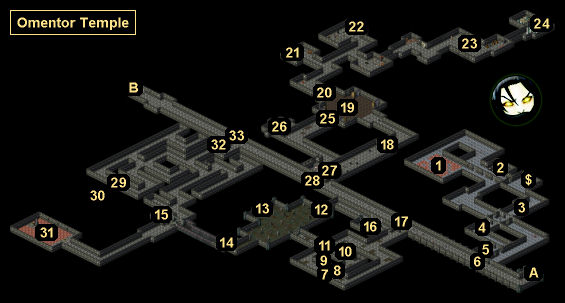
1 - Trapped Chamber
The "checkerboard" here is full of traps. If you're not any good at the Skullduggery skill, then you might be better off running through the fire squares. Just remember to take your boots and leggings off first.
2 - Powder Kegs
When you approach the two
Powder Kegs here, a
Fused Powder Keg will appear in between them and blow them up -- and you, too, unless you vacate the area.
3 - Scrylexus
At this spot you'll encounter Scrylexus.
4 - Daedrotha
At this spot you'll encounter Daedrotha.
5 - Machine
When you place the
Titanium Gear Widget (from the
Wrecked Ship, Level 2) into the machine here, the gate to the west (#6) will open, and you'll earn 1000 xp.
6 - Gate
You'll only be able to open this gate by fixing the machine to the east (#5).
7 - Chest
Inside this chest you'll find a
Jade Key, which will unlock a nearby lever (#9).
8 - Gate
To open this gate, you'll need to unlock and use the lever to the west (#9).
9 - Lever
To use this lever, you'll either need to pick its rank 8 lock, or you'll need to use the
Jade Key (#7) on it. The lever will open and close the gate to the east (#8).
10 - Lever
Using this lever will toggle the four gates to the west (#11).
11 - Gates
You can toggle these four gates here by using the lever to the east (#10).
12 - Gate
To open this gate, you'll need to take the
Cheap Glass Crystal from the nearby pedestal (#13) and place it in the "feed me" chest to the west (#14). Of course, when you do that, four Cursed Undead will appear and attack you.
13 - Pedestal
14 - Feed Me Chest
15 - Secret Area
To reach this secret area, you'll need to go theough the secret door next to the "feed me" chest to the southeast (#14).
Inside the secret area you'll find a random chest.
16 - Machine
When you place the
Chromium Spring Widget (from the
Moonrise Underground) into the machine here, the gate to the east (#17) will open, and you'll earn 2000 xp.
17 - Gate
To open this gate, you'll need to fix the machine to the west (#16).
18 - Blocked Gate
To pass through this gate, you'll either need to bash or blow up the barrel blocking the way. Conveniently, you'll find a
Powder Keg nearby.
19 - Deathbringer Room
In this room you'll discover a locked lever and a chest -- and four Deathbringers in cages. If you open the chest, then you'll find a
Strange Key, which will unlock the lever. Pulling the lever will release the four Deathbringers. If you have trouble with the ensuing battle, then you might want to run into one of the vacated cages, so you only have to fight the Deathbringers one at a time. One (or more) of the Deathbringers will drop a
Heavy Key when it dies, and this key will unlock the exit door (#20).
20 - Locked Door
To open this door, you'll either need to pick its rank 9 lock, or you'll need to fight the Deathbringers (#19) for the key.
21 - Chest
Inside this chest you'll find around 25 gp.
22 - Lever
Pulling this lever will open a gate to the south (#25).
23 - Smithy
At the smithy you'll encounter Bruiser the Blacksmith, a tough melee fighter who has 350 hit points. He can't see in the dark, so that's the easiest way to deal with him. In the back of the smithy you'll find three chests with
Copper Long Swords and
Copper Short Swords inside.
24 - Chests
In one of these chests you'll find the unique sword
Maledge. In the other you'll find a
Bar of Mithril.
25 - Gate
To open this gate, you'll need to pull a lever to the north (#22).
26 - Treasure Room
You'll have to pick a rank 2 lock to enter this room. Inside you'll find a pair of random chests.
27 - Machine
When you place the
Tungsten Bracket Widget (from the
Akadai Underworld) into the machine here, the gate to the west (#28) will open, and you'll earn 3000 xp.
28 - Gate
To open this gate, you'll need to fix the machine to the east (#27).
29 - Secret Doors
30 - Secret Area
When you reach this secret area you'll see that it was designed as a safe hiding place, but you won't be able to do anything with it.
31 - Fire Room
If you pull the lever in the front of the room, then you'll create a safe path to the lever in the back of the room. However, when you pull the lever in the back of the room, which will open the gate to the exit machine (#32), you'll also remove the safe path. To escape, you'll either need to shoot the front lever to recreate the safe path, or you'll have to run across the fire squares. For the latter approach, you should remove your boots and leggings, or else they'll take damage when the fire squares burn you.
32 - Machine
You'll need to pull a lever in the back of the fire room (#31) to open the gate to this machine. Then when you place the
Platinum Bolt Widget (from the
Ruined Castle Dungeon) into the machine, the gate to the east (#33) will open, and you'll earn 4000 xp.
33 - Gate
To open this gate, you'll need to fix the machine to the west (#32).
Local Exits
- Exit to the
Valley of the Wanderer.
- Exit to the
Western Astral Range.


