 Did we miss anything in this section? Is there something we didn't discover?
Let us know!
Enemies
Notable Loot
Secrets
Did we miss anything in this section? Is there something we didn't discover?
Let us know!
Enemies
Notable Loot
Secrets
- Secret Areas (#9, #10, #11)
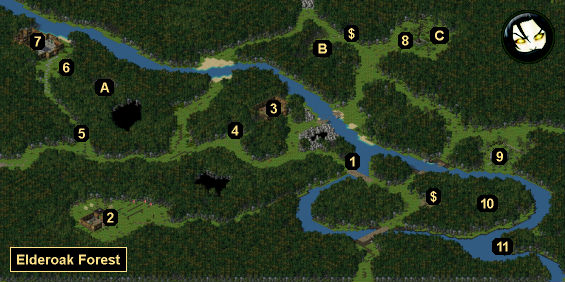
Overview
1 - Barrel
You'll find around 40
Arrows inside this barrel. Across from the barrel is the start of the trail leading to the ranger clearing (#2).
2 - Ranger Clearing
Two important NPCs will wander around the clearing:
You'll also find a well and a
Powder Keg in the camp. But don't loot the green ceramic jars or else the rangers will attack you.
3 - Unused Cabin
You'll find two empty chests in this cabin. Since the cabin is right next to the geo marker (#4), you could use the chests for storage.
4 - Geo Marker
This geo marker will add Elderoak Forest to your Quick Travel menu.
5 - Gate
You'll only be able to open this gate with the
Tarnished Key from Ranimer (#2).
6 - Pedestal
This pedestal is involved in the quest
The Meaning of the Note. When you complete the first part of that quest, a path will appear to the east, leading you to the
Lair of the Emayu Witch (Exit A). Near the pedestal you'll find a
Powder Keg.
7 - Baizel's House
You'll encounter two things of interest inside Baizel's house:
- In the entry room you'll find a chest containing some bottles of
Demon Oil II, a
Mana Potion II, a
Scroll of Cat's Eyes, and some gp. However, when you loot the chest, you'll see that it's sitting on "some kind of floor plate," and if you examine the wall above it, you'll see a sign with a "5" on it. Between these two clues, you'll need to figure out that you should put exactly 5 pounds of loot into the chest. When you do, the secret door leading to the back room will open, and you'll earn 300 xp. You'll then be allowed to take back your loot.
Note: The easiest way to come up with 5 pounds is to take two drinks from a full
Water Skin.
- In the back room you'll discover a red ceramic jar that you'll need to blow up to open. Conveniently, you won' have to go far for a
Powder Keg (#6). Inside the jar you'll find
Gildedmoon Pendant 13, a
Sigil of Fire, and some gp. You'll find a use for the pendant when you reach the
Moonrise Underground. You'll need a
Sigil of Fire for the quest
Baptism in Fire.
8 - Geo Marker
This geo marker will add Ulgolek (the tree right next to the marker) to your Quick Travel menu.
9 - Tomb / Graveyard
The tomb here is a secret area. To enter it, you'll need to use a
Powder Keg to blow open the fence surrounding the graveyard, and you'll also need to pull the lever to the south (#10), which will open up the tomb's front gate. Inside the tomb, you'll find a green ceramic jar containing a
Large Emerald and some reagents (including
Auricflax), and you'll also find a chest with 50-100 gp in it.
10 - Secret Area
The small clearing here is a secret area. To reach it, you'll need to follow the bank of the river to the north in a clockwise fashion, and then head west through a narrow path. Inside the clearing you'll find a lever. Pulling the lever will open up the tomb to the north (#9).
11 - Secret Area
You'll only be able to reach this secret area via a narrow path from the
Valley of the Wanderer. When you reach the secret area, you'll find a chest containing a
Potion of Invisibility III and over 200 gp.
Local Exits
- Exit to the
Lair of the Emayu Witch. This is how you'll first be able to enter the lair.
- Exit to the
Lair of the Emayu Witch. Exiting the lair from here will allow you to explore the northern half of the map.
- Exit to the
Lair of the Emayu Witch. This is how you'll reach the northern part of the lair where you'll encounter Baizel.
World Exits


