 Did we miss anything in this section? Is there something we didn't discover?
Let us know!
Overview
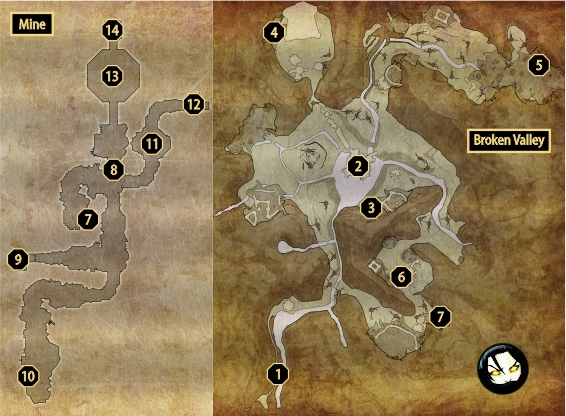
After the events at the Battle Tower have transpired, Damian destroyed most of the Broken Valley, leaving just a noxious waste filled with nest towers and headquarters of his lieutenants. Explore the region thoroughly and be sure to destroy all the towers and nests if you want to maximize experience gained.
There isn't a whole lot to explore here, apart from the dungeon that will be visited during the main quest Lock and Key. If you want to, head to
#2 first and visit Needleman, this time without his copper helmet to prevent you from mindreading him. After you've got the password to his storage, head towards the mountains in the south (
#3), where you'll find his storage. It's not too hard to spot as it has large doors glowing with blue light. Check it out, though it doesn't have a whole lot of great items. You'll also find another entrance to Stone's Flying Fortress just a small bit to the right.
The other points of interest are Geshniz's headquarters (
#4) and Rayhun's headquarters (
#5). They are very small dungeons and very easy to navigate with just a single corridor. Both of them are objectives of the second alchemist quests that upgrade your battle tower.
Another important place is the old quarry. Take a look at
#6 first, to find William in the tower and acquire the quest A Guild Without a Master. Enter the tower and you'll overhear two Black Ring members talking. Dispatch them and head upstairs. At the top floor you'll find Williams and two other soldiers. Grab the quest and then lead them all the way down, fighting a few waves of Black Ring members on the stairs. After you reach the bottom floor, they'll be glad you saved them and the quest will finish successfully. If William dies during the quest, it will fail.
More importantly, William told you of a way to enter the mine from the southeast (
#7) and gave you a key to the entrance. Head there and start clearing the dungeon. The door at
#8 will be locked, so head to the other passages in order to find a key.
The southern corridor has a lever handle at the end of it (
#10) in a chest. The corridor to the west at
#9 has just a few minor treasures. Backtrack now and head to the eastern part of the mine.
One of the Black Ring officers, Amon (
#11), will taunt you into a fight, but he should be no problem for you to handle. He also drops the key that opens the door at
#8. Head up the ramp to the back of that place (
#12) to find a small treasury room. You should also see a lever slot where you can insert the handle you found earlier. Pull the lever and the fake wall will reveal a hidden chamber with some more treasures, albeit a bit redundant at this point of the game.
Head to
#8 now to confront the real challenge in the mine: Ba'al (
#13). Right as you enter the chamber, he'll sense that you're a Slayer and a Dragon at that. Be sure to mindread him to gain two extra skill points before the conversation's over. The fight can be a bit tricky to deal with, due to large amount of interrupting spells you're going to take. Hide behind the pillar first and defeat the minions from there. Then when Ba'al's alone, just kill him. He'll drop a sigil for Hall of Echoes and a few other formidable items. Looting that sigil ends the subquest Lock and Key and your job in the Broken Valley is done.
You can use the teleporter at
#14 to get away from the place. Be sure to loot the chests nearby as well.
1 - Entrance
2 - Doctor Needleman
3 - Needleman's Storage, Stone's Flying Fortress
4 - Geshniz's Headquarters
5 - Rayhun's Headquarters
6 - Guild Master William
7 - Mine Entrance
8 - Locked Door
9 - Storage Room
10 - Lever Handle
11 - Amon
12 - Treasure Room
13 - Ba'al
14 - Teleport Shrine