 Did we miss anything in this section? Is there something we didn't discover?
Let us know!
Overview
Did we miss anything in this section? Is there something we didn't discover?
Let us know!
Overview
This section covers the first part of side quests in Broken Valley. They are roughly sorted in order of difficulty and there shouldn't be any trouble doing them with just the basic of skills.
 Band of Brutes
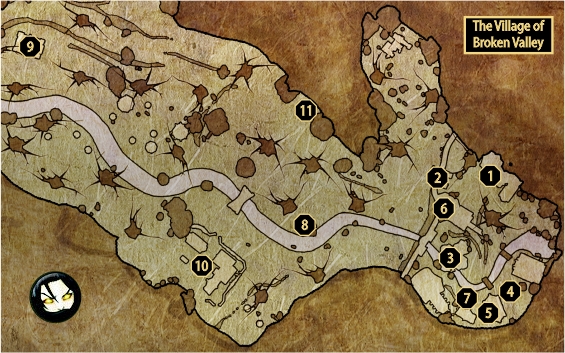
This quest is received from either Tom or Barmaid Elsa who are located inside a tavern (
#1). As you enter the tavern, you'll hear Fanny, clearly in distress, as something is going on in the tavern. Once you reach the guests' area, you'll see that a band of bullies are exploiting the workers. After you receive the quest, you'll have to deal with the band of Seekers, the soldiers.
There isn't a whole lot of choice here except to start up a fight with them. Luckily enough for you, Louis, their superior, will show up and line them up properly. They'll be chased away by his intimidation and you can then talk to Tim about your reward. In addition, he'll also throw in a discount on his goods. The rewards are 600 experience and 300 gold, along with a choice reward of either 150 gold, 300 experience, a potion or a glass of water.
For a Pound of Flesh
This quest is received from Locke, a merchant found in the tavern (
#1) after you clear it up from the brutes. He had a deal with one of the guards about hunting a rabbit. The guard Keane was supposed to bring him a rabbit, but since he failed to deliver it, Locke's money went to waste.
You can confront Keane about it on the wall at
#2. You'll have to push him a bit before he'll finally give you the rabbit. As a reward, Locke will lower his prices and you'll get 600 experience and 150 gold as a reward with an addition reward of either 300 experience, 75 gold, a potion and a mug.
The Fugitive
This quest is received after mindreading David, who can be found on the first floor of the inn (
#1), after you liberate it from the band of brutes. You'll find out that he's a deserter and that he's hiding from Richard, the Champion in charge for the soldiers around here.
You can threaten him a bit to initialize the quest and you'll be presented with two choices, either to stay silent about it or report him to Richard (
#7). If you decide not to report him you'll receive a pair of Armoured Champion Gloves, along with the usual reward of 600 experience, 150 gold and a choice of either 300 experience, 75 gold and a minor potion.
If you decide to report him, he'll flee and you'll meet him later on your way to Orobas Fjords, where you can mindread him and get a stat point as a reward. You'll of course get the usual quest rewards.
Buad Blood
This quest is received either after getting the information from Stan about miller's hidden cellar (
#3). The key to it can be found in the pot at the upper floor, the one full with lettuce. Then find your way the the bottom and you'll reach a glowing tree called Abanayabar. Talk to the tree about Upton and then head back up to start the quest from the miller.
You'll learn that he's being hunter by assassins and that's why he had to change his name from Buad to Upton. He was a renowned alchemist, but once he failed to heal a member of an assassin's guild, they swore revenge to bring him down instead. You'll first need to talk to the people around the town who can help you identify the assassin.
Linda is the first one and she's right beside him, in the mill (
#3). She'll tell you about Romon (
#4), Rose (
#5) and captain Rodney (
#6). After talking to each one of them, you'll learn that something's going on at the burnt chapel at
#8.
The path to the burnt-down church can be rather perilous if you take on too many goblins at once, so take caution. Over there you'll meet Jesse, who won't repent and you'll be forced to fight him. He'll also mention that an assassin, one of the best, in fact, is already on the way to kill Buad, so head back to the mill (
#3).
You can choose either to fight the assasssin, along with the NPCs, or kill Buad and his daughter. The final quest reward is 1500 experience, 400 gold and a choice of either 750 experience, 200 gold and a rare quality item.
High and Dry
This quest is started by talking to Quincy, who can be found on top of the tower at
#7. After talking to him, you'll learn that he's being chased by goblins and that they'll be here any minute. After accepting the quest to help him out, three goblins will come: two ordinary ones and a shaman. Shaman can be a bit tough, but it's still nothing you can't handle.
After dispatching them, talk to Quincy again and hand him the rope you looted from the goblin shaman. Then you'll find out that he was supposed to patrol the area with his colleague Peavey, who chose not to accompany him. Next thing to do is to expose Peavey atop of the barracks' watch platform (
#6). Rodney and Quincy will show up and after a closing conversation, the quest will end. You'll get 600 experience, 150 gold and choice of either 300 experience, 75 gold, a potion or booze.
Louis' Stash
This quest can be received from Merill in the barracks on the second floor (
#6) only if you didn't scorn him and his unit in front of Louis during the quest in the tavern. He'll reveal the location of Louis' hidden stash near the chapel (
#4).
The trapdoor right beside the chapel will now be unlocked and you'll have to pass a few obstacles to reap the rewards. The first door is opened by pressing the button that's on the wall right next to the fire. In the room with third floor, you'll find a lever on one of the walls, which opens a secret area that has two additional chests. To open the last door, you'll need the key that's found on a skeleton's corpse.After looting the place, the quest will end and you'll receive the usual rewards.
Beside doing the quest the normal way, you can report Merill for telling you about this storage and Louis will punish them. This however, marks the quest as failed.
Hearttaker
This quest is started by talking to Richard (
#7), who patrols the area at the southwestern part of the village. He'll suggest that you can earn more money if you want to, by bringing him the hearts of goblins. Each heart nets you 150 experience and 50 gold. In case you mindread him, you'll learn that the hearts sell for three times as much.
If you tell him about this, he'll increase the reward as well and you'll get 150 gold per heart. You can bring him as many hearts as you want. The goblins are literally all over the place outside the town.
1 - Tavern
2 - Keane
3 - Mill
4 - Romon
5 - Folo, Rose
6 - Barracks
7 - Richard
8 - Quincy
9 - Jesse
10 - Jackson's Farm
11 - Mouse


