 Did we miss anything in this section? Is there something we didn't discover?
Let us know!
Overview
Did we miss anything in this section? Is there something we didn't discover?
Let us know!
Overview
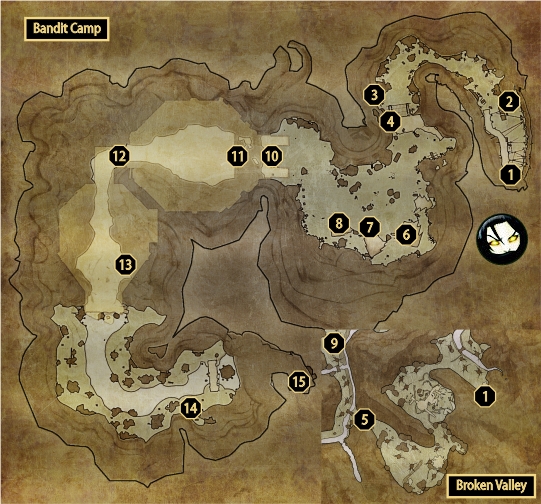
This page contains the quests that are started in the Bandit's Camp. Once you've accessed the bandit camp (that is, you didn't immediately report the location to Louis during the quest
Into the Bandit's Den), there are several quests available in here.
Christopher (
#1) will stop you at the entrance, demanding a password. You should've learnt that so far ("Beetroot"). He can be mindread before the entrance to gain an additional stat point.
Inside the camp, you'll find Martis (
#6) again, who's a trader. There's also a group of bandits who argue over the loot on the table at
#7. You can loot any item from the table and they'll go hostile. Don't worry, no one will really do anything about it, so just defeat them all and sell the stolen goods, they are worth quite a while.
 Couple Trouble
The first one starts off with two bandits who don't want to live a life that anymore, so they need your help to escape the camp. Clement and Sybille are located at
#2.
Mindreading Christopher (
#1) reveals that he'd like a drink, especially that exquisite Rimmer's Rum. To obtain a bottle of that, you'll need to claim the gate that you'll soon come across if you head further into the camp. There are ladders nearby. Then just continue past Tagos, and onto the cliffs. You'll find the bottle hidden in the bush at the end (
#3). Head back to Christopher, get him drunk and then report the good news to Clement and Sybille.
The rewards are the usual ones, in this case 1500 experience, 400 gold and a choice of either 750 experience, 200 gold, a weapon or a potion.
An Axe to Find
This quest starts from Tagos at
#4, atop the wooden gate. He wants you to find an axe of his as it has certain memories of his tied to it. He can also be mindread for an additional stat point.
The axe in question is located at
#5, by the caravan. It might take a while to reach it though, as there are a lot of Black Ring members to kill on the way. Once you return to Tagos, you can choose either to keep the axe or to give it to him. If you decide to keep it, he'll attack you and you'll have a duel. Either way, the quest is completed and you'll receive the usual rewards.
Daylight Robbery
Once you talk to Ragnar (
#8), you'll receive this quest. He'd like you to help out his friend Jenae to rob Filip the traveling merchant. Head to
#9, outside of the camp, in the Broken Valley. You'll meet Filip and Jenae there, disputing and getting ready for a fight.
You can pick either of the sides as rewards are almost the same: the experience, gold and after the fight, you can mindread either Jenae or Filip to gain an additional stat point.
The Temple of Doom
This quest is obtained from Leda (
#10), who apparently worships a Dragon Knight who designed a temple with gauntlets and as such, only the worthy ones are able to contact him. To prove your worth, you'll need to enter the gauntlet. Be sure to mindread Ragnar (
#8) if want some extra loot later on in the temple, the door will close after you enter it and you cannot reenter it again after the first time.
Once inside the temple, you'll strike up a conversation with Jagon (
#11). He's objective of the quest
A Hunting We Shall Go. However, he'll be quick to note out that you can only duel him if you pass the trials.
In order to avoid poison, follow the trail of blood and corpses scattered around. Managing this place can be extremely tricky to pull off as a melee fighter. Be careful and once you have to chance go whack at Jagon as he'll disappear once he drops around 30% hp. The reason that you don't want him around is because he hits for over a hundred damage per arrow. Take the door at
#12 to proceed.
The second chamber is slightly easier, as there's no environmental damage. The locked door to the left (
#13) can be opened with a key found atop the large statue once you loot the key on the left horn. This one can only be looted if you mindread Ragnar about it.
The third area is made up of lava pathways left and right and a stream of water. The only way where you won't take damage is to go through the water. As far as the treasuries around go, there are two chests. The second one (
#14) contains a set item, Wild Dwellers Leggings, so you might wish to get that one if you must (you might have to chug a potion or two).
At
#15, you'll enter the cave where Jagon is hiding. It's a fairly straightforward, small cave. You'll finally confront Jagon himself and beware, he hits hard. Loot the necklace and keep it for another quest. There'll also be a fairly good limb part for creating your minion. Make sure to loot nearby chests as there's a dragon armor piece, the tail. Enter the green portal and you'll meet Laiken. He's just a Dragon Knight imposter and he'll soon see through your plans and knock you back into the portal and seal it with falling rocks. The quest is also completed. The rewards are the usual ones and you can use the small green teleporter on the left to go back.
1 - Entrance, Christopher
2 - Clement, Sybille
3 - Rimmer's Rum
4 - Tagos
5 - Tagos' Axe
6 - Martis
7 - Stolen Goods
8 - Ragnar
9 - Filip, Jenae
10 - Leda
11 - Jagon
12 - Stone Door
13 - Treasure
14 - Treasure Chest
15 - Dark Cave, Jagon


