 Did we miss anything in this location? Is there something we didn't discover? Let us know!
Background
Did we miss anything in this location? Is there something we didn't discover? Let us know!
Background
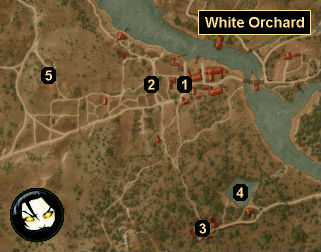
You'll receive this contract from the notice board in
White Orchard (#1).
Walkthrough
The contract will ask you to defeat the "devil" that guards the well in the abandoned village of Hovel. To learn more about the devil, you should visit Odolan in his house (#2). He'll tell you that he needs fresh water for his sick daughter, and that the well in Hovel is the only reliable source for it right now. He'll also describe the devil as a female spirit that howls "like it's sufferin'." You'll decide that it must be an alp or a wraith.
Hovel is located to the south (#3). When you get there, you won't see any sign of the devil -- unless you arrive around midday, and then you'll have to fight it for a bit -- so you'll decide to use your witcher senses. Near the well you'll spot some burned grass and a burned dog, and you'll decide that the devil must be a noonwraith.
To continue the quest, you'll have to look up the Devil by the Well and Noonwraiths in your bestiary (under specters). You'll learn that something must be binding the noonwraith to the area, and that once you've learned this secret, you'll have to fight it. So you'll need to search the village using your witcher senses.
In the eastern house, you'll spot signs that a man and a woman were murdered, and that the woman was dragged out and hanged in the well. You'll also find a
Yellowed Diary, indicating that the man gave the woman a bracelet, and that the woman never wanted to take it off. At the well, you'll need to pull the woman's skeleton out, and you'll notice that it's missing an arm -- no doubt the arm that held the bracelet. So you'll decide to head down into the well to look for it.
To enter the well, you won't be able to climb down a rope or anything. You'll just have to jump in. Luckily, you'll land in a pool of water, so you won't get hurt. The easiest way to locate the bracelet is to turn on your witcher senses. You'll find the
Ornate Bracelet at the bottom of the pool, and you'll detect an inscription on it: "To Claer from Volker."
To escape the well, you'll have to do some climbing and swimming. First you'll need to climb out of the pool of water you landed in and enter the smaller pool to the north. Then you'll need to follow some underwater passageways to the north and east. You'll end up in the small lake near the village (#4).
If you're Level 1-2, then you should definitely prepare yourself before facing the noonwraith. A good idea for the fight is to brew
Specter Oil. You'll need
Arenaria and
Bear Fat for it. You'll find the former near Odolan's house. You'll find the latter in Hovel. You might also want to brew a
Swallow potion because the fight will likely take a while.
To confront the noonwraith, you'll need to return to the well and burn its skeleton and bracelet. This will cause it to appear and attack you. The noonwraith will spawn some mirror images of itself, but otherwise you'll just need to whack away at it until it dies. When that happens, you'll earn 50 xp, and you'll find a
Noonwraith Mutagen, a
Noonwraith Trophy, and more on its remains.
To complete the quest, you'll just need to return to Odolan (#2). He'll offer you the amount of money you negotiated when you first met him. You can either accept this payment, or you can decline it, which will cause Odolan to give you an
Amethyst instead. You'll also earn 50 xp.
Note: Odolan will also mention that he once heard the herbalist Tomira mention the name Claer. You'll find Tomira in her cottage to the west of town (#5), but only after you've triggered the quest
The Beast of White Orchard. Tomira will fill in more of the blanks about Claer and Volker, and she'll give you an extra reward:
Berbercane Fruit (x8),
Cortinarius (x6),
Hellebore Petals (x8),
Saltpeter (x4), 10 crowns, and 10 xp.
1 - Notice Board
2 - Odolan's House
3 - Hovel
4 - Lake
5 - Tomira's Cottage


