 Did we miss anything in this section? Is there something we didn't discover?
Let us know!
Background
Did we miss anything in this section? Is there something we didn't discover?
Let us know!
Background
The last part of the narrative starts with the dialog option "We split up at the monastery".
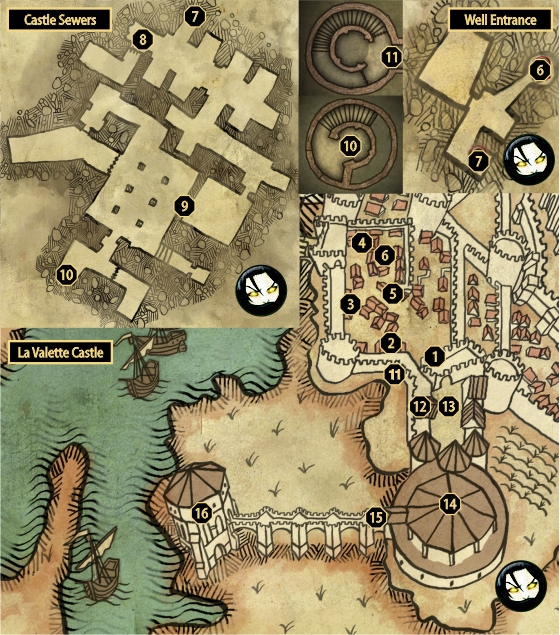
After escaping from the dragon, there will be another gate (
#1) blocking the way to the inner courtyard. Royal axe men won't help a lot in here, therefore it will be up to you to find an alternative way in and open the gate from the inside. The quest covering this segment is called
To the Temple!. Most of the houses can be entered, they contain minor loot (crafting materials), and some of them even have a few diagrams which could prove useful later on.
Walkthrough
Approaching
#2, you'll witness a murder by Temerian soldiers as they are trying to raid the city. You'll acquire a side quest called
Woe to the Vanquished. Afterwards, you can enter the house and either defend the poor civilians or simply ignore the whole situation. If you decide to defend the civilians you can make the soldiers leave the site using either Axii sign in the dialogue, intimidation or persuasion. Afterwards, you can satisfy yourself with their thanks and earn 50 experience points or try to gain some money for your services, which gives 10 orens and 30 experience points. Conclusion of this quest is done at the commander (
#3).
Once again, you can ignore the situation and let the soldiers terrorize the poor civilians or intervene and chase them away. Talk to the commander at
#3 and you'll be forced to beat him until around 40% of his health, which will result in him pleading for mercy. Afterwards, you can either extort some extra orens through intimidation from the locked people in the nearby house (175 experience points, 20 orens), or simply accept their thanks (200 experience). Taking the money concludes this quest, while being selfless opens up a small reward in Act I.
Now would be a good time to continue your search for the temple entrance. Start moving to
#4. Right before reaching this place, you'll enter a fight with five La Valette's soldiers. After defeating them, you'll see the soldiers from the other side blocking the alley with a cart, forcing you to find another way around at the wooden barrier (
#5).
This particular "wall" can be brought down with the Aard sign. After removing the obstacle, you'll be fighting three soldiers next to the well. Reaching the temple will require traversing through the sewers (
#7), whose entrance is located below this well at
#6.
As soon as you descend below get ready to face a few drowners using your silver sword. Drowners aren't particularly hard to kill. There's a place of power nearby at
#8. This place of power, Circle of Vitality, gives 2 vitality regeneration out of combat / 1 vitality regeneration in combat. You'll then reach a wooden barricade at
#9. Smash this down with Aard and then get ready to face a few drowners.
Using the ladder at
#10 brings you to one of the towers of the castle. As you approach the ruined wall, you'll see a group of Scoia'tael brigands. Then prepare to head upstairs and battle three soldiers in a relatively tight space (
#11). Keep heading straight and then turn around to see a spot where you can climb up (it has a lot of leaves around it). Now you're outside the castle, as you can see on the map. Head over to the door at
#12 and get out on the other side.
Entering this yard (
#13), you'll find yourself on the opposite side of the gate (
#1) where you started this part of the prologue. There will be five enemies: one large soldier with a two-handed sword, one shieldbearer and three normal soldiers. Use your strong attacks and Quen/Yrden to make short work of them. Loot the big soldier for the key. Now backtrack to the room at
#12 and take a turn right into the locked door. You'll find a winch which you can use and a chest with a pair of gauntlets.
After using the mechanism, Foltest will be waiting in the yard at
#13. Talking to him ends this part and returns you to the conversation with Roche in the dungeons. This ends the quest
To the Temple and starts
Blood of His Blood.
After continuing conversation with Roche, you'll be back next to Foltest (
#14) who is talking to Archpriest and Tailles. While talking about the royal children, you'll use Axii sign on the archpriest to reveal their location and as an addition you can either calm down Tailles or slap him, after he comments your usage of magic on the sacred ground.
The only thing worthy in this place is the room behind you, which probably serves as a warehouse as it is full of crafting materials and has a diagram for a pair of trousers and a book on nekkers in one of the chests. After exploring the chambers you can go and find Foltest outside at
#15 who's waiting in front of what appears to be a bridge leading to the solar.
After a short talk, the dragon attacks again. The gauntlet contains a QTE which will require you to press right-click in the right time. Roche will get hurt, but the dragon will chase you and the king. You will then have to just press your backwards directional key (default key S) and press right-click when QTE appears. When you reach the end on the other side, there will be another right-click QTE where you'll stick your silver sword into dragon's mouth (if you're using imported save, you shouldn't worry, neither Aerondight nor The Moon Blade will be lost in here, but just the standard witcher's silver sword from the inventory).
The room you've just entered is called the solar. There's some minor stuff to be collected on the lower level and then you can move up where you'll get a nice cutscene which stirs up the Witcher 2's story. A seemingly not dangerous monk was with the children. As Foltest gets to see his children, he'll send them over to the next room to wash their tears away, letting the unknown assailant attack the King who lowered his guard. Geralt, who was relatively far away, couldn't get close fast enough to protect the King. Having slain the King, the assassin removed his robes, pushed the King's corpse into Geralt and jumped through the nearby window into the river. After Geralt witnessed his escape, he went back to the corpse, only to find the knights who have just entered the room. They of course became suspicious and accused Geralt of the murder. This completes the quest
Blood of His Blood, progresses the other main quests and nets you 1375 experience points. Following this cutscene you'll be back to Roche.
1 - King Foltest, royal axe men & starting location
2 - Temerian soldiers and civilians
3 - Temerian commander, soldiers and civilian group
4 - Sealed way
5 - Wooden blockage
6 - Well
7 - Sewers entrance
8 - A Place of Power - Circle of Vitality
9 - Wooden barrier
10 - Exit of the sewers
11 - Tunnel exit
12 - Entrance to the inner courtyard
13 - Inner courtyard
14 - Church
15 - Foltest & the start of the gauntlet
16 - The solar


