 Did we miss anything in this section? Is there something we didn't discover?
Let us know!
Background
Did we miss anything in this section? Is there something we didn't discover?
Let us know!
Background
The first time you enter the
Stalwart Mines, you'll witness Gamel being arrested for Sameth's murder (#1). Then Foreman Ismey will make her way over to you and give you this quest. Afterwards, she and Gamel will head over to her quarters (#2).
Walkthrough
Ismey will tell you that Gamel was found standing over Sameth's corpse, which apparently was enough evidence for her to have him arrested. She'll also mention that several miners have gone missing lately, and that only Sameth's body has been found. When you talk to Gamel, he'll plead with you that he's not a killer, but then he'll also admit that he doesn't remember what happened. With enough Perception, you'll notice that Gamel is covered with blood, including under his nails and on his teeth.
When you examine Sameth's corpse (#3), you'll see that he was torn apart and also that his hands are stained yellow. When you talk to Teryc (#4), he'll inform you that Sameth worked in the sulfur mines to the east, thus explaining his hands. Teryc will also mention that sulfur gas can cause people to act funny, which might explain why a few of the miners near Teryc are dazed, including one who keeps asking about a crystal.
Inside the sulfur mines, you'll have to kill several xaurips, spiders, and even an ice troll, but eventually you'll reach Cillan (#5). She'll tell you that she purchased some constructs from Galvino because they're more reliable than regular miners. But then suddenly Cillan will lose control of herself, and she and her constructs will attack you. Cillan will drop a
Looped Rope when she dies.
After the battle, you should go into the nearby tunnel entrance (Exit A). The tunnel will take you into a maze of sorts. To reach the next map, you'll need to follow the breeze: right, right, light
Torch, forward, left, right. If you have a
Hammer and Chisel (#5) but not a
Torch, then you can also take an alternate path: left, right, use
Hammer and Chisel, left. Either way you'll reach the
Luminescent Caves.
Inside the
Luminescent Caves, you'll almost immediately run into a Vithrack Luminary asking two dominated miners where they've hidden the crystal. However, when they notice you, they'll attack, and the miners will continue attacking even after the vithrack has been killed, so there isn't any way to save them.
As you explore the caves, you'll run into more vithrack and dominated humans, plus spiders and radiant sporelings. Eventually, you'll find Terenat (#9). He'll tell you that the vithrack recently discovered a giant Radiant Spore, and that while they thought they'd be able to use it to heighten their powers, it actually started infecting them, causing them to do its bidding. Luckily, Terenat was cautious about the spore, and he locked it behind a barrier in the Common House (#7) to keep it away from his kin. The key for the barrier is a
Vithrack Crystal, which can be found in the nests to the south (#8). If you have the crystal in your possession, then the barrier will disappear when you approach it, and you'll be able to enter the Common House.
Inside the Common House, you'll meet the Radiant Spore. There isn't any way to talk your way out of a battle, but you'll have two choices for how to attack it:
- You can ignore all of the dialogue options and attack the Radiant Spore right away. This will lead to the toughest version of the fight -- since you'll have to face the Radiant Spore plus sporelings, spore tendrils and vithrack -- and for that reason we wouldn't recommend following this option, unless you're looking for a serious challenge.
- You can communicate with the Radiant Spore. This will require you to breathe in some of its spores but then use Constitution 18 or Resolve 13/15 to keep it from controlling your thoughts. This will allow you to sever the connection between the Radiant Spore and the vithrack in the chamber. Unfortunately, instead of helping you in the battle, the vithrack will simply flee, but at least this way you'll face easier foes.
Note: If you need more Resolve, then you can get +4 from the
Siegebreaker Gauntlets (gained at the end of the task
Bleak Oath), you can get +3 from the chapel resting bonus at
Caed Nua, and you can get +3 from the
Dragon Meat Dish.
Another Note: When you talk to the Radiant Spore, don't demand that it let the vithrack go. If you do, then it will give your main character a concussion injury.
When the battle starts, you'll face off against the Radiant Spore plus some sporelings and spore tendrils. The tendrils are by far the most dangerous enemy, but you should target the sporelings first since they'll be surrounding you and getting in your way. If you can kill the sporelings quickly and survive the first couple of salvos from the tendrils -- by using Second Wind, healing potions, healing spells, or
Scrolls of Revival if necessary -- then you should be able to take the fight to the tendrils and eventually win. The Radiant Spore itself is sort of a pushover.
After the battle, none of the enemies will drop anything interesting, but on a nearby table you'll find the unique blunderbuss
Silver Flash. Then when you return to Foreman Ismey, you'll have to make a decision. If you recommend that Gamel pay for killing Sameth, then you'll earn a "minor" reputation bonus with
Stalwart Village. If you say it wasn't his fault, then you'll take a "minor" penalty. If you refuse to take a side, then your reputation won't change. But regardless, Ismey will pay you 2000 cp for your help.
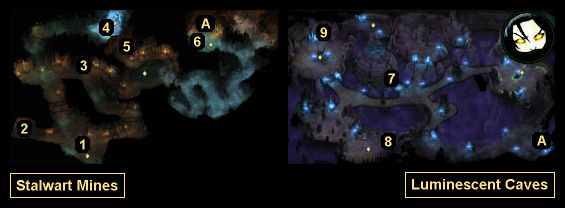
1 - Arrest
2 - Foreman's Quarters
3 - Sameth's Corpse
4 - Teryc
5 - Hammer and Chisel
6 - Cillan
7 - Common House
8 - Hidden Crystal
9 - Terenat
Exits
- Tunnel system.


