 Did we miss anything in this section? Is there something we didn't discover?
Let us know!
Background
Did we miss anything in this section? Is there something we didn't discover?
Let us know!
Background
You'll receive this quest after completing the quest
The Iron Flail.
Walkthrough
For this quest you'll need to travel to
The Abbey of the Fallen Moon. When you get there, you'll discover that the Ondrites running the abbey don't much care for outsiders. So you'll have two ways to proceed -- stealth or violence. These two approaches are just different enough that we'll describe them separately below.
Attack the Abbey
You can just kill everybody who gets in your way. This is the simplest but slowest method. None of the battles should be too tough, but you'll need to watch out for tidalfists, since they can teleport right to your casters and knock them out quickly. For best results, you should send your melee fighters ahead of the rest of your party, and then after the battle has been going on for a few seconds, have your casters and other ranged attackers join in. The tidalfists usually won't teleport if you use this strategy.
While you're at the abbey, you'll need to visit two places that will give you enough information so you'll be able to solve a panel puzzle (#10). The first is the mural outside (#1), which will show you the four stages of the abbey. The second is the Hall of the Tidal Wave (#6), where you'll encounter High Abbot Kaoto. When the abbot dies, he'll drop some things -- a
Ring of Deflection,
Robes of the Tidebringer, and a
Spellward Amulet -- and you'll be able to read his soul, which will reveal the Sign of the Tide to you. You can also learn the Sign by reading the
Journal of the High Abbot, which you'll find in the Abbot's Quarters (#7).
On your way to the panel puzzle, you'll meet Farentis (#9), who was the high abbot before Kaoto. He'll explain how the temple works. The Ondrites living in the Halls of Presence are the High Tide, and those living in the Halls of Silence are the Low Tide. Every so often, there is a Rising, where a Tidebringer selects a new High Tide, the old High Tide is demoted to become the new Low Tide, and the old Low Tide is killed off in a flood.
At the end of his explanation, Farentis will tell you about an aspergillum ("a device used to sprinkle holy water") called
Ondra's Witness, which can be used to control the floodgates in the Halls of Silence. He'll ask you to use it to open an exit for the Low Tide, so they can escape their fate. He'll then give you a Cracked Ornate Key, which you can use to unlock the door behind him.
When you reach the panel puzzle (#10), you'll need to give the answers "city in flames," "tidal wave," "barren shore," and then "flourishing city." After selecting those answers in the right order, and after performing the Sign of the Tide, a water bridge will form, allowing you to make your way to
Ondra's Witness (#11). However, before you can take the Witness, you'll have to point it to a "rising tide" (to kill off the Low Tide) or an "open gate" (to allow them to escape their fate). Either way, the Low Tide Ondrites (including Farentis) will disappear from the game.
With
Ondra's Witness, you'll now be able to make your way to the reliquary (#4).
Infiltrate the Abbey
You can also infiltrate the abbey. To do this, you should head east when you first arrive at The Abbey of the Fallen Moon. If you wait for the guards patrolling that route to move away from you, then you'll be able to reach a precipice (#2) without being noticed. From there you can have a character with Dexterity 18 throw a
Rope and Grappling Hook, which will allow you to swing across and reach
The Halls of Silence.
Inside
The Halls of Silence, you won't need to be stealthy. As soon as you run into some Ondrites, you can just choose the "leave" dialogue option, and they'll kick you out to
The Halls of Presence.
Inside
The Halls of Presence, unless you're really good at sneaking, you'll probably run into some Ondrites, and you'll have to dupe them. To do this, you should lie and say that you're the Tidebringer, and then "prove" it by using one of three dialogue options -- one requiring Resolve 14, another requiring Perception 13, or a last one requiring Lore 6. Regardless, you should head directly for High Abbot Kaoto (#6).
When you reach the high abbot, he'll also assume that you're the Tidebringer. Unless you disabuse him of this notion, he'll tell you to get ready for the "recitation" that will start the Rising, and he'll give you some hints for how to prepare. He'll tell you to talk to Giftbearers (#5), study the mural outside (#1), and read books in the library (#8). Also, from this point forward, the Ondrites should allow you to wander around freely in the abbey.
When you're ready for the recitation, you should return to Kaoto. You'll need to give him three answers:
- "I am Saman, the Flood." (Learned from the mural.)
- "I give myself." (Learned from the book The Giftbearer's Pilgrimage.)
- "I have none." (Learned from Giftbearer Beasca.)
When you pass the test, Kaoto will inform you that you're the agent for a Rising, and he'll explain what that means. The Ondrites living in the Halls of Presence are the High Tide, and those living in the Halls of Silence are the Low Tide. Every so often, there is a Rising, where a Tidebringer selects a new High Tide, the old High Tide is demoted to become the new Low Tide, and the old Low Tide is killed off in a flood.
Kaoto will then tell you to go to
The Halls of Silence and seek out an aspergillum ("a device used to sprinkle holy water") called
Ondra's Witness. The Witness will allow you to set the Rising in motion. Kaoto will also teach you the Sign of the Tide, which will allow you to reach the Witness.
Inside
The Halls of Silence, the High Tide Ondrites will let you pass when you tell them that you have Kaoto's permission to be there. But the Low Tide Ondrites will attack you on sight. However, it won't make any difference to the quest if you kill the Low Tide Ondrites, so you can try to avoid them or not.
As you explore
The Halls of Silence, you'll eventually meet Farentis (#9), who was the high abbot before Kaoto. He'll give you some background information about the abbey and Ondra's Witness, just in case you missed it with Kaoto, and he'll ask you to use the Witness to set the Low Tide Ondrites free.
When you reach the panel puzzle (#10), you'll need to give the answers "city in flames," "tidal wave," "barren shore," and then "flourishing city." After selecting those answers in the right order, and after performing the Sign of the Tide, a water bridge will form, allowing you to make your way to
Ondra's Witness (#11).
However, before you can take the Witness, you'll have to point it to a "rising tide" (to kill off the Low Tide) or an "open gate" (to allow them to escape their fate). If you choose the latter, then you'll upset the High Tide Ondrites (including Kaoto), and they'll attack you. You'll then have to make your way to the reliquary (#4) on your own. But either way, the Low Tide Ondrites (including Farentis) will disappear from the game.
Assuming you flooded the Low Tide, when you return to Kaoto (#6), he'll see that you have
Ondra's Witness, and he'll head up to the Veil of Tears (#3) and wait for you. When you meet him there, he'll decide that he doesn't really want to become a part of the Low Tide, and he'll attack you. There doesn't appear to be any way to stop this, but with Perception 15 or Resolve 13, you can sway some of Kaoto's allies to turn against him. This will make the fight much easier.
After the battle, you'll find a
Ring of Deflection,
Robes of the Tidebringer, and a
Spellward Amulet on Kaoto's corpse. Then with
Ondra's Witness in hand, you'll just need to pass through the Veil of Tears and head for the reliquary.
The Reliquary
When you reach the reliquary (#4), you'll discover that it contains a giant skull. When you examine it, you'll find a
Fragment of Abydon's Hammer. You'll also have a vision of Abydon's death -- he was killed by a fragment of the moon Ionni Brathr, sent at the world by Ondra -- and you'll realize that the skeleton surrounding the abbey is what remains of Abydon.
Then Ondra will contact you. She'll inform you that the White Forge -- Abydon's Forge -- is too powerful and must be forgotten, and that the job of the Eyeless is to kill anyone who knows about it, which unfortunately now includes almost all of the Dyrwood. However, after talking to you about it, Ondra will begin to have second thoughts about her actions, and she'll agree to help you defeat the Eyeless. But she'll warn you that "something more fearsome and dangerous than any Eyeless" will try to bar your way.
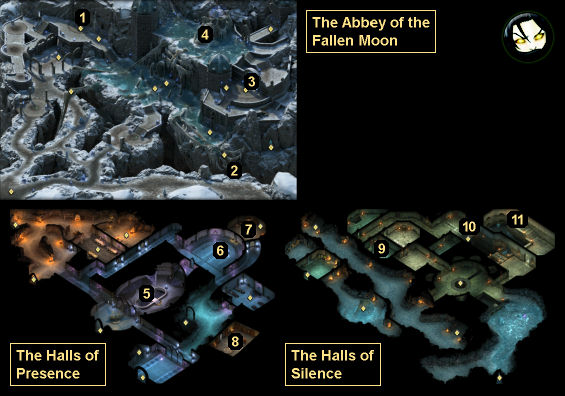
1 - Mural
2 - Precipice
3 - The Veil of Tears
4 - Reliquary
5 - Giftbearer Beasca
6 - The Hall of the Tidal Wave
7 - Abbot's Quarters
8 - Library
9 - Farentis
10 - Panel Puzzle
11 - Ondra's Witness


