 Did we miss anything in this section? Is there something we didn't discover?
Let us know!
Background
Did we miss anything in this section? Is there something we didn't discover?
Let us know!
Background
You'll receive this quest when you talk to the steward at
Caed Nua at the start of the quest
Durgan's Battery.
Walkthrough
The steward will tell you that a mercenary band called the Torn Bannermen has made its way to
Cragholdt Bluffs, where it is laying siege to Concelhaut's tower. She'll then warn you to be careful should you travel through that region. She's not kidding. This part of the DLC is for high-level parties only. You shouldn't go there unless you're at least level 12.
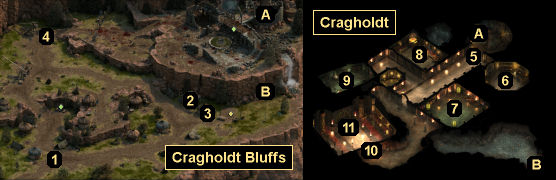
Cragholdt Bluffs is located to the northeast of
Caed Nua. When you get there, you'll immediately encounter some mercenaries (#1), who will warn you to leave or die. You can try sneaking around them, but the map isn't designed for it, and it won't make any difference if you're successful. So you might as well fight them. Then as you explore the area, you'll encounter more mercenaries, and you'll find an
Unsigned Letter detailing what they're up to (#2). You'll learn that they're after an Engwithan phylactery, and that their employer wants them to kill Concelhaut as well.
In the northern part of the area, you'll run into Commander Baelorin, the mercenary leader (#4). He won't be thrilled to see you, and after a few words, he and his men will attack. This battle shouldn't be much tougher than the other mercenary fights. We'd recommend going after the ranged attackers (gunslingers, marksmen, warmages) first, and then mopping up the rest. Baelorin will drop
The Golden Scales and a key when he dies. The key will unlock a chest to the southeast where you'll find a
Sentinel's Girdle (#3).
Eventually, you'll make your way into
Cragholdt (via Exit A). Inside, you'll meet a thrall assassin (#5), who will invite you to talk to Tanoss (#9). Tanoss will tell you that each of Concelhaut's four apprentices was given part of a key, and he'll make you a deal: if you kill the other three apprentices and take their parts, then he'll give you his part. He'll also reveal that you'll need this key in order to open Concelhaut's door (#10).
When you visit the other apprentices, you'll be able to tell them about Tanoss' offer. Pelden (#7) and Sabel (#8) will get mad and attack you, but Uariki (#6) will try to recruit you to her side, and get you to kill the other apprentices for her instead. So regardless, you'll have to kill three of the apprentices:
- Pelden (#7). He'll have some alguls with him. Pelden is something of a glass cannon, so while your melee fighters distract the alguls, have your DPS characters focus on Pelden and knock him out of the fight as quickly as possible. Pelden will drop a
Girdle of Mortal Protection, a
Necklace of Fireballs, a
Ring of Overseeing, and
Pelden's Note when he dies.
- Sabel (#8). She'll have some steelspine magi with her. The magi can knock your characters down with their pikes, so you'll need to keep them away from your casters and rangers. That is, you should either fight in the doorway to the lab or in the entrance corner, where your melee fighters can block access to the rest of your party. Then you'll just need to concentrate on one enemy at a time, taking down Sabel whenever it's convenient. When Sabel dies, she'll drop
Boots of Evasion,
Bracers of Deflection, a
Cloak of Minor Missiles, and
Sabel's Note.
Note: Sabel will probably cast Confusion during the battle, so if you have a priest with you, then Prayer Against Bewilderment is a good spell to cast at the beginning of the battle.
- Tanoss (#9). He'll have several thralls with him. The thralls will mostly only have "fine" equipment, which means they shouldn't pose too much of a problem. So we'd recommend sending your tank to distract Tanoss while the rest of your party quickly deals with the thralls. Then you can gang up on Tanoss, who will drop a
Ring of Thorns, a
Torc of Defiance, and
Tanoss' Note when he dies.
- Uariki (#6). She'll have animated weapons with her. Most will only do melee damage, so the best place to fight Uariki is in the doorway to her lab, where your melee fighters can block enemies from going through. When Uariki dies, she'll drop
Uariki's Note.
If you work for Tanoss, then he'll give you
Tanoss' Note when you report your success. If you work for Uariki, then she'll give you three
Potions of Major Endurance, a
Scroll of Valor, and
Uariki's Note.
When you reach Concelhaut's door (#10), it will ask you four questions. You'll only get the dialogue options for the right answers if you've taken and read the apprentices' notes. The right answers are:
Beyond the door, you'll meet Concelhaut (#11). He'll automatically start a conversation with you when you approach him, from which you'll learn two things of interest: that his phylactery is a "complex layer of spellwork" carved into his skull, and that he set up the clash with the Torn Bannermen as a way to draw you to him so he could claim your soul. After that, he'll attack you.
Concelhaut will have several alguls, ancient death guards, animated wands, steelspine magi, and void seers with him, making the fight difficult. So before starting it, you should buff up with a good inn resting bonus (such as the one from the Gref's Rest in
Stalwart Village), and you should eat some good food (like
Dragon Meat Dishes and
Darkest Rauatai Cookies). We'd also recommend leaving most of your party outside Concelhaut's chamber. That way you'll be able to bunch up Concelhaut's minions in the doorway, and you'll also be able to defeat any void seers lurking outside before the real fighting starts.
Otherwise, you'll just need to play the battle by ear. Concelhaut and the void seers are the only spellcasters in the battle, so it would be a good idea to target them first -- except that you'll probably have trouble reaching them through all of the other combatants. So just concentrate your fire and kill one enemy at a time, and make good use of crowd control abilities and spells, like the druid's Relentless Storm.
Killing Concelhaut will complete the quest. When you loot his body you'll find
Boots of Stability,
Bracers of Deflection, a
Broad Belt of Power,
Concelhaut's Skull, and a
Spellward Amulet. You'll also find a grimoire called the Ironclasped. It'll contain all of Concelhaut's spells -- including two that you can't learn anywhere else: Concelhaut's Draining Missiles (level 2) and Concelhaut's Crushing Doom (level 7).
Note: If you worked with Tanoss and return to him after defeating Concelhaut, then he'll attack you.
1 - Mercenary Checkpoint
2 - Command Tent
3 - Locked Chest
4 - Commander Baelorin
5 - Thrall Assassin
6 - Uariki
7 - Pelden
8 - Sabel
9 - Thanoss
10 - Concelhaut's Door
11 - Concelhaut
Exits
- Main entrance to
Cragholdt.
- Back entrance to
Cragholdt.


