 Did we miss anything in this section? Is there something we didn't discover?
Let us know!
Background
Did we miss anything in this section? Is there something we didn't discover?
Let us know!
Background
After completing the quest
Investigating the Dark Dahlia, the next time you walk through the
Harbor Loop with Charissa in your party, you'll be stopped by Seeker Tarmesh, who will tell you that you're needed by the "prophet" and "first follower of Tyr," Brother Edens. If you respond that you're interested in seeing Edens right away, then you'll instantly move to Brother Edens' Shrine in the
Arena District. Otherwise, you'll have to find your own way there.
Walkthrough
When you meet with Brother Edens, he'll tell you about a group of Thayan slavers who have been operating in the city for years -- "the sheer volume of human traffic they have moved would boggle the mind of most" -- and he'll ask you to deliver Tyr's justice to them. Charissa will be all excited to go right away, and if you refuse to accept the quest, then she'll leave your party and complete it on her own, and you'll have to return to the Black Eye Tavern in the
Harbor Loop to pick her back up.
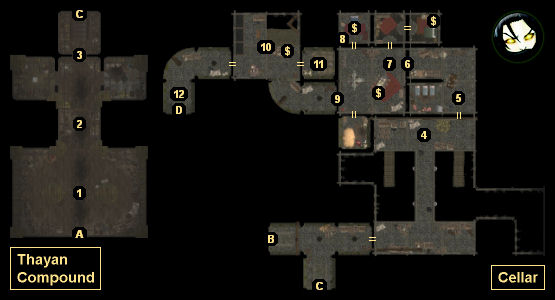
You'll find the Thayan Compound in the southwestern corner of the
Harbor Loop. You'll have two ways to get inside. You can just go in the front entrance (Exit A), or, if you're playing a druid or a ranger, then you can grab the meat from the barrel next to the entrance, give it to the nearby mongrel, and then watch as it digs in the dirt and reveals a side entrance for you (Exit B).
Inside the compound, you'll have to do some fighting (at #1, #4, and possibly at #5), but eventually you'll encounter the Thayan wizard in charge of the operation (#7). The wizard will guess that Brother Edens sent you to her, and then she and a pair of ogres and a human priest will attack you. With some area effect spells, this battle should not be too difficult, but if you have trouble, be sure to use the doorway to the room (#6) to keep the ogres away from your casters.
Once you've done enough damage to the wizard, she'll flee to the inner sanctum (#10). The other enemies will just die like they're supposed to, and when you loot their corpses, you'll find
Ardulia's Fall, a
Heavy Shield +2,
The Viper,
Anti-Venom Chainmail, and more. To follow the wizard to the inner sanctum, you'll need to loot a key from a chest (#8), and then use it to unlock a door (#9).
When you reach the inner sanctum (#10), the wizard will introduce herself as Falucca Ardarbrent -- which will surprise Charissa, because Falucca Ardarbrent along with Pharros Sneed were the two people involved in the plot to imprison her parents. However, before this coincidence can settle in, Falucca will begin gassing the remaining slaves (#11), and then she'll flee.
That means you'll have to make a choice -- to follow Falucca or to rescue the slaves:
- If you choose to follow Falucca, then you'll gain influence with Charissa, and you'll catch up to Falucca right before she can go through the exit (#12). With nowhere left to run, Falucca will attack you, but with the odds stacked against her, she won't last very long, and after the battle you'll gain 500 xp and find
Righley's Dueler, a
Ring of Protection +2, and more on her corpse.
- If you choose to rescue the slaves, then you'll lose influence with Charissa, and she'll (briefly) leave your party to chase after Falucca. To free the slaves from their chamber (#11), you'll need to pass an intelligence check at the slave controller in the center of the room, or you or one of your companions will need to pick or bash open the door to the chamber. If you talked to the duergar miners earlier (#5), then their solution for the controller will work as well.
For freeing the slaves, you'll earn 500 xp, but when you belatedly chase after Falucca, you'll find her gone and Charissa waiting for you by the exit (#12). Charissa will then rejoin your party.
Regardless of your choice, afterwards you'll end up with Falucca's journal (Charissa will either take it from Falucca's corpse, or she'll find it on the ground near the exit). The journal will indicate that Brother Edens is really Pharros Sneed, and so Charissa will demand that you return and talk to him.
When you return to Brother Edens' shrine (in the
Arena District), Edens will admit to who he was and what he did, and he'll even explain his relationship with Falucca -- and then at the end of the conversation he'll allow Charissa to pass Tyr's judgment on him. Charissa will be conflicted about what to do, and she'll ask you for advice. If you have enough influence with her, then she'll do what you say. Otherwise she'll let him live. Either way, you'll earn 3000 xp for completing the quest.
1 - Shadow Fight
2 - Gong Trap
There doesn't appear to be any way to detect or disarm this trap. If you trip the trap -- that is, if you enter the compound via the front entrance (Exit A) rather than the side entrance (Exit B) -- then everybody in the cellar will turn hostile, and you won't be able to talk them out of a fight.
3 - Secret Door
When you walk close enough to the door, you'll detect it.
4 - Slaver Battle
If you didn't trigger the gong trap (#2), then you'll have a very easy battle against a few slavers here. But if you did trigger the gong trap, then you'll have to fight the slavers and the duergar miners (#5) at the same time, and you'll have to destroy a barricade to even get to them.
5 - Duergar Miners
If you didn't trip the gong trap (#2), then you'll catch the duergar miners unawares, and you'll get a chance to talk to them. During the conversation, if you pass a bluff, diplomacy, or intimidate check, then you'll convince the miners to leave without a fight, and they'll even tell you how to disarm the gas trap in the inner sanctum (#10).
6 - Locked Door
One of the duergar miners (#5) will either drop or give you the key to this door.
7 - Ogre Battle
8 - Chest
9 - Locked Door
You'll find the key to this door in a nearby chest (#8).
10 - Inner Sanctum
11 - Slaves
12 - Falucca / Charissa
Exits:
- Front entrance.
- Side entrance.
- Stairs.
- Back entrance.


