 Did we miss anything in this section? Is there something we didn't discover?
Let us know!
Background
Did we miss anything in this section? Is there something we didn't discover?
Let us know!
Background
After meeting with Pentical Bleth in the Tower in the
Market Triangle (#1), when you leave her office you'll notice a commotion in the back hallway. When you investigate, you'll learn from a Council of Guilds representative that the Council of Guilds set up an exhibit for the Knot of Shou Lung, including a special
Prize Chalice for anyone who can figure out how to untie the knot -- but that the chalice was stolen. At the end of your conversation with the representative, she'll ask you if you're an adventurer, and when you respond in the affirmative, she'll usher you into the exhibit.
Inside the exhibit, you'll meet Threston Arundel, the guild president. He'll give you some background information about the knot and the chalice. Among other things, he'll tell you that the chalice was protected by a variety of locks and traps, all of which were untouched by the thief, but that somehow the chalice was replaced by a note. This conversation will trigger the quest.
Walkthrough
The first thing you'll need to do in the quest is check out the note, which you'll find in the glass counter in the back of the exhibit. If your lore skill is high enough, then you'll recognize the script as "androsphinx," and you'll translate the riddle the note contains. If your lore skill isn't high enough, then the wizard Aluriel Saladar will show up just long enough to translate the riddle for you.
Note: If your spellcraft skill is high enough, then after translating the note, you'll be able to examine the shop counter in the exhibit and detect the chalice inside. This will cause Arundel to give you 1500 gp for finding the chalice, but still he'll ask you to track down who hid it and why, and so the rest of the quest will remain about the same. If your spellcraft skill isn't high enough, then you'll only find the chalice at the end of the quest.
The first part of the riddle will mention "the trail of the dead" and "foul stains of red" -- that is, bloody footprints. To detect these footprints, you'll have two choices: you can buy a
Potion of Blood Revealing from Mintassan in his shop (#3), or, if you've completed the quest
Trouble at the Track, then you can return to the Track (#4) and ask Tudor Fezziwink if you can borrow his dog.
If you purchase the potion, then you'll need to return to the exhibit and examine the entry door (by opening it or closing it). This will give you the option of using the potion, which will lead you to the Lair of the Riddler (#2). If you borrow Tudor's dog, then it will automatically lead you to the lair.
Inside the lair, you'll encounter an iron golem, which you'll probably have trouble hitting and damaging (among other things, it's immune to spells). So buff up your party before attacking it (including any spell that gives a bonus to attack), and buy adamantine weapons (from the weapon merchant at #5) or the warhammer
Golem Slayer (from Mintassan at #3) if necessary. When the golem dies, it will drop a key, which will allow you to move into the next room in the lair.
In the second room in the lair, you'll find a checkerboard pattern on the floor, with a colored path leading from the entrance door to the exit door. If you attempt to open the exit door, then you'll learn that it requires a four part code. To learn the code, you'll need to refer to the riddle again, which will hint that "the keys lie on the floor" with "the order defined by their length." If you examine the path on the floor again, then you might notice that the path is made up of four segments of length 4, 8, 11, and 2. That's the code for the door.
In the final room of the lair, you'll meet an androsphinx named Porthyria. She'll tell you that she only stole the chalice to lure a competent group of adventurers to her lair, and that she'd like you to steal some
Oil of Laduguer from the duergar in
Undergate so she can use it to untie the Knot of Shou Lung. In reward, she'll offer to let you keep the
Prize Chalice and the reward money when she unties the knot.
Note: If you've already found the chalice, then you can refuse Porthyria's offer. This will end the quest, and when you return to Arundel in the exhibit, he'll reward you with 1000 gp (for 2500 gp total). You'll get a better reward if you help Porthyria.
When you visit the duergar in their quarter in
Undergate, you'll get attacked by groups of duergar warriors. Each group will drop a key that will allow you to advance to the next group. After three of these groups, you'll encounter the duergar high priestess, who will decide to speak with you. The high priestess will tell you that a "pack of thugs" recently invaded the quarter and stole some items, including the
Oil of Laduguer, and she'll offer you some of the oil if you can get all of the items back from them.
Note: You can refuse the deal if you want. The high priestess will try to encourage you by increasing the reward a couple of times, but eventually she and the duergar with her will attack you. You'll have to fight the high priestess eventually no matter what, and taking this route will allow you to skip a step in the quest.
If you agree to retrieve the items for the duergar, then you'll find the thugs in the southeastern part of
Undergate. The thugs will include a drow wizard, a troll, an ogre, and a bugbear, so make sure you're prepared before you fight them. Afterwards, when you loot the corpses, you'll find
The Grinning Skull and a key on the corpse of the wizard. The key will allow you to unlock a nearby chest, inside of which you'll find... a
Dragon's Egg. When you loot the egg, a group of duergar will show up and taunt you for having believed their lies. Then they'll attack -- and probably die pretty quickly.
Note: The only thing you'll be able to do with the
Dragon's Egg is sell it. Both the drow merchant (in Undergate) and Captain Fennesh (in the barracks in the Arena District) will give you 500 gp for it. You'll become more chaotic if you sell it to the former and more lawful if you sell it to the latter.
When you return to the high priestess, she won't be happy to see you, and she'll use some of the oil to create an Essence of Laduguer. Then she and all of the remaining duergar in the quarter will attack you. This can be a tough fight, especially since you'll start out right in the middle of it, so be sure to buff up your party before talking to the priestess. After the battle, when you loot the corpses, you'll find the
Oil of Laduguer, a
Cloak of Movement,
Gol'Kai's Cry,
Malchor's Punch, a
Scarab of Protection +1, and more.
Finally, when you deliver the oil to Porthyria, she'll teleport you to the exhibit, where she'll untie the knot and reveal the chalice (if necessary). Arundel will then reward you with 3500 gp, 2000 xp, and the
Prize Chalice (which is worth about 2000 gp). You'll also receive the Riddle Master history feat.
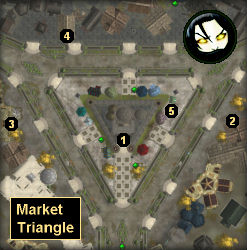
1 - The Tower
2 - Lair of the Riddler
3 - Mintassan's Mysteries
4 - The Track
5 - Weapon Merchant


