 Did we miss anything in this section? Is there something we didn't discover?
Let us know!
Background
Did we miss anything in this section? Is there something we didn't discover?
Let us know!
Background
After meeting with Pentical Bleth (see the quest entry for
An Unexpected Message for more information), the next time you visit the Bent Mermaid Inn in the
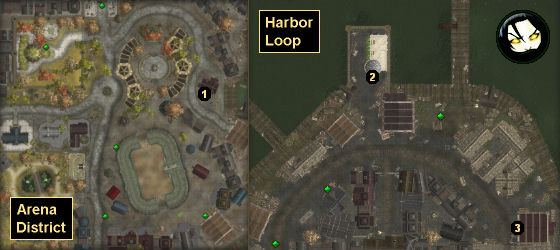
Arena District (#1), you'll meet some drunken commoners out front. They'll let you know that Aloster Drake is inside, and that he just received a 5000 gp bounty for bringing in the head of the dread pirate Galandaro. This encounter will trigger the quest.
Walkthrough
Inside the inn, you'll discover that Drake is hiding in one of the back rooms. To get access to him, you'll have to bribe, bluff, or intimidate his door guard, Breel. However, when you talk to Drake, he'll claim that he hasn't received any reward money yet, and that you should talk to Harbormaster Grenn if you don't believe him. You'll find Grenn in the Harbormaster's Office in the
Harbor Loop (#2).
When you talk to Grenn, you'll learn that while he believes Drake's story, he won't pay the bounty until he finds someone who can verify that the head actually belonged to Galandaro. To resolve the situation, you'll need to talk to Sami Horngold back in the Bent Mermaid Inn (#1). She'll volunteer to identify the head, but when she does, she'll mention that she's seen Rabid Red, Galandaro's first mate, skulking around the docks recently. This will send everybody in the Harbormaster's Office into an uproar, and Drake will finally decide that he should confide in you.
When you talk to Drake, he'll admit what really happened -- that Rabid Red killed Galandaro in a mutiny, then captured Drake's ship, and now is holding Drake's crew captive while he waits for Drake to claim the bounty for him. Drake will then mark the location of Red's hideout in the
Harbor Loop (#3), and he'll ask you to rescue his crew before the city guards get involved and mess everything up.
Inside the hideout, you'll run into a pirate guard. If you intimidate him, then he'll leave peaceably. Otherwise, you'll have to fight him and four other pirates. One way or the other, you'll end up with a key that will allow you to enter the back room of the hideout.
Note: It's actually better to fight the pirate guard. If the four pirates don't rush in and assist the guard, then they'll stay in the back room and assist Rabid Red.
In the back room, you'll meet Rabid Red, and he'll try to make you a deal. If you allow him to escape, then he won't kill any of the captive crewmembers. This decision will affect your companions more than it will the quest because even if you attack Rabid Red, you'll probably be able to kill him quickly enough that none of the crewmembers will die. If you agree to Red's deal, then you'll gain influence with Mantides but lose influence with Charissa and Rinara. If you attack Red, then you'll get the opposite result.
Regardless, you'll have to do some fighting, because even if Red escapes, you'll still have to deal with his remaining pirates, including a pirate wizard. This battle, even if Red is involved, should not be too difficult, and afterwards, when you loot the bodies and containers in the hideout, you'll find
Studded Leather Armor +3,
The Mutineer's Toll, and
Rabid Red's Head on Red (if you killed him), and a
Heavy Crossbow +3 plus some other odds and ends elsewhere.
When you return to the Harbormaster's Office (#2), if you killed Red and looted his head, then Harbormaster Grenn will reward you with 5000 gp and 400 xp. If you kept all of the captive crewmembers alive, then Drake will reward you with
Aloster Drake's Falchion. And just for completing the quest, you'll earn 1600 xp. It won't make any difference if you convince Drake to add Sami Horngold to his crew.
Note: Supposedly, if Rabid Red gets away, then at some point he'll show up in
Undergate, and you'll be able to attack him there and still collect the bounty on him.
1 - Bent Mermaid Inn
2 - Harbormaster's Office
3 - Pirate Hideout


