 Did we miss anything on this map? Is there something we didn't discover? Let us know!
1 - Arrival
Did we miss anything on this map? Is there something we didn't discover? Let us know!
1 - Arrival
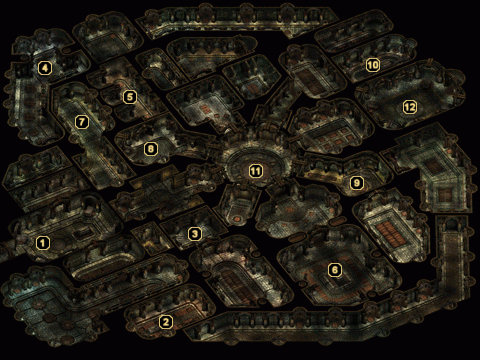
Having entered through the secret door within the offering room of
Castle Maluradek's courtyard, you'll arrive in this ancient network of crypts. Your objective here (as described in the Manuscript of the High Watcher) is to acquire six keys needed to gain entrance to the Watchknights' tombs. This level is quite extensive and will most likely take you awhile to finish. There are numerous traps, many oddly-placed secret doors, and plenty of dead bodies to search along the walls. The whole level is also heavily defended by scores of undead, so tread carefully and save often.
Before leaving the entrance room, pop open the trapped sarcophagus just ahead to find twenty
Bolts +2 and a
Heavy Crossbow of Accuracy.
2 - Electrum Key
Five Ghosts and a Crypt Thing guard this room. When all of the undead have been dealt with, search the sarcophagus to find the Electrum Key.
3 - Loot!
Search the recessed tombs along the wall in this room to uncover a
Girdle of Bluntness.
4 - Silver Key
This long chamber is guarded by several Blast Skeletons, two Boneguard Skeletons, and two Crypt Things. Wipe them out, then plunder the Silver Key from inside the sarcophagus.
5 - Loot!
Ransack two of the recessed tombs in this chamber to find twenty
Static Darts +3 and a
Bastard Sword +3: Incinerator.
6 - Gold Key
A Greater Mummy and six regular Mummies guard the Gold Key within this sarcophagus.
7 - Copper Key
Two Crypt Things and two Revenants will attempt to keep you from acquiring the Copper Key from the sarcophagus at the end of this hallway.
8 - Loot!
Once you've taken down the four Ghosts and two Crypt Things inhabiting this chamber, you can loot some
Studded Leather of Resistance +3, a
Reinforced Large Shield +2, and a
Shocking Flail +4 out of the trapped sarcophagus.
9 - Platinum Key
You'll have to deal with five Revenants and a Crypt Thing before you can snatch the Platinum Key from this sarcophagus.
10 - Bronze Key
Another five Revenants and a Crypt Thing have to be taken down to claim the Bronze Key from within this sarcophagus.
11 - Room of Doors
This central chamber is guarded by four Crypt Things. When they've been sent back to the void, you'll discover eight doors arranged around the room. The seven you haven't yet passed through are all locked. Each of these lead to a different area of the crypt and can only be unlocked with the key that matches the plaque above it.
Starting from the door you originally entered through and moving clockwise, the keys you'll need are: Platinum, Gold, Electrum, All, Silver, Copper, Bronze. When all six of the precious metal doors have been opened, the "All" door will automatically slide away and allow you entrance to the hallway leading to area #12.
12 - Watchknight Tombs
After dealing with three Crypt Things and five Skeleton Warriors armed with
Long Swords +1 in the hallway past the final locked door at area #11, you'll emerge through a secret door into the Watchknights' final resting area. Before doing anything else, make a quick trip around the room and loot the four sarcophagi for a
Mace +1, a
Spear +1, a
Two Handed Axe +2: Life Giver, a
Reinforced Large Shield +2, and a
Long Sword of Action +4.
Aside from some simple graverobbing, your purpose in this room is to put the Watchknights to rest. This is accomplished by placing each of the four "Tale of..." scrolls that you received from the Luremaster in the castle's four towers into its appropriate sarcophagus. Starting with the northwest sarcophagus and moving clockwise, place the scrolls in the following order: The Tale of Sir Erris, The Tale of Sir Geddian, The Tale of Sir Zierrki, and The Tale of Sir Giles. As each scroll is placed into the correct tomb, the Watchknight will appear and thank you for putting him to rest. Once all four Watchknights have been sent to the afterlife, you will be awarded 420,000 experience points and will be granted access to
Castle Maluradek's Ground Level through the main gate in the courtyard.


