 Did we miss anything on this map? Is there something we didn't discover? Let us know!
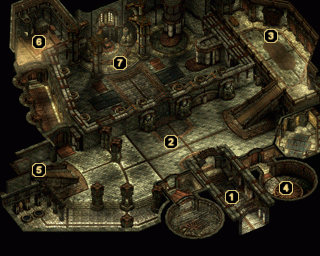
1 - Arrival
Did we miss anything on this map? Is there something we didn't discover? Let us know!
1 - Arrival
After putting all four Watchknights to rest in the
Watchknight Crypt, you'll be able to enter through Castle Maluradek's main gate. The Luremaster will appear and congratulate you on your progress so far, but will refuse to let you leave until you have "learned the story of what happened here." Before disappearing, he utters another cryptic riddle:
To understand this shameful tale,
Through princely guards you must prevail.
'Neath unused arms and unstruck mail,
Will you find the coffin's nail.
'Round and 'round the sun does fly,
And one man left below will die.
His crime? To make the peasant's eye
Reflect his lord's ignoble lie.
Don't try to make sense of this yet - just lodge the words in the back of your mind as you explore the castle.
2 - Throne Room Entrance
Spectral Guards stand watch over the door leading into the throne room to the north and the two staircases at the far ends of this chamber. If you attempt to walk past them (which you obviously need to do), they will immediately become hostile. Try to avoid getting the attention of too many at one time, as you'll find that they consistently hit your characters for a lot of damage.
Even after dealing with all of the Spectral Guards, you will not be able to access the throne room at area #7 until you have escaped the dungeon below.
3 - Rakshasa Battle
Standing by this bookself is Hobart Stubbletoes... or is it? He'll claim that he knows the answer to the Luremaster's latest riddle, but asks that you retrieve a key for him first. When you question his motives or just outright refuse to get the key, he'll transform into a Rakshasa and attack. When the battle begins, two more Rakshasa and ten Invisible Stalkers will appear and you'll find yourself up against a difficult group of foes.
When all three Rakshasa have been slain, search their bodies for a total of 726 gold pieces and three
Cloaks of Non-Detection. You'll also find scrolls of Monster Summoning IV, Flesh to Stone, and Tenser's Transformation in the northernmost bookshelf.
4 - Exit
Once you've acquired the Dungeon Key from the secret room on
the second floor of Castle Maluradek, you can access these stairs to reach
the first floor of the castle's extensive dungeon.
5 - Exit
Ascend these stairs to reach
the second floor of Castle Maluradek.
6 - Spectral Cook
The castle's Spectral Cook isn't too happy to see you. After calling six hostile Spectral Guards into the room, the cook will disappear. Look at the bright side - it's another 30,000 experience points.
7 - Luremaster Confrontation
This throne room is only accessible via the portal on
the fourth floor of the castle's dungeon. When you arrive, the Luremaster is surprised to see that you've exceeded the castle's previous guests in both bravery and wits. He agrees to let you leave, but not before you complete one final service for the castle's undead residents - put them to rest. Before you can argue, the Luremaster calls forth several Spectral Heroes and a battle begins.
As you kill off the first wave of Spectral Heroes, more will teleport into the room. There are a total of thirteen to deal with, so you'll need some endurance to get through the battle. When the number of Spectral Heroes in the room begins to dwindle, focus all of your efforts on the Luremaster. This is a little tricky, though, since he has the annoying habit of casting Dimension Door when you close into melee range. If you ever lose track of which combatant is the Luremaster, just remember that he is listed as a "Spectral Figure" instead of a "Spectral Hero." By making use of a few ranged weapons and typical combat spells, you shouldn't have a problem dealing a significant amount of damage to the bard over time.
Eventually, the Luremaster will yield and declare his happiness that he perishes for all time by your hand. He congratulates you for being more resourceful and fit for survival than "any of the hundreds" that have come before. With that, he vanishes and the seat of the throne flips open. Search the hidden compartment within to find a Tarnished Ring capable of teleporting your party back to the Whistling Gallows Inn in
Lonelywood. To make use of it, simply put it on and then invoke it from the backpack icon on that character's hotbar. Congratulations on surviving the Trials of the Luremaster!


