 Did we miss anything on this map? Is there something we didn't discover? Let us know!
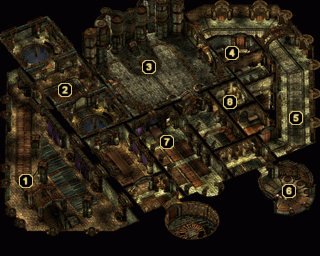
1 - Arrival
Did we miss anything on this map? Is there something we didn't discover? Let us know!
1 - Arrival
When you reach the top of the stairs from
Castle Maluradek's ground floor, three Spectral Guards will jump your party. Prepare accordingly.
2 - More Guards
Two more Spectral Guards guard this chamber. A pair of Water Elemental Kin await you in each of the two flanking rooms, so try to avoid drawing their attention before the guards are dealt with.
3 - Ballroom
When you first enter this large ballroom, you'll witness the Luremaster playing the organ while several Spectral Courtiers dance around the room. After a few seconds, the apparitions will disappear and a Beholder will charge in from the northeast hallway. Kill the aberration as quickly as you can to avoid any casualties.
4 - Loot!
After taking out the two Spectral Guards in this room, you can grab a scroll of Power Word: Stun from the bookcase.
5 - Beholders
A Beholder will be standing guard at the south end of this hallway. Slay the beast quickly, as a second Beholder will suddenly show up behind your party to the north.
6 - Loot!
Search the two bookshelves in this chamber to uncover a
Tome of Leadership and Influence and scrolls of Acid Storm, Power Word: Kill, and Prismatic Spray.
7 - Lord Fallon Maluradek
This is Lord Fallon Maluradek's private chambers, and his spirit isn't too happy to see you barging in unbidden. In fact, it sounds like he might have gone a little crazy as he seems to think that your characters are traitors. Before you can say a word, the self-proclaimed "Slayer of the Azure Wyrm Aehirglass" attacks your party.
Lord Maruladek isn't a pushover. He has a lot of hit points and access to some very potent spells, including Power Word: Kill. Luckily, he's alone (unless he summons monsters to his aid) so you can simply surround him and bring him down with brute force. When he dies, he'll drop a sinister weapon called
Dead God's Dreaming that you most likely won't find too useful since your party doesn't typically fight good-aligned creatures.
When you're free to search the room, check the chest of drawers by the bed to find Maluradek's Journal. This tome will reveal everything that has transpired to bring Castle Maluradek and its citizens to their current condition. It also chronicles how the bard and his cowardous Lord lost their lives and why each has their own reason to be restless in death.
8 - Dungeon Key
After scoping out the secret door leading into this room, you'll discover a high quality bastard sword, a
Great Shield +3, some
Full Plate Mail +1, and the Dungeon Key lying on the floor. You'll need this key to access the dungeon from
Castle Maluradek's ground floor.


