 Did we miss anything in this section? Is there something we didn't discover?
Let us know!
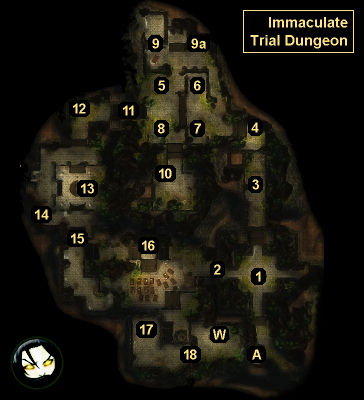
Overview
1 - Trial Statue
Did we miss anything in this section? Is there something we didn't discover?
Let us know!
Overview
1 - Trial Statue
When you get close enough, this statue will welcome you to the trial, the "prelude to purification."
2 - Locked Door
The only way to open this door is to pull the lever on its western side. That is, you'll only be able to use this door when you want to exit the dungeon.
3 - Corridor of Bane
When you walk far enough along this corridor, you'll catch the Rot, unless you've already completed the quest
The Troll's Bounty and received Rot immunity from it. You'll just have to deal with the Rot while you're completing the trials.
On the northern side of the bridge you'll find the corpse of Mendius, who you might remember as the leader of the Fabulous Five. He'll have
Mendius' Last Words on him, which will reveal that you can find his secret stash next to the "bellowing troll" in
Luculla Forest South.
4 - Chamber of Burdens
When you enter this chamber, a Trial Statue will inform you that you'll need to "balance the weights of knowledge" in order to continue on in the dungeon. You'll find four pressure plates in the chamber (#5-8). What you'll need to do is put just the right amount of weight onto each one so you hear them "click." The only hint for the trial is that each pressure plate is a different size, and you'll soon figure out that the bigger the plate is, the more weight you'll have to put on it. When all four pressure plates are correct, the magical barriers blocking the exit (#11) will disappear.
5 - Pressure Plate 1
You'll need to put a weight of 1 onto this pressure plate. You'll find a
Book of the Immaculates II in the chamber just to the north. It will work for the pressure plate.
6 - Pressure Plate 2
You'll need to put a weight of 2 onto this pressure plate. You'll find a
Bucket with Water in the secret room to the north (#9). It will work for the pressure plate.
7 - Pressure Plate 3
You'll need to put a weight of 5 on this pressure plate. One of the nearby vases will get the job done.
8 - Pressure Plate 4
You'll need to put a weight of 7.5 on this pressure plate. To the south you'll find a Heavy Barrel (#10). It will work for the pressure plate.
9 - Secret Door / Button
In order to open the secret door here (#9), you'll need to press the button to the east (#9a). Inside the room beyond, you'll find a
Bucket with Water, which is just the right weight to work for one of the pressure plates to the south (#6).
10 - Heavy Barrel
11 - Trial Exit
12 - Hall of Vigilance
When you enter this chamber, a Trial Statue will warn you that you'll need to "observe" and "bear witness" to continue on in the dungeon. In the center of the chamber you'll find three levers together and one lever off to the side (#13). What you'll need to do is adjust the trio of levers so they're in the right position and then pull the lone lever to see if you're right.
The first time you get the lever sequence wrong, you'll get attacked by a Shadow Woebringer. You won't earn any xp for killing the woebringer, but it will drop some decent random gear, and so it's worthwhile to get the answer wrong once. However, after that, if you get the answer wrong then the character who pulls the lever will simply get zapped for 25 air damage.
To complete the trial, you should notice that the correct lever sequence is shown on the wall in the chamber (#14): right, right, center. When you move the trio of levers to match that sequence and then pull the lone lever, the exit door (#15) will unlock, allowing you to continue.
13 - Levers
14 - Lever Sequence
15 - Trial Exit
16 - Altar
When you approach the altar here, you'll trigger the Star Stone on top of it, which will heal your party (including curing the Rot if necessary) and earn you some xp.
17 - Loic
When you talk to Loic, he'll tell you to kill the nearby chicken (you should see it clucking as it runs around) so you can spill its blood on the Star Stone and cure yourself of your ills -- but then he'll notice that you're already healed, and he'll get flustered and leave. However, soon enough he'll return with a handful of Immaculates, and he'll order them to kill you for being a "foe" and a "defiler."
The battle against Loic and the Immaculates might be tough depending on your level. We'd recommend targeting the Stormweaver (who can stun you) and the Frostweaver (who can freeze you) first, and then mopping up the rest. You'll earn about 25,000 xp for defeating the Immaculates, and Loic will probably drop some nice gear, plus the Church Hatch Key (which will allow you to use the hatch in the Immaculate church in
Silverglen) and the Luculla Portal Temple Key (which doesn't appear to do anything). Killing Loic and his party will also complete the quest
The Initiation.
Note: If you have the Pet Pal talent, then you can talk to the chicken if you want. This will give you a choice between being Compassionate (critical chance +3%) or Heartless (hit chance +20% when backstabbing). If you kill the chicken, then it will leave behind a
Chicken Corpse, which you can combine with the
Empty Vial on Loic's desk to produce a
Vial with Chicken Blood. However, if you try to combine the filled vial with the
Inert Stone on the altar (#16), then the vial will just disappear. You won't create a
Blood Stone.
18 - Locked Door
Loic will open this door when he leaves.
Exits
- Exit to
Luculla Forest North.
- Waypoint portal.


