 Encounter any problems with this walkthrough? Have comments? Let us know!
1:
Encounter any problems with this walkthrough? Have comments? Let us know!
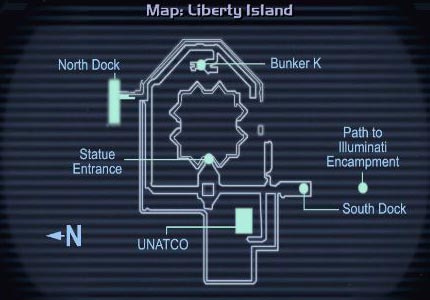
1: Likely you've talked to Leo and decided to take out all the leaders, perhaps just for fun to see what happens. This is that ending. Tell Leo to stay put, as he will get himself killed without constant supervision. There's no need to enter the UNATCO building unless you want to explore. First head to the south docks, as it's closest. Take out any Illuminati Elite Guard (IEG) resistance there if you haven't yet, and continue through the door at the southern end to the Illuminati Encampment.
2: Once inside the encampment, there's a Hunter Seeker bot on your left and a couple IEG's on the right in the back. Sneak up to the repairbot if you want to restore energy, and disable the Hunter Seeker using your favorite method. The IEG's may take notice and scout out the scene, but you can take them down from afar as well. When the area is clear, proceed to the back of the bunker, open the door, take out your rocket launcher, open the inner door, back up and fire inside. A few shots will do Chad and Nicolette in quickly. When they're dead, head back to the West End, and continue all the way north past the Statue Entrance. Notice that the Gray out front is still friendly. We'll keep it that way until the end.
3: When you reach the northern end, head east and take the exit to the East Side. The giant military bot nearby should be friendly to you. Our objective is the North Docks, but there's a lone IEG just inside the North Dock entrance. Take him out, and head north and around the western building to see Tracer Tong. He'll give you a small quest to release the Hunter Seeker bots in the sheds nearby. Using your multitools, walk around the back of the three sheds and unlock each Hunter Seeker bot. Return to Tracer Tong and tell him you want to take the East Side back from the Templars.
4: Our next objective is Bunker K. Watch as Tracer Tong and the Hunter Seekers begin moving south and east fairly quickly. You can stand back and observe them take down a couple PAP's to the north of the bunker, but they'll get killed more easily if you do so. Just to the east of the bunker are some IEG's and more PAP's, and you may find them battling each other. When the area is clear, walk around the south end of the bunker and look down the ramp. You should see at least one PAP. There are two down there, plus Saman in back. All three may come out, so use your best weapon combo to take them down. The Spy Drone, Mag Rails for the PAP's and even Saman all work well. When the battle is over, head inside and resupply yourself with ammo and items.
5: Time for JC, Paul and the machine. Head back north and to the West Side. Now come back south to the Statue Entrance and the Gray will still be friendly. Open the door, and them back up quite a ways so that JC and Paul are just within your scope's range. Shoot them first and you'll be able to take both them and the Grays out before they reach you, if they even bother coming out. When they're dead, stand far back from the entrance so you don't get shot at by the turrets inside, and take down the Helios Uplink Machine in the middle of the room. JC will actually return to life as a mortal human and come after you.
6: Get as far away as you can to avoid his attacks, and use your Rocket Launcher or Mag Rail. Sniper and Rocket alt-fire works as well if you can get far enough behind him. There are many ways to defeat him, but staying out of his range is easiest, and strafe his rocket attacks. When he's dead, sit back and watch the ending! Congratulations on beating Deus Ex: Invisible War!


