 Encounter any problems with this walkthrough? Have comments? Let us know!
1:
Encounter any problems with this walkthrough? Have comments? Let us know!
1: The abandoned Versalife Base is probably the scariest place in the game. So welcome! But since this game isn't nearly as scary as, say, Doom III, we're not talking grab-your-pillow type scary, merely the tense up type. That's of course if you're not using a walkthrough... if you are, divide by three.
2: When you enter, you'll be able to see a Templar just ahead before the first communications building (which has the Pilot Beacon we'll need later). Take him down from afar, and inch forward. Beyond the large tunnel in the middle of the small building, you'll see another Templar on patrol. There's yet another to his right, and a ground-mounted rocket turret to his left. When these are dealt with, the immediate area is secure. Head up the stairs to the communications building and inside for a resupply of items. You cannot use the pilot beacon yet but will need to come back before you're through.
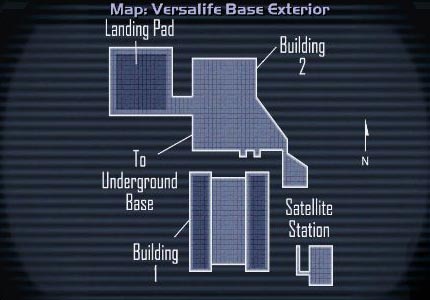
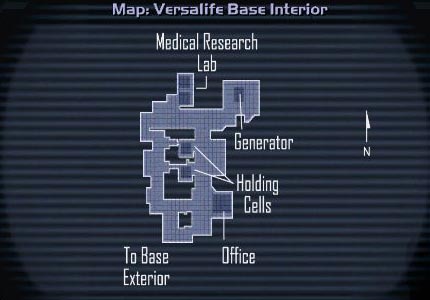
3: Exit the communications building and head right to a small tunnel with doors on either side: A Wing is to your left (and is optional but has a map), and the B Wing to your right. Open the A Wing door and notice the greasel droppings. Prepare your greasel hunting weapon and head upstairs to deal with two of them. On your left will be a couple vent openings, one on the left side of the room and one on the right. It matters not which one you choose, as you'll probably want to come upstairs and go down the other afterward. When you exit the room after the vent, notice some lockers against the wall on your way back to the stairway. To the right of these lockers on its base is a datacube with the Interior and Exterior Versalife maps seen here.
4: Check out the unlocked room downstairs and then exit the A Wing door. Facing the B wing door, head left out into the snow and make a quick u-turn. Climb the two boxes up onto the top of the bridge across the A and B wing doors. Head through the vent and you'll emerge in a small room with some items. Beyond the door is a couple more greasels and a stairway. Take the stairs down and then the door on the right. A Templar is in here, so deal with him, search the room for goods and head downstairs to the Versalife Interior.
 5:
5: As you enter the Interior there are two greasels downstairs. Tracer Tong lets you know where the generator can be found... unfortunately at the other end of the facility in the northeast. Take the vermin out, and rather than going down, jump onto the piping along the right side wall and follow it to the end, then take a left and continue along the piping to a vent; you'll notice that it's in the northwest corner of the room. That's the route we're taking, in order to bypass most of the experimental animals below and land us right in the generator room. But it's not a short crawl.
6: Enter the vent shaft through the grate, and when you emerge in the next area, take a right. Ignore the pleas of the Templar in the pen, as he'll turn benedict on you as soon as you release him. Besides, it would require jumping down off the pipes. Continue through the next vent, and when you exit the other end, take a left (as it's the only way you can go). As soon as you can cross over, take a right and do so. You can enter the nearby vent to the left and follow it for items,in a chest, but afterwards come back and head to what's right now the piping on your right.
7: Follow it all the way past a camera at the other end, and eventually drop down to a grate. This is the generator room. There are two greasels here that are fairly easy to take down (especially with your Spy Drone or Assassin Pistol if you picked it up back in Trier). As you enter, Tong informs you you're in the right place. Walk around one of the generators and use the generator switch to turn the power back on. There's a chest in this room with some items if you're interested. My advice right now would be to backtrack all the way through the vents the way you came, but you could also hoof it at floor level, facing a few nasty animals on the way... but it can be rewarding if you're in need of supplies.
8: One other thing of note. Once you're back in the first room of the Interior, the one with the vent you first entered and two greasels, if you head through the vent at the bottom of the room to the sub floor, you can sneak down a ways and find yourself a BLACK MARKET BIOMOD CANISTER. When finished, exit the Interior and head back to the Communications building you first saw when you entered the Versalife area, the one with the beacon. Flip it on, and then make your way around to the Helipad, which is just above the B Wing.
9: To avoid any more enemy or turret confrontation, take the "secret" vent entrance to the B Wing that you took to begin with, and in the first room (that had the greasels), follow the other exit labeled Helipad. Talk to Ava to board and make your way back to Cairo.


