 Did we miss anything? Is there something we didn't discover? Let us know!
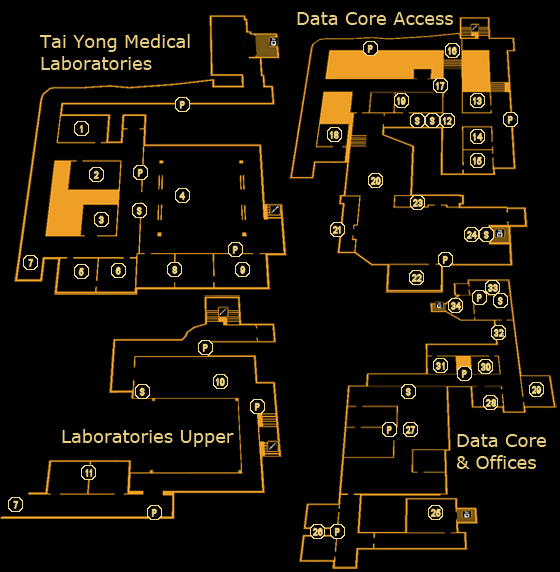
After taking the elevator up through the Pangu, you'll arrive at the Tai Yong Medical Laboratories area, which contains a mix of public and restricted areas. While you don't need to be discreet in making your way through, it's certainly preferable for those who want to avoid a fight. Note that the guards will become hostile if they catch you entering any restricted areas or performing any questionable acts, including hacking.
1 - Laboratory A-1
Check the drawer for a Credit Chip and then, if you're able, move the heavy crates in the room's corner to find a cart holding some
Crossbow Arrows, a
CyberBoost ProEnergy Pack, two bottles of Whiskey, and three
Typhoon Ammo boxes. The computer has some insight into Tai Yong's "information management" policies, and one of the e-mails suggests corner-cutting in their products.
2 - Security Room
Hacking the level 3 panel will get you busted by the guards, but, as the vent in the room signifies, there's an alterate way in, throught the vent in the storage room on the other side of the hall. You'll still need to be careful either way, however, as the guard sitting outside will spot you if you stand in plain sight. First order of business is the
Access Card on the table - it will let you into the Lee Geng Memorial Lab at (4) without causing a fight. Next, loot the room for two boxes of
Tranquilizer Darts, two boxes of
Machine Pistol Ammo, and some
Combat Rifle Ammo. The security computer (level 3) will give you dominion over the nearby Sentry Bot and the lone Security Camera outside the Lee Geng Memorial Lab, though hacking it might expose you to the guards outside.
3 - Storage Room
You won't find any useful loot in here, but you'll find a vent hidden in the top corner of the room behind some boxes. Move the boxes and climb in to gain discreet access to the security room at (2).
4 - Lee Geng Memorial Lab
The lab here is restricted to authorised personnel, as the guard standing on duty will so diligently inform you of. Gaining access is as easy as finding an
Access Card... you'll either have found one in the hidden stash back on the lower levels of Tai Yong Medical, or you'll have to search the security room at (2). Alternately, you cans imply blast your way through, crawl through the vent at (6), or climb up onto the balcony via the vending machine at (7).
When you're inside, you can read the computers for more suggestions that Tai Yong is cutting corners with its product line, and one e-mail hints at the fact that they may have somehow got their hands on Sarif's Typhoon data. Also be sure to grab the Scholar eBook, "Radical Evolution is a Reality", from a box under the central lab station, for +200 XP.
5 - Laboratory A-3
Not much to find in this office, but the computer will give you a tip about the
Access Card in the security room at (2).
6 - Laboratory A-2
You'll need to hack one of the level 2 keypads to get into this lab. Search one of the drawers to find some
Tranquilizer Darts, then check the computers for some more information on Tai Yong and its employees. The vent will provide you with alternate access into the Lee Geng Memorial Lab (4).
7 - Balcony
The balcony above tempts an alternate route to the Lee Geng Memorial Lab, but how to reach it? If you can lift the vending machine in the corner, you'll be able to hop up and use your Jump Enhancement to reach it. If your jumping ability is of the non-enhanced variety, you can hunt down some crates in the storage room at (3) and stack them up on top of the vending machine.
8 - Laboratory A-4
This lab is divided into two rooms. In one, you'll find an eBook on some of Tai Yong's R&D advancements, and a level 2 computer containing more suggestions that Tai Yong somehow got their hands on the Typhoon's schematics. In the other, you'll find a Pocket Secretary on a trolley containing the computer password "ghost". The vent will take you back to the lab at (6).
9 - Security Room
Seems security is tight enough that Tai Yong requires more than one security office on the same floor. Sneak up on the guards to hear them chat about some secret meetings taking place in the Upper Tower, but don't get too close or they'll become alarmed and eventually open fire. In the desk drawers, you'll find
Stun Gun Darts,
Tranquilizer Darts and
Combat Rifle Ammo. Meanwhile, the level 3 security computer will provide control over a nearby Sentry Bot and the Security Camera on the upper level of the lab area.
10 - Desk
Check the desktop here for some
Combat Rifle Ammo. Otherwise, there's very little else to find up here, save for the lone patrolling Belltower guard.
11 - Laboratories B-2 & B-3
Check the drawers in B-2 for some Stun Gun Darts and, more importantly, a
Praxis Kit. The computer contains some more info about faulty products, while in B-3, you'll find a level 3 computer to hack for some more information in a similar vein.
12 - Data Core Guard
Another friendly guard here will deny you access to the data core area. While you can simply back off if you wish, or blow him to kingdom come, use of the CASIE augmentation will get him to spill some details about a second security office closer to the data core, and a faulty laser beam protecting it. If you take him out, his body contains a Pocket Secretary with the code to the data core, "9762",
13 - Server Room A-3
You'll need to hack the level 2 keypad to gain entry. Snatch a Credit Chip from the desk drawer, then read the computer to see some of Arie's involvement in Tai Yong's affairs.
14 - Server Room A-2
This room is unlocked, and occupied by a couple of Tai Yong employees. Grab another Credit Chip from the desk, then, if you like, hack into the level 3 computer to find some more e-mails about van Bruggen's antics (though doing so will alert the Tai Yong employees).
15 - Server Room A-1
Another occupied office. Check one drawer for a Credit Chip, and the other for a Pocket Secretary containing a computer password, "radium".
16 - Laser Grid
The grid here can be bypassed by hacking the nearby level 1 panel on the wall, or by waiting for a Belltower guard to pass through it (which will briefly drop the grid). However, note that entering this area will cause the guards to become hostile.
17 - Laser Grid
Similar to the laser grid at (16), except the panel is on the other side of the grid this time. You'll need to sneak around another way to avoid the alarm.
18 - Storage Room
You'll find a
CyberBoost ProEnergy Bar on the cart in this room. Of more importance are the vent and weak wall section on the north side: the weak wall will take you well into the data core room itself, as well as a stash containing
Crossbow Arrows,
Tranquilizer Darts, and a
CyberBoost ProEnergy Jar, while the vent takes you to the back of the security room at (19).
19 - Security Room
This room is guarded by two Belltower soldiers. Dispose of them if you wish (one of them holds a Pocket Secretary with some info on the data core), then get to looting the room. You'll find a Credit Chip in one of the desk drawers, and
Machine Pistol Ammo in another. The eBook on one of the desks contains some speculation on a "human AI", and the computer nearby contains an e-mail with the password "muonrule", which will work on the nearby level 1 security computer.
Last, search the lockers in the back room for a Credit Chip, some
Revolver Ammo, and
Machine Pistol Ammo; the bench has also got a newspaper and some
10mm Pistol Ammo on top of it. The vent nearby will take you to the storage room at (18).
20 - Data Core Room
The Data Core Room is a maze of moving lasers. While players who want to go in guns blazing can simply walk through, those who want to avoid setting off alarms will have more trouble. The goal is to make it to the elevator at the end of the room, which can be accomplished with some deft movement and patience. If you've got Silent Running, now's a good time to switch it on, as regular running or spriting may alert the guards in the security room at (22).
21 - Vent
Duck into this room by timing your movement with the flickering laser, and the vent will take you straight to the security room (22).
22 - Security Room
This security room is guraded by three operatives. Taking them out without setting off alarms can be a challenge, but with the cloaking augmentation, it becomes a good deal easier. When they're down, search inside the lockers and weapon cabinet for three
Combat Rifles, a
Gas Grenade and some
Machine Pistol Ammo, then check out the desk drawers to find a Credit Chip. The computer has an e-mail hinting that the hangar is guarded by a couple of Boxguards (the large robots you first encountered in Detroit), while the security computer will allow you to disable the Security Camera at the data core elvator, and will give control over the nearby Sentry Bot. Last, what you've been waiting for: look for a level 2 panel (code "9762") to disable that pesky laser grid once and for all.
23 - Server Room
Check inside this small room to find a Pocket Secretary on the trolley for some more paranoia about van Bruggen. The computer terminal is locked up with level 2 security, and can be hacked to reveal more information on Van Bruggen's involvement with the hacking of Sarif Industries. Last, check the lockers in the far corner to find some
Typhoon and
Revolver Ammo.
24 - Data Core Elevator
This elevator will take you up to the data core itself. You'll find a terminal on the nearby pillar that will disable the laser grid, code "9762", if you haven't shut it down already.
25 - Data Core
When you arrive, you'll view a cinematic sequence - seems that van Bruggen's evidence is indeed there, and it reveals not only that Tai Yong was involved in the attack on Sarif, but that the scientists are potentially still alive, and that a contact in Montreal is also involved. Afterwards, you'll receive a bonus of +2500 XP and orders from Sarif to hunt down Zhao Yun Ru in her penthouse. Before going on, check the eBook on the counter for some light reading material.
Note that the way out is blocked by easily-avoided laser beams, which will trigger the alarm if touched. You shouldn't have any trouble getting by them one way or the other.
26 - Archives A-2 & A-3
The A-2 archives are locked with a level 3 keypad, and the computer inside contains the suggestion that van Bruggen may have had outside help in deserting Tai Yong. The A-3 room, meanwhile, is open already, but its computer has little on it but spam mail. That message sure does get around.
27 - Open Offices
This office is guarded by two patrolling Belltower goons, and a Sentry Bot will give you a hard time should you trip the alarm. You'll find the level 2 security computer controlling the nearby defenses in the office to the right (smash the glass or hack the level 3 keypad, computer password "pangutym"), which will allow you to shut down the Security Camera at the end of the room.
As far as plunder goes, you'll find a Pocket Secretary containing the code "ebrain" and
Stun Gun Darts in the security room,
Shotgun Cartridges on a nearby trolley, and, in the open offices, a
PEPS Energy Pack,
Stun Gun Darts, five Credit Chips, a Pocket Secretary with the code "2967", and a second Pocket Secretary with the password "sixiron". Most of the computers are open, while a few require level 3 hacks to get in. Among them, you'll find information on a "Hyron project", Tai Yong's approach to improving "efficiency", and information on an apparent rush order of new biochips for LIMB.
28 - Vent
This vent will take you to the security room at (29).
29 - Security Room
You'll hear two guards chatting with each other as you approach this room. Eliminate the two, then move on to looting. You'll find a
Gas Grenade, two boxes of
Machine Pistol Ammo and two
Machine Pistols in the lockers and weapon cabinet, as well as a
PEPS and
PEPS Energy Pack in the locker at the other side of the room, and more
Machine Pistol Ammo and a Credit Chip in the drawers. The level 3 computer contains the code "3090", as well.
30 - VP of Business Affairs' Office
You'll be able to get into this office by smashing the window on the other side, or by hacking the level 4 keypad. Alternately, the code "3090" will get you inside. The office is mostly empty, but the computer has further evidence of Tai Yong's actions against Sarif Industries.
31 - Narhari Khan's Office
You'll find Narhari Khan, the Belltower security chief, inside his office here, wielding a
Heavy Rifle (unless you killed him earlier at the Alice Garden Pods). Defeat him to find a Credit Chip on his body, and then search his desk for some
Shotgun Cartridges and
Revolver Ammo. His level 4 computer can be broken into using the password "ironfist" you might have picked up a while back, and contains some information on the attempt to capture van Bruggen by Tai Yong and Belltower.
32 - Trolley
Grab the
Machine Pistol Ammo from this trolley, but keep on guard, as the Security Camera in the next room will be able to pick you up even through the door.
33 - Front Desk & Conference Room
Pay attention to the Security Camera watching over the entrance while you explore this area. The computer at the front desk contains the code to the penthouse elevator, "6906", and the desk drawer holds a Credit Chip. The conference room in the back has an eBook on Tai Yong Medical, and the room just behind it has a weak wall that will give you access to the elevator, plus some
Shotgun Cartridges.
34 - Penthouse Elevator
The elevator here will take you up to the penthouse that Zhao Yun Ru calls her home. If you gave a weapon to Arie van Bruggen back at the Alice Garden Pods, he'll contact you during your ride and transfer a welcome +2000 Credits to your balance. Otherwise, you'll find yourself at the Tai Yong Medical Penthouse... time to
confront their CEO.
P - Alarm Panels
S - Security Cameras


