 Did we miss anything? Is there something we didn't discover? Let us know!
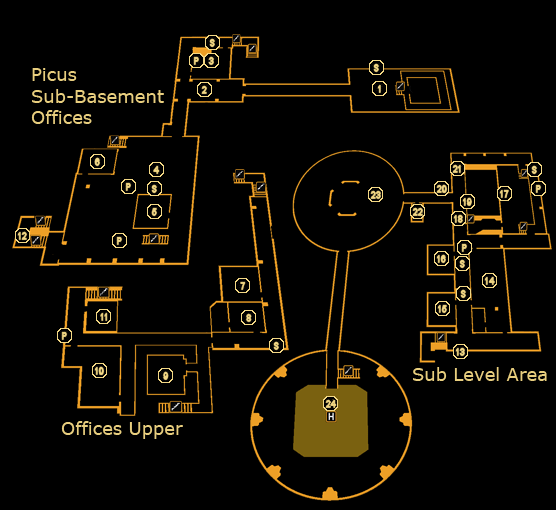
Heading down the funicular to the unmapped sub-basement, Pritchard will state that the energy surge he detected during your encounter with Eliza's hologram came from a room labeled 802-11 - that's where you'll need to head. But what kind of news station has an underground complex of this nature?
The sub-basement is well-guarded by dozens of Spec-Ops Soldiers, Sneakers and Ogres, as well as the occasional Sentry Bot, Security Camera, and so on. Exercise caution if you've decided to go the stealth route, because at this point your efforts at remaining undetected will be more strictly tested. Those specialising in heavy weapons should be able to mow through the opposition without too many concerns, although the Sneakers will likely give you a hard time. Note that this area culminates with another boss fight, so you'll want to stock up on weapons if you've been going the non-lethal route.
1 - Funicular Exit
The first thing you'll likely notice in this room is the laser grid up ahead, though you'll also quickly be spotted by the Security Camera if you stick your head out into the open. This room is actually fairly difficul to get through for stealthy players who want to explore everything, as the Security Camera will pick up the bodies of the soldiers who shortly walk into the room. Picking up a crate and throwing it at the Security Camera is an effective way to disable it without tripping the alarm, so consider doing that if you want to maintain a low profile. If you don't mind just rushing past everything, you'll spot a weak wall on the left-hand side of the lasers you can use to gain alternate entry past the laser grid.
When you've removed the opposition, check the crate stacks for some
Stun Gun Darts, a Credit Chip, a
Machine Pistol and Pocket Secretary. You'll also find a Pocket Secretary on one of the couches with the password "index", and the ammo case near the second batch of crates holds an
EMP Grenade,
Revolver Ammo and
Machine Pistol Ammo. To move on, you'll want to get past the laser grid by either using the weak wall to its left (+100 XP), by hacking the level 1 security panel, or by moving one of the soldiers' bodies to disable the grid.
2 - Statue
You know things are bad when you start seeing statues like this one. The vent accessed via the weak wall at (1) will let you out here if you chose to take it.
3 - Security Office
Thankfully, this security office is for the most part unoccupied. The unlocked security hub will allow you to disable some Security Cameras in the vicinity, while the standard computer contains a message sent regarding the complex's evacuation. When you're done reading, search the desks and drawers for a couple of Credit Chips,
Stun Gun Darts,
Tranquilizer Darts, and a
Machine Pistol. The Pocket Secretary on one of the desks has another message about the evacuation on it.
4 - Open Offices
A bunch more workstations in here, guarded by a handful of spec-ops. Avoiding a firefight in this area is tricky - it's probably better to take the stairs to the upper level instead if you want to sneak through, as the placement of the Security Cameras and size of the room will likely leave you quiet exposed.
Once the guards have been disposed of, take the time to loot the place. Going through all the drawers (both desks and cabinets), you'll find about six or seven Credit Chips, a
Mine Template, some
Stop! Worm Software,
Painkillers,
Tranquilizer Darts, and a Pocket Secretary containing E. Masse's password, "moufette". On the computer systems (most require level 3 hacking, one requires level 4), meanwhile, you'll find a good deal of information supporting Picus' strong bias and manipulation of information for their own ends.
5 - Office
Divert in here for a
PEPS Energy Pack and Credit Chip in the desk drawers.
6 - Office
This northwest office will yield you +200 XP for finding it. Poke your head inside for a Credit Chip and
Revolver Ammo in the drawers, then turn your attention to the desk for a
Scholar eBook "Healing Thyself - Health Preservation Implants" and +200 XP. The computer system will provide you the code for the armory upstairs, "1980".
7 - Office
A +100 XP bonus awaits you in this room, as well as a Credit Chip and
Nuke Virus Software in the desk. The computer terminal will surrender the password to the armory computer next door, "titom".
8 - Armory
Delicious weapons of mass destruction? Well, not quite. You'll find some
Painkillers in the desk drawer, while the level 4 security hub can be broken into with the password "titom" in order to disable the camera outside and to gain control over the nearby Sentry Bot. The armory is protected by a level 4 keypad (the code "1980" will get you inside), and contains a minor treasure trove:
Revolver Ammo, two
Sniper Rifle Ammo boxes, a
PEPS and
PEPS Energy Pack, two
Typhoon Ammo packs, three
Heavy Rifle Ammo boxes, a
Machine Pistol,
Cooling System, and
Automatic Unlocking Device (DLC only). You'll also receive a +400 XP bonus for breaking in, making it worthwhile even if you don't want the loot.
9 - Security Office
The security hub inside this room is locked with a level 3 firewall, but getting past it will give you control over the Security Cameras and Sentry Bot downstairs. Grab the Credit Chip on the desk before you head out.
10 - Conference Room
This conference room contains a couple of Credit Chips,
Stun Gun Darts, and a
CyberBoost ProEnergy Pack in its cabinet drawers. You'll also find a Pocket Secretary left behind on the table, containing the armory code "1980".
11 - Office
The computer in here has a stock office e-mail as well as one written in French, for the linguistically inclined. Before going, check out the locker for a
10mm Pistol,
10mm Pistol Ammo, and a
Machine Pistol.
12 - Stairwell
As you'll likely notice, the walls of the stairwell here are covered with a
Concussion and
EMP Mine - shoot them, or manually disable them, to get through. Triggering them will alert the guards downstairs.
13 - Weak Wall
Smash through here for a +300 XP bonus. The vent will give you access to a couple of the offices down the hall. Be aware of the Security Camera and the Spec-Ops Ogre around the corner when entering.
14 - Office
You'll find several computers to tinker with in here, including a security hub (password "spitfire") that will allow you to disable the Security Cameras outside, and grants control over the nearby Sentry Bot. On the rest of the computers, you'll find the code "0101" for a nearby office, as well as blatant evidence of Picus tampering with video footage and covering up certain types of information. Well, that's not too different from current news channels, right?
As for items and equipment to find, search the drawers for Vodka,
Stun Gun Darts, a
CyberBoost ProEnergy Pack,
Nuke Virus and
Stop! Worm Software, an
EMP Grenade, and a few Credit Chips. Check the desk in the security office for a
Machine Pistol, as well.
15 - Office
The room here can be accessed by hacking the level 3 keypad, using the code "0101" to open it, or by smashing down the weak wall at (13). You'll gain +300 XP for getting inside. Sift through the drawers and lockers for
Tranquilizer Darts, a couple of Credit Chips, a
Revolver,
Revolver Ammo, a
Machine Pistol, and a
Reload Speed Upgrade. The computer has a note on it about employees being reported for "developing a conscience". Nice place to work.
16 - Office
Another office protected by a level 3 keypad - hack it or take the vent at (13) to get inside. Check out the lockers for some
Nuke Virus Software,
Stop! Worm Software, two boxes of
10mm Pistol Ammo and a
10mm Pistol to go with them, and an
Automatic Unlocking Device (DLC only). The desk drawer contains a Pocket Secretary which contains the code to the level 3 computer terminal, "widget". Hack or log your way in to find the password to the security computer at (14), "spitfire".
17 - Data Processing Area
The data processing area is patrolled by a couple of guards, though the bigger threat is actually the Security Camera in the room's corner, as avoiding it can be difficult. You'll find the security hub to disable the Security Camera in the small hallway to the left as you come in - hack its level 3 firewall or use the password "spitfire" to get in. The Pocket Secretary on the same counter will additionally provide you with the password "diode".
When it's clear, you can search the desks for a Credit Chip,
Mine Template,
Tranquilizer Darts and
Revolver Ammo. The computers in the room will shed more light on Picus' manipulation of global events. If you check the very back room, through the hallway with the security computer, you'll find a large holographic globe and a visual on the large display showing off a render of a planned moon base.
18 - Secure Door
You'll need to either hack your way through this level 3 door, or take a detour through the Data Processing Area to reach your goal.
19 - Weak Wall
Break your way through the weak wall section to get a backdoor into the Data Processing Area.
20 - Vent
This vent will let you bypass the secure door at (21), and allow you into the back of the Data Processing Area.
21 - Secure Door
Another impenetrable door. To get past it, you'll need to hack its level 3 keypad or take the vent from (20) to get around its steely confines.
22 - Supply Room
You'll find a
Heavy Rifle and four packs of
Heavy Rifle Ammo in this room. You might want to load up on it, as you'll need some heavy firepower shortly...
23 - Eliza Cassan & Fedorova
Fair warning: you'll want to avoid entering this room until you're ready for a boss fight. When you step inside, you'll view a cutscene which reveals that Eliza, Picus' anchor, is in fact an advanced AI construct designed to monitor and reshape information to protect certain interests. The question remaining, whose, is left unanswered, however, as Fedorova, one of the mercenaries involved in the attacks on Sarif, appears.
Fedorova is a challenging enemy, but less so if you get a handle of her attack patterns. She'll initially rush you and attempt to use her Typhoon augmentation to deal heavy damage - run out of the way and she'll most likely miss (Eliza will alert you when she's on a war-path for you). She'll stay cloaked for most of the fight as she recharges her Typhoon, occasionally firing with her dual Machine Pistols. If you just want a straight-up fight, though, the Smart Vision augmentation will allow you to see past her cloaking and fill her full of holes. Mines and grenades are also fairly useful, especially EMP Grenades, which will temporarily disable her. Last, if you need supplies, there are a number of lockers around the room that will provide ammo and consumable items should you need them.
There is an additional hazard: when she unleashes her Typhoon attack, she's liable to destroy one of the four power generators around the sides of the room, temporarily electrifying the floor. If you've got the EMP Shielding augment, this will cause no damage, but if you don't have it, you're in for some heavy damage yourself - jumping up and down will minimise your changes of getting hurt. The upside, however, is that if Fedorova blows up all four power generators, you'll barely have to touch her to finish her off. Alternately, you can blow up the generators yourself with a few bullets, though this may do less damage to her.
When the Russian ice-queen is defeated, you'll speak more with Eliza about the kidnapping: Megan and her team had their GPL implants removed, ensuring they couldn't be tracked, by a surgeon... Isaias Sandoval, William Taggart's aide. Does this mean that the Humanity Front are involved with the kidnappings? Before you're able to get that answer, Eliza will suggest you get it from a colleague of yours - David Sarif. Perhaps he hasn't been telling you everything after all. When the cutscene's finished you'll gain +2500 XP and the objective to meet Malik at the nearby helipad (24) for extraction. Before you leave, be sure to use the supply lockers around the room to replenish your inventory - there should be plenty to keep you well fed.
24 - Helipad
Malik will fly in with her VTOL as you enter the hangar bay, explaining that Eliza contacted her and told her where to pick Jensen up. When you're ready to go for good, let Malik know to gain an additional +750 XP, and begin the flight home to
Detroit.
P - Alarm Panels
S - Security Cameras


