 Did we miss anything? Is there something we didn't discover? Let us know!
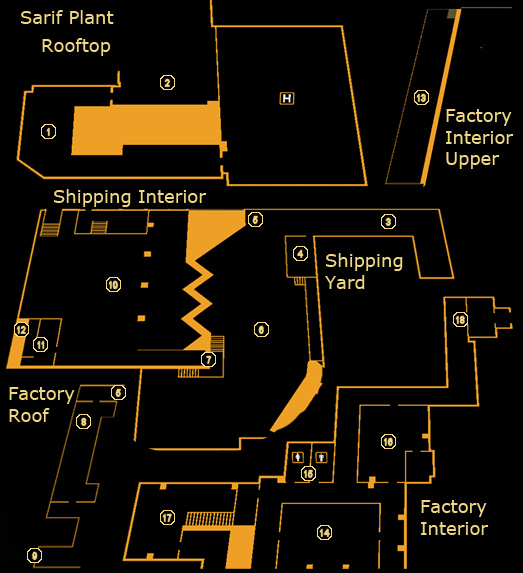
Your first mission after coming back to duty takes place at the Sarif Plant, where many of their products are manufactured. Your mission is threefold: find the
Typhoon, a piece of top-secret Sarif technology that's been stolen, confront Zeke Sanders, the terrorist leader behind the attack, and, as a secondary objective, rescue the hostages that have been captured by the terrorists.
During the fly-in with David, you'll be given the choice of either lethal or non-lethal equipment - and between these two you'll have a few more choices for armaments. If you go the lethal route, you'll get the choice of a
Combat Rifle or
Revolver, whereas if you go non-lethal, you'll be able to choose from a
Tranquilizer Rifle and
Stun Gun. You'll find the Combat Rifle and Revolver fairly early into the game on your own, so your best bet is the Stun Gun or Tranquilizer Rifle if you're concerned with "bang for your buck". However, it really just comes down to personal preference, so go with what you feel you'd like to use.
1 - SWAT Officers
On the way, search the lockers in the hallway for a
CyberBoost ProEnergy Bar, which will refill one of your Energy Cells. Up ahead, you'll find a group of SWAT Officers. You can open a dialogue with the helmet-less Officer, who will give you some background on the situation, including the fact that Zeke Sanders used to be augmented, but had his implants removed. On the way out, you'll find some
Painkillers, a health-boosting item, in another set of lockers.
2 - Rooftop
Pritchard will contact you as you step onto the rooftop here. The only way down safely is to take the ladder immediately ahead of you down to the second rooftop landing, where you'll find another ladder going down to the ground level.
3 - Guard
Your first encounter as an augmented agent is, lucky for you, a guard with his back turned. You can choose to listen in on his radio conversation and pass by him, take him out lethally, or knock him unconscious. If you take him out, you might want to drag the body back around the corner, so the other guards don't find it. There's also a Pocket Secretary on top of the air vents, mentioning a weapons dealer at a gas station, who you'll be able to find a bit later.
4 - Storage Room
You'll find some
Stun Gun Darts in one of the overturned crates here. This room makes an ideal location to hide KO'd guards in. Take note of the hole in the fence leading out; you'll have to hop over some boxes to reach it, again, useful for stealthy players.
5 - Path to Roof
You'll find a series of planks, storage containers and other conveniently-placed items here that form a path up to the roof, which in turn leads to either a tactical height advantage over the guards below, or a ladder to a rooftop entrance into the factory.
6 - Shipping Yard
The location here has three Purity First thugs on patrol. You can either sneak on top of or underneath the small walkway opposite the factory, or go in guns blazing. There's several explosive barrels around the yard, which might help you in taking out the thugs, but the noise could potentially bring out more from inside the factory.
7 - Factory Door
Entering the factory will provide you with a +200 XP bonus, and a +500 XP "Ghost" bonus if you did so without being seen by any of the guards.
8 - Electrified Floor
Some damaged wires on the rooftop here are sending electric current through the water. Move the crate nearby to uncover a passage leading to a breaker box, which you can flip to turn off the current and proceed. You'll receive a +100 XP bonus for doing so.
9 - Rooftop Vent
The vent here will provide you with a clear path to the inside of the factory. You'll receive a +200 XP bonus for entering, and a +500 "Ghost" bonus if you managed to avoid being seen by any of the guards.
10 - Shipping Interior
Inside the factory, you'll find a host of Purity First thugs to deal with. These guys are more numerous and more heavily armed than those outside, and there's about five of them in total, so you might want to exercise caution when fighting them directly. Stealthy players will want to either climb across the storage racks, or sneak along the left or right sides of the room. There isn't much loot to find, but you'll spot a
Concussion Grenade near the front door, and a Credit Chip on the plateau at the far side of the factory floor, near a trolley.
There are three exits from this area. One, at (13), is on the upper level and leads to a vent. Another, on the left side, goes to the Lobby at (17). The middle exit goes straight into the hallway near the Cafeteria at (14).
11 - Office
If you came in through the roof, you'll find yourself on a stack of crates above the office.
Inside this office, you'll find an eBook with some Purity First propaganda, a newspaper, a few lockers with some
Revolver and
Combat Rifle Ammo, and a computer terminal with some e-mails to read. The ladder in here leads to the roof of the office, where you'll find yourself if you came in through the roof.
12 - Office Roof
If you entered from the roof, you'll land on an upper level, with a great overview of the factory's interior, and an equally great vantage point for taking the thugs out with your
Tranquilizer Rifle. There's also a box of
Tranquilizer Darts on the floor behind where you drop down.
13 - Upper Level & Vent
Climb the ladder in the northwestern corner of the factory floor to get up to this catwalk. You'll find a box of
Tranquilizer Darts near an overturned crate. There's a vent on the wall you can reach by moving a nearby crate and hopping on top of it, which leads to outside the Washrooms (15), the Locker Room (16), and the hallway leading to (18). Climbing through it will yield a +100 XP bonus.
14 - Cafeteria
You'll find a single guard sitting around in here, as well as three others on patrol in the hallways around the area. Take him out or sneak by, then grab some
Tranquilizer Darts and
Beer from one of the tables.
15 - Washrooms
Check the women's washroom here for an eBook on the counter and a
CyberBoost ProEnergy Bar on the floor. The men's room is empty. The vent at (13) has an exit just in front of the washrooms if you want to use it.
16 - Locker Room
There's another thug on patrol in the locker room. Incapacitate or kill him, then loot the lockers for
Combat Rifle Ammo,
Stun Gun Darts,
Tranquilizer Darts,
Revolver Ammo, a
Concussion Grenade, and a Credit Chip. The storage room in the back is empty, but is one of the places you can exit the vent at (13) from.
17 - Lobby
The factory lobby has two Purity First goons inside, but their backs are turned. Either open fire and eliminate them, or knock them out. The computer terminals have a little bit of background info on the Sarif Plant on them and can be read freely. Otherwise, you'll find a Credit Chip inside one of the computer desks.
18 - Assembly Labs Door
This door leads to the Assembly Labs, where the hostages and the
Typhoon await you. As you apporach, Pritchard says that he's been locked out of the systems - sounds like the Purity First guys have a hacker on their side. You'll need to override the door manually, so find its keypad and hack it.
The hacking mini-game is somewhat complicated, but this first panel should be very easy and is almost impossible to fail at. A handy tutorial will pop up here if you need help on hacking, but it's not too difficult to figure out. Note that to hack systems above level 1, you'll need to invest points into your Hacking: Capture augmentation tree... but you won't need to worry about that this mission.
Once the door is hacked, proceed onward to the
Sarif Plant Assembly Labs.


