|
|
Main Quest: Whatsoever a Man Soweth...
 Did we miss anything in this location? Is there something we didn't discover? Let us know!
Walkthrough
Did we miss anything in this location? Is there something we didn't discover? Let us know!
Walkthrough
For this quest you'll need to travel to the Alchemy inn in Oxenfurt (#1) so you can tell one of Olgierd's men that you've completed the third wish. However, when you enter the inn, Gaunter O'Dimm will flag you down. He'll inform you that you'll still need to do one more thing for him -- draw Olgierd to the Temple of Lilvani to the south. When you relay this pronouncement to Olgierd's man, the man will inform you that Shani would like to talk to you.
Shani
Visiting Shani is optional. You'll only need to do it if you want to take down O'Dimm. You'll find Shani at her clinic (#2). When you talk to her there, she'll inform you that she's been looking into Olgierd, and that she found out that he's been meeting with Professor Shakeslock at Oxenfurt Academy. She'll then offer to lead you there.
When you reach the academy, you'll find two guards at the entrance (#3). Shani will recognize one of them and use their relationship to talk her way inside. She'll then lower a rope to you so you can climb up a side wall (#4). To reach the side wall, you can simply jump off the bridge into the water and then swim over. When you reach the wall, you'll have to fight a trio of level 34 drowned dead before climbing up.
Inside the academy, Shani will warn you that there are level 34 mage hunters guarding Shakeslock's house (#5), and then she'll return to her clinic. After dealing with the hunters, you'll discover that the house is locked. To get inside, you'll need to move over to the other side of the courtyard, climb up a couple of ladders, and then jump over to a balcony on the upper floor of the house. You'll find a weak door there, which you'll be able to break open with Aard.
Inside the house, you'll find Shakeslock on the ground floor. He'll be inside a protective circle, where he'll tell you that he's safe from O'Dimm. Shakeslock will then reveal that he researched O'Dimm for Olgierd, and that he found a way to cancel one of O'Dimm's contracts -- by challenging him to a duel of wits.
At the end of your conversation, Shakeslock will slip and fall out of the circle, and he'll hit his head and die. If you loot his corpse, then you'll find Professor Shakeslock's Journal (which will give you some background information about him) and the Key to Professor Shakeslock's Home (which will unlock the front door).
To escape from the academy, you won't be able to climb down the rope you used to get in. It won't even be there anymore. Instead, you'll have to climb up into a tower (#6), jump into the water, and then swim back to Oxenfurt.
Temple of Lilvani
To reach the Temple of Lilvani, you'll need to enter a cave in Velen East (#7), which you might remember from the quest
Contract: Phantom of the Trade Route. If you move through the cave to the east and south (or just follow the quest markers), then you'll exit it at the temple. After waiting for a short time, Olgierd will show up, and you'll give him the
Violet Rose or the
Painting of Iris Holding a Violet Rose, depending on what you took with you at the end of the quest
Scenes from a Marriage.
Olgierd will accept the item as proof that you've completed his third wish, but then he'll start clutching his chest, and Gaunter O'Dimm will show up. O'Dimm will announce that his pact with Olgierd is now complete, and he'll start to claim Olgierd's soul. You'll have two options for how to respond:
- If you met with Professor Shakeslock, then you can intervene. This will result in you challenging O'Dimm. O'Dimm will then send you to his Riddle World, where he'll ask you the following riddle:
To all things and men I appertain, and yet by some am shunned and disdained.
Fondle me and ogle me till you're insane, but no blow can harm me, cause me pain.
Children delight in me, elders take fright, fair maids rejoice and spin.
Cry and I weep, yawn and I sleep, smile and I too shall grin.
Given the last line about mimicry and the person who asked you the riddle, it's not too difficult to come up with "mirror" as the answer. However, you won't be able to just say the answer. You'll have to find it in Riddle World, and you'll be timed.
Luckily, the timer won't start right away. It'll only begin ticking down once you've left the starting area. You'll only have about five minutes to complete the task, which won't give you enough time for careful exploration. You won't find anything off the roads in the Riddle World, so you won't gain anything by wandering all over. If the timer runs out, then you'll die and have to load your game. So stay focused.
Note: You won't be allowed to save your game while you're in the Riddle World, but you will get a checkpoint save at the start. You might want to keep track of that save and then use it later because the Riddle World contains a few useless but interesting encounters -- like being able to "rescue" Shani, finding some incorrect riddle answers, and looting a treasure cave (where you'll find
Orens, relics, and glyphs, except it'll take you too long to clean out) -- that you might want to visit later on just to see them.
To find the riddle's answer, you should head north out of the starting area, turn right at the first intersection (where you'll encounter two specters) and cross a bridge, turn left at the second intersection, and then turn left again at the third intersection. This will lead you to a specter guarding a sword in a stone. After defeating the specter, if you pull out the sword, then you'll end up with the
Viper Venomous Silver Sword (which you won't be able to find otherwise).
As you continue following the path, you'll pass by a swing (a wrong answer) on the left, and then you'll need to turn left at the next intersection. This will take you to a graveyard guarded by a pair of specters. The specters will poison you, so Golden Oriole is a good idea for the fight.
Right next to the graveyard you'll find a manor house with a mirror at the end of a long hallway. However, as you approach the mirror, the floor will give way, and you'll be dropped into the garden behind the house. You'll discover a few mirrors in the garden, but they'll just break if you get too close to them.
To create an "unbreakable" mirror, you should head to the left side of the garden, where you'll find a fountain behind a mirror. If you turn on your witcher senses, then parts of the fountain will glow red, and when you examine them, you'll mention breaking down a wall. To break open the fountain, you'll just need to use Aard on it. You'll then automatically spot your reflection in the water and use it to defeat O'Dimm.
With O'Dimm out of the way, you'll return to the real world, where your brand will disappear, and you'll find Olgierd waiting for you. Olgierd will thank you for your help, and he'll give you the steel sword
Iris. You'll also earn 200 xp for completing the quest.
- You can stay out of the matter. This will make O'Dimm happy, and he'll offer you a reward. You can ask that you become as swift as the wind (and receive the
Caparison of Lament), that you never go hungry again
(Horn of Plenty), that you always have vodka available
(Bottomless Carafe), or that you become rich (5000 crowns). You can also refuse a reward (150 xp). Regardless, you'll also earn 150 xp for completing the quest, and O'Dimm will remove the brand from your face.
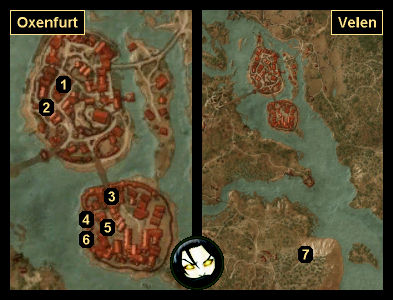
1 - Alchemy Inn
2 - Shani's Clinic
3 - Academy Entrance
4 - Rope
5 - Shakeslock's House
6 - Tower
7 - Cave Leading to Temple
|
|
|


