 Did we miss anything in this section? Is there something we didn't discover?
Let us know!
Background
Did we miss anything in this section? Is there something we didn't discover?
Let us know!
Background
In order to conduct the ritual, you will need to learn the words of an ancient Azunite recitation. According to Simeon, they are inscribed upon a tablet and hidden in a nearby temple.
Walkthrough
Travel to the Temple
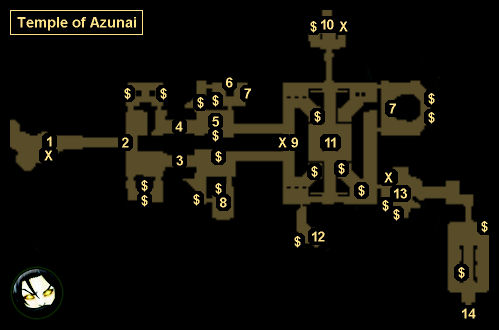
You'll find the temple on the eastern side of the desert. You'll complete this objective when you reach the temple entrance (#2).
Find the Tablet
You'll catch sight of the tablet (#11) when you approach the altar near the center of the temple (#9).
Find a Path to the Central Chamber
When you examine the altar (#9), you'll discover that two orbs called the Eyes of the Oracle are required to reach the tablet.
Obtain the Eyes of the Oracle
To obtain the Eyes of the Oracle, you'll need to pass through the Hall of Trials (#13), which will test you in two ways:
- First trial. For this trial you'll need to light three braziers in the correct order. The clue for this is on the placard in the room with the braziers. The correct order is gold (left), blue (right), and then green (middle). If you get the order wrong, then you'll have to fight the guardian statues in the room (which are much tougher than the regular guardians).
- Second trial. For this trial you'll need to find a way past several barriers. You can do this by stepping on the pressure plates, as each pressure plate will remove one barrier. But the best way to complete the trial is to ignore the pressure plates and barriers and simply walk on the water in the center of the room. If you step on the pressure plates, then you'll have to fight the guardian statues at the end of the room.
After passing the trials, you'll find the Eyes of the Oracle sitting on an altar in the final room (#14). It won't make any difference how you passed the trials.
Place the Eyes of the Oracle
When you place the Eyes of the Oracle in the altar in the center of the temple (#9), bridges will extend, granting you access to the central chamber and the tablet.
Retrieve the Tablet
When you approach the tablet (#11), all of the guardian and gargoyle statues in the chamber will come to life and attack you, and then once you've defeated them, the daeva statue in the center of the chamber will come to life as well. The daeva will send out tracking fireballs but she won't regenerate any of her health, so as long as you can dodge effectively, you should eventually be able to wear her down. When the daeva dies, she'll drop an item depending on the character that you're playing --
Ceremonial Temple Shield (Lucas),
Pearlescent Diadem (Reinhart),
Starjewel Barrette (Katarina), or
Sunbrace of Hathra'unok (Anjali).
After the battle when you pick up the tablet, you'll complete the quest and earn 1535 xp.
1 - Digglefitz
Digglefitz will give you the side quest
Map of the Past.
2 - Temple Entrance
3 - Bridge
You'll be able to extend this bridge by pulling the lever on the eastern side.
4 - Bridge
You'll be able to extend this bridge by pulling the lever on the western side.
5 - Swinging Blades
To turn off the blades, you'll need to pull the lever behind the bookshelf to the north (#6).
6 - Bookshelf
Behind the bookshelf you'll find a treasure chest and a lever that will switch off the swinging blades (#5).
7 - Placards
These two placards will give you information for the quest
Map of the Past.
8 - Locked Room
You'll only be able to enter this room during the quest
Map of the Past.
9 - Eyes of the Oracle Altar
10 - Keystone Altar
The keystone altar is involved in the quest
Map of the Past.
11 - Tablet
12 - Book
This book is involved in the quest
Map of the Past. Reading it will also give you the lore entry for Hathra'unok, the Patriarch-Emperor.
13 - Hall of Trials
14 - Eyes of the Oracle
X - Save Point
$ - Treasure Container


