 Did we miss anything in this section? Is there something we didn't discover?
Let us know!
Background
Did we miss anything in this section? Is there something we didn't discover?
Let us know!
Background
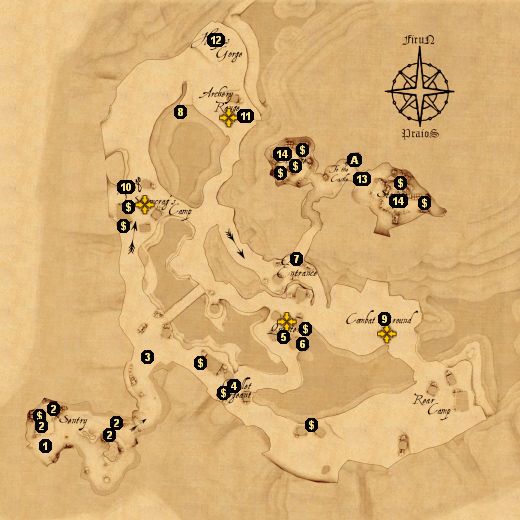
You have made it through the secret entrance but you are not in the castle proper yet. An enormous underground cave houses the army Dajin has been gathering. This quest can be solved either by remaining in disguise or fighting your way through. As the mercenaries do not net any AP for high-level (12 or up) characters but are a pain to fight in great numbers, staying in disguise is advisable.
1 - Mercenaries
Six mercenaries man the sentry spot. You will have to pass two Fast Talk checks to convince them you are the new recruits, but if you have to fight them you can still pass the rest of the area in disguise.
2 - Chest of Tabards
Four chests of tabards, two containing 4x Leather Armor and Tabard, the other two 4x Shirt of Chainmail and Surcoat. Equip them to stay in disguise.
3 - Mercenary
One mercenary guards the entrance and will not let you through unless you're wearing your tabards. You can opt to go into combat with the entire area in dialog with him, or do so by trying to get by him three times without your tabards on.
Talk to him with tabards on and he will bring you to billet sergeant Derpel.
4 - Billet Sergeant Derpel
This unfortunately-named man assigns you to Sergeant Hailstrike (#5), so head there.
5 - Sergeant Hailstrike
Hailstrike provides you with own personal tent and chest, and refers you to complete tasks with Bowmistress Keen and Sir Erund.
Returning with each recommendation nets you 40AP. After getting both recommendation Hailstrike gives you a letter to get you past the gates guards at #8.
6 - Hidden Treasure
Locked chest containing 5D 1T 7F and Tulamidian Mail.
7 - Barred Gate
The way to the castle is barred until you complete the tasks given to you, or kill your way through to here and through these guards.
8 - Lower Path
Follow the lower path to beneath the bridge to find a Rondracomb and Shoulder Plates.
9 - Sir Erund of Olming
Before he tests your combat skill, Erund wishes you to retrieve his sword from Blacksmith Ingrasha (#10). Simply ask Ingrasha about it and you can pick it up from the weapon chest behind her to take back to Erlund.
After you return with the sword, Erund pits you against four mercenaries. Knock two down to 1HP and the fight is over, netting you 20AP and a positive evaluation.
Pick pocketing notes: Erund carries 2D 8T 4F and 2x Diamond Whetstone.
10 - Blacksmith Ingrasha and Physician Ethan
Ingrasha is a trainer that can teach you Blacksmith.
Ethan can heal your wounds for free.
11 - Bowmistress Keen
Bowmistress Keen wishes you to get rid of the harpies at #12.
12 - Harpies
Two harpies guard two separate nests. Kill the harpies, then destroy the nests. With each nest's destruction, six harpies appear. Destroy both nests and kill harpies for 20AP and Bowmistress Keen's recommendation.
Also in this area is a hollow tree stump containing 2x Elm Wood and a Gold Ring.
13 - Quartermaster Springdale
No matter what you did before, at this point the mercenaries will have discovered the bodies of Orbert and his cronies. Hailstrike appears to take care of you right as you are talking to Springdale, this nets you 100AP. It is advisable to equip your own armor right before this conversation.
You will have to fight Springdale and Hailstrike as well as 11 mercenaries. Defeating them all nets you 100AP and the Key to the Castle Cellar.
14 - Storage Areas
Filled with craft chests, as well as old crates containing a total of 26x Simple Bandages, 5x Golmoon Tea, 4x Whetstone, Salve of Healing
Exits:
- To Nadoret Castle (wine cellar).


