 Did we miss anything on this map? Is there something we didn't discover? Let us know!
In the caves and hollows of Undome, save the witch Entelesse, who is in grave danger.
Did we miss anything on this map? Is there something we didn't discover? Let us know!
In the caves and hollows of Undome, save the witch Entelesse, who is in grave danger.
| Adventure Statistics |
| Party Members |
Recm'd Level |
Total Monsters |
Total Chests |
End Reward |
| 6 |
5th |
35 |
5 |
900 XP |
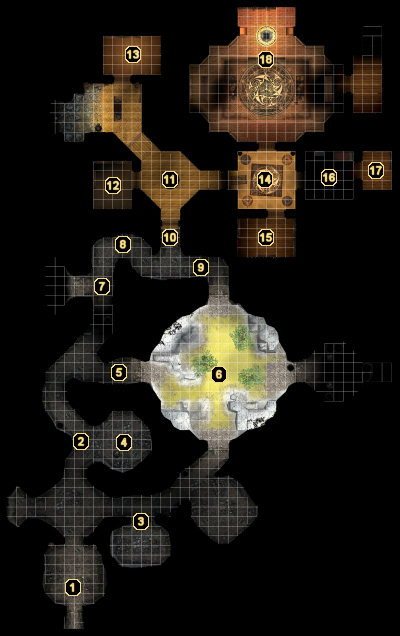
1 - Arrival
Upon arriving in these caves, your main character will suggest that you keep your eyes open for traps. That's pretty good advice, as you'll soon find out.
2 - Wolves
Your first confrontation here in the witch's labyrinth will include these two Wolves.
3 - Werewolf and Wolves
A Werewolf and two standard Wolves will emerge from this room when you step out into the hallway to the west.
4 - Trap, Wolves, and Chest
Two more Wolves and a trap stand between your party and a locked chest. Once open, you'll find a small amount of gold, some Silver Arrows, and a Scroll of Ice Storm inside the chest.
5 - Werewolves
This tunnel is patrolled by a pair of Werewolves.
6 - Dire Wolf and Wolves
This rocky, well-lit area is home to a powerful Dire Wolf and three standard Wolves. Since the Dire Wolf is new, it's worth noting that it's worth 100 experience points per party member.
7 - Werewolf
One more Werewolf will charge at your party from down this hallway.
8 - Traps
Be careful of the two pressure plate-triggered traps as you round this corner.
9 - Traps
Two more pressure plate-triggered traps have been set at this area of the hallway.
10 - Traps
A third pair of pressure plate-triggered traps lie between your party and a locked wooden door.
11 - Werewolves and Wolves
Once you've made it past the traps and locked door, you'll find yourself in a massive battle with two Werewolves and five standard Wolves.
12 - Wolf and Chest
Another Wolf guards an unlocked chest containing a small amount of gold and a Glaive +2 called "Langblade."
13 - Werewolf and Chest
Take down the Werewolf inhabiting this room, then open the unlocked chest to find a small amount of gold and a Club of Animal Bane +1 called "Beastbane."
14 - Werewolf and Wolf
Yet another Werewolf and Wolf attempt to keep your party from progressing any further.
15 - Chest
This storage room provides you with another chest, though this time it only contains some gold and a set of Silver Arrows.
16 - Wolf
Cleanse this room of its Wolf inhabitant to gain access to the room beyond.
17 - Werewolf and Chest
Bring the Werewolf down before ransacking the chest for a large amount of gold, a Potion of Cure Moderate Wounds, and a Wand of Burning Hands.
18 - Entelesse
You're just in time. The witch is under attack by a Wolf Khan leader, a Dire Wolf, two Werewolves, and two standard Wolves. She's armed with a Wand of Magic Missile and has access to 3rd level Wizard spells, so luckily you have a solid ally helping you bring these foes down.
When all the opposition has been taken out, you'll immediately be brought to the "End of Adventure" screen. Along with the usual experience point reward, you'll also receive a Silver Dagger +1 called "Paper Cut."
During the following cutscene, Entelesse will tell you that Athearorn once rested at a monastery called Tol-Dornor. This will open up a new adventure called
The Temple. She'll also mention that a greater evil still exists in the Tower of Crows, which presents you with an optional adventure called
The Demon. And, finally, she identifies your main character as having a draconic bloodline, though she's unable to divine your entire dragon ancestry. You'll have to learn more on your own.


