 Did we miss anything on this map? Is there something we didn't discover? Let us know!
Destroy the nest of evil said to be at the top of the Tower of Crows.
Did we miss anything on this map? Is there something we didn't discover? Let us know!
Destroy the nest of evil said to be at the top of the Tower of Crows.
| Adventure Statistics |
| Party Members |
Recm'd Level |
Total Monsters |
Total Chests |
End Reward |
| 6 |
5th |
8 |
2 |
1000 XP |
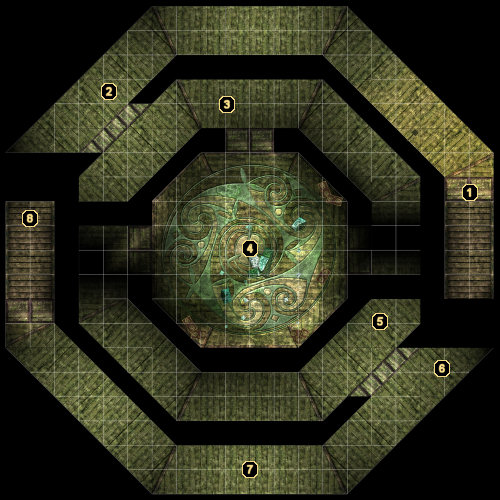
1 - Arrival
Having ascended the stairs on
the first floor of the tower, you'll arrive in the eastern hallway of the second floor.
2 - Skeleton Warrior
This Skeleton Warrior will foolishly attempt to bring your party down singlehandedly.
3 - Wight
Send this Wight back to the void before moving any farther to the east or south.
4 - Bearded Devil
I suppose this room could be considered part of "the nest of evil." As soon as you enter, you'll be defending yourself from the attacks of a polearm-wielding Bearded Devil, a skeletal Weaponthane, and a Skeleton Warrior. The Bearded Devil can do a significant amount of damage, so you should focus on taking him out first. Overall, this fight was easier than I expected it to be.
5 - Ghoul and Chest
Approaching the end of this hallway will provoke an attack from a Ghoul, after which you can loot the locked chest for a small amount of gold, a Mithral Chain Shirt, and a Scroll of Fireball.
6 - Chest
This unlocked chest contains a small amount of gold and a Scroll of Inflict Light Wounds, Mass.
7 - Wight
This Wight proves to be the final encounter on this floor of the tower.
8 - Exit
Reaching the top of these stairs brings you to another "End of Adventure" screen, after which you'll immediately move on to
The Demon 3.


