Did we miss any information for this quest? Is there something we didn't discover? Let us know!
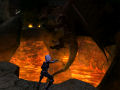
The ninth chapter is where the graphics in Demon Stone really shine. The three companions arrive to find Cireka the Githyanki and the dragon from chapter one locked in combat. Since Cireka must be imprisoned in the Demon Stone, you cannot allow the dragon to kill her. Make your way through several waves of Slaad and demons until you're shown a cutscene of Cireka retreating into a stone passageway. Once the dragon flies to the top of the cavern, follow her inside and make your way through the stone hallways, killing the demons that try to stop your progress. In the middle of the passageway is a small room with five barrels, so destroy them to score some loot on the way.
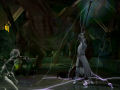
When you emerge on the other side, the Cireka and the dragon will still be locked in battle. You must cross a stone bridge while being fired upon by archers and under constant attack by demon and Slaad, so you may find yourself having quite a few problems with this section. Use Illius to take down the archers from a great distance while Rannek and Zhai clean up the creatures using melee along the path. After all the foes in your way have been defeated, move through the corner building to witness the dragon finally killing Cireka with a blast of fiery breath. When this occurs, Rannek will notice that the dragon fears the Githyanki's weapon, so he will pick it up and start using it, thus forcing the dragon to maintain a perch just off the bridge. Move through this last leg of pathway quickly, as the dragon will still fire its breath at the companions in regular intervals until you make it to the next passageway.
 |
The second passageway is very similar to the first, although you'll be facing a few more demons than last time and there are less barrels to take advantage of. The opposite side is where things really start getting hairy, though. A whole army of Slaad and archers await you and you'll most likely find yourself loading a few times to make it through this hallway alive. Once you've defeated the swarms of enemies blocking your way, you'll finally reach the dragon's lair. Illius recognizes a portal amongst the dragon's scattered treasure that you can use to leave the area, but the dragon makes another appearance and spoils any plans the companions had of leaving.
This time, you'll actually be doing battle with the dragon itself. Use Illius' best spell to destroy the dragon's wings while Rannek and Zhai take out the Slaad that teleport in on a regular basis. Before destroying both wings, though, make sure you shatter all the chests in the dragon's hoard and take the gold. As soon as both wings are nothing but tatters, the dragon falls into the lava below. When the companions begin using the portal, though, the dragon emerges from the lava for one last land-based battle in the hallway behind you.
 |
This battle is extremely tough. The dragon can use its breath weapon as well as a terribly damaging bite and will retreat from time to time to spawn in several Slaad to keep you occupied. I recommend using Rannek to inflict as much damage on the dragon as possible until he gets bit, then use Illius to fire off spells until the dragon retreats. The summoned Slaad can actually be useful since they drop health items from time to time. Eventually, the dragon's health will run out and you'll have to use all three companions in a teamwork effort to kill it. First, use Illius to put it into a trance. Next, use Zhai to jump on top of the dragon's head and force it to the ground. Lastly, attack the head with Rannek's sword to put an end to its existence.
Once the chapter's ending cinematics have completed, you'll be shown Cireka's sword up close. It's called the Silver Sword of Gith and is obviously much nicer than the one Rannek was previously using. Time to try it out on a Slaad Lord...