Did we miss any information for this quest? Is there something we didn't discover? Let us know!
Although you're safe from the dragon patrolling Damara within this mine system, you still have other creatures to deal with. At the end of the rock bridge is a large band of Orcs to contend with, but this time you get to utilize all three party members at once. Push the beasts into the forge along the far wall whenever you can to help speed up the fight, and make sure to smash all barrels and crates in the room to accrue some gold and items. When you're finished with the first band of Orcs, the broken doors in the corner explode and another wave of the creatures pours into the room. Make short work of these newcomers then make sure you have all the room's containers searched before moving farther into the mine.
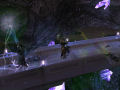
A few more Orc warriors and archers await you near the front of a large bridge that crosses over a large crystal-filled chasm, but you should be able to take these out easily. Be careful not to advance too far until you're ready, though, as a swarm of crystalline spiders will drop from the ceiling and attack the companions before you can cross the bridge. Things get a little crazier at the end of the bridge, too, with Orc archers firing at you from the distance ledges and more crystalline spiders emerging from the sides of the bridge. When all the spiders and archers are dead, use Illius' primary spell to destroy the two chains that raise the final leg of the bridge into the air. Once the bridge section drops, kill the remaining Orcs and continue down the next hallway.
 |
The next room is filled with barrels and other containers, so be sure to smash them all to obtain as much loot as possible. It won't be long after you enter the room, though, that more Orcs form an assault on the party members and you'll be forced to defend yourself during the container raid. When all the Orcs in the vicinity have fallen, a cutscene will show an Orc release a poisonous gas into the room and both Rannek and Illius will fall unconscious. Zhai will actually slip into a sleep as well, but she will have made it out of the Orcs' sight before she collapses. When she awakes, you must navigate her through the next tunnel on a rescue mission for the two captured adventurers.
The tunnel between Zhai and her companions provides a perfect opportunity to use the Rogue's sneak attacks. A handful of Orcs patrol the tunnel, but a patch of shadows before each one allows Zhai to navigate undetected and use stealth kills for most of the journey. A set of barrels and crates marks the end of the tunnel, after which a cutscene will show Rannek and Illius locked up in a makeshift cell. Use the shadows at the base of the tunnel exit to take the two Orc guards out easily, which will trigger another cutscene showing Zhai popping the lock open on the cell. With all three companions available again, Orcs will start moving into the room via the far tunnel and the ledge on the opposite side. Use whichever companion you are most comfortable with and make sure you take advantage of the instant kill opportunities by pushing the creatures back off the ledge they emerge from.
 |
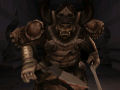
When this final wave of Orcs is finished with, the Orc leader charges into the room brandishing two large blades. He's not a pushover by any means, but since he's the first "boss" you'll encounter, there's not a whole lot of strategy to besting him other than executing some good dodging skill. When the leader goes down, the companions will find some Gauntlets of Ogre Power, Beads of Force, and a Ring of Jumping on its corpse. The gauntlets will make Rannek a more formidable fighter by allowing him to use his ground smash ability, the beads allow Illius to destroy obstacles by utilizing his useful first level skill of the same name, and the ring allows Zhai to jump to previously inaccessible areas and make use of a few of her acrobatic skills.
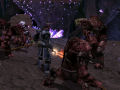
Use these newly acquired items to smash through the three barriers barring your way into the next room, where a cutscene will show Cireka the Githyanki General and Goro the Slaad Lord materializing from the Demon Stone. Slaad will start spawning into the room and you'll be forced to fight a small army of them before the cutscene continues and shows Cireka retreating through a passageway in the rock. The companions will retreat through the same doorway and then proceed to the Wood Elf city of Cedarleaf to help defend against Cireka's attack.