 Did we miss anything in this section? Is there something we didn't discover?
Let us know!
Walkthrough
Did we miss anything in this section? Is there something we didn't discover?
Let us know!
Walkthrough
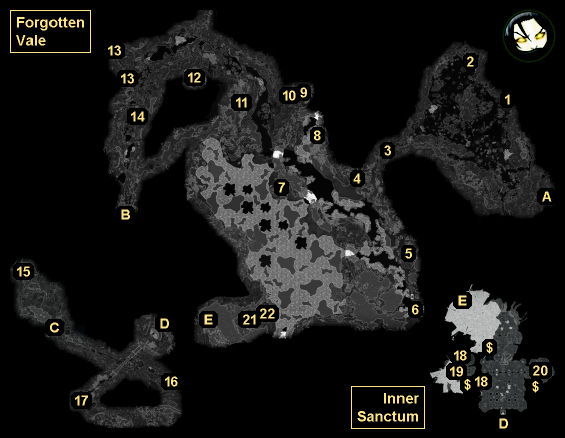
The Forgotten Vale is a large outdoor area. What you'll need to do while you're there is find four wayshrines (#2, #5, #11, #17). At each wayshrine, you'll meet a prelate out front, and when you tell him that you'd like to fill your
Initiate's Ewer, he'll open up the wayshrine, which will give you access to the water basin inside. The wayshrines also contain portals to each other (including the wayshrine in Darkfall Passage), giving you an easy way to move between places you've already visited.
The first three wayshrines (#2, #5, #11) should be easy to reach. They're in plain sight, and if you follow the quest markers then you should come right to them. For the final wayshrine (#17), however, you'll have to travel through the Glacial Crevice (Exit B). It's another one of those twisty dungeons that you might have trouble navigating. In general, you should follow the path upwards, first traveling south and then looping your way clockwise to the east. You'll have to battle trolls and falmer during your trek.
When you exit the Glacial Crevice (Exit C), you'll find yourself outside a falmer village. To reach the next wayshrine, you'll need to travel southeast through the village, and when you get to the chieftain's tent (#16), you'll need to drop down to the ground, where you'll find a gate leading south. The path past the gate will take you to the wayshrine and also to the Inner Sanctum (Exit D). To enter the sanctum, you'll need to pour the water from your ewer into the basin by the door.
Inside the Inner Sanctum, you'll see a lot of frozen "statues." Many of these statues will be holding objects that you can take. However, if you try to loot them, then some of the statues will come to life and attack you. You can also reach a treasure room (#18) by using your ewer to open some doors.
You'll find Arch-Curate Vyrthur past the sanctum to the east (#21). He'll be in a room filled with more frozen statues, and when you approach him, the statues will start waking up and attacking you. You'll then have to defeat waves of falmer, falmer shamans, and chaurus. At the end of the battle Vyrthur will realize that his plan isn�t working out so well, and he'll flee to the east.
When you catch up to Vyrthur (#22), he'll reveal that he's a vampire, and that he was attempting to take his revenge on Auriel for allowing him to become that way. Then he'll attack you. Vyrthur will summon a frost atronach, and he'll cast frost spells on you, but otherwise you should have an easier time against him than you did against his statues. Vyrthur will drop some gems and more when he dies.
After the battle, the wayshrine next to Vyrthur will activate, and Gelebor will step through. He'll be surprised but happy to learn that his brother was a vampire, and he'll allow you to take
Auriel's Bow, which you'll find inside the wayshrine. When you pick up the bow, you'll also receive 12
Sunhallowed Elven Arrows and 12 regular
Elven Arrows.
Note: Gelebor will stick around after the quest, and he'll offer to convert
Elven Arrows into
Sunhallowed Elven Arrows for you. You can also ask Serana to convert
Elven Arrows into
Bloodcursed Elven Arrows.
1 - Forgotten Vale Cave
Inside this cave, you'll encounter some chaurus, including chaurus hunters. If you pull the rope release at the end of the ramp, then you'll open up a secret room on the western side, where you'll find a shellbug. If you have a
Pickaxe, then you'll be able to "mine" the shellbug for a
Shellbug Chitin. You'll also find a treasure chest inside the cave (next to the ramp).
2 - Wayshrine of Sight
3 - Giant Frostbite Spider
4 - Book
On the ground here next to a skeleton and a treasure chest, you'll find
Unknown Book, Vol. I. If you take this book to Urag gro-Shub at the College of Winterhold, then he'll pay you 1000 gold, and he'll also give you a copy of the translation,
The Betrayed.
5 - Wayshrine of Learning
6 - Waterfall
If you jump into the waterfall here, then you'll end up in Darkfall Grotto, where you'll find a ravaged falmer village (complete with a few treasure chests) and the feral falmer who did the ravaging. To exit the grotto, you'll need to jump back into the river, where you'll float (and fall) into Darkfall Passage.
7 - Word Wall
When you get close enough to the Word Wall, you'll unlock the Word of Power for "Magicka, Drain Vitality." Nearby, you'll get attacked by the dragons Naaslaarum and Voslaarum.
8 - Frost Giant
The frost giant here will drop an
Amethyst Paragon when it dies.
9 - Frost Giant
The frost giant here will drop a
Sapphire Paragon when it dies.
10 - Paragon Socket
At this spot you'll discover a paragon socket. If you insert a paragon gem into the socket, then you'll create a portal:
-
Amethyst Paragon (#8). The portal will take you to the top of a rocky pillar inside Darkfall Grotto, where you'll find a treasure chest with some random loot inside.
-
Diamond Paragon (#15). The portal will take you to an isolated ledge in the Glacial Crevice, where you'll find a treasure chest with some random loot inside.
-
Emerald Paragon (#12). The portal will take you to the Forgotten Vale Overlook, where you'll find a river rushing north towards a waterfall. Just to the right of the waterfall you'll discover a treasure chest, some elven gear, and Unknown Book, Vol. II. If you take the book to Urag gro-Shub at the College of Winterhold, then he'll pay you 1000 gold, and he'll also give you a copy of the translation, Journal of Mirtil Angoth.
-
Ruby Paragon (#19). The portal will take you to the Forgotten Vale Forest, where you'll encounter a falmer warmonger carrying Auriel's Shield. You'll also encounter some frost trolls (unless the warmonger killed them all), and you'll find a treasure chest with some random loot inside.
-
Sapphire Paragon (#9). The portal will take you to an isolated room in the Inner Sanctum (#20), where you'll find three treasure chests, some elven gear, and lots of gems.
11 - Wayshrine of Resolution
12 - Frost Giant
The frost giant here will drop an
Emerald Paragon when it dies.
13 - Sharpslope Cave
Inside this cave you'll encounter falmer, chaurus, and a shellbug, but you won't find anything out of the ordinary.
14 - Book
You'll find
Unknown Book, Vol. III in a falmer tent in the mountains here. If you take this book to Urag gro-Shub at the College of Winterhold, then he'll pay you 1000 gold, and he'll also give you a copy of the translation,
Diary of Faire Agarwen.
15 - Frost Giant
The frost giant here will drop a
Diamond Paragon when it dies.
16 - Chieftain's Tent
Inside the chieftain's tent you'll find
Unknown Book, Vol. IV. If you take this book to Urag gro-Shub at the College of Winterhold, then he'll pay you 1000 gold, and he'll also give you a copy of the translation,
Touching the Sky.
17 - Wayshrine of Radiance
18 - Doorways
To open these doorways, you'll need to activate the altar in front of them. This will remove the
Initiate's Ewer from your inventory and place it on the altar. To open the second doorway, you'll need to open the first doorway, then pass through it, then take the ewer back from the altar, and finally activate the second altar. Behind the second doorway you'll find a treasure chest, some potions, and more.
19 - Frost Giant
The frost giant here will drop a
Ruby Paragon when it dies.
20 - Paragon Room
This is the room you'll visit when you insert the
Sapphire Paragon (#9) into the Paragon Socket (#10). The only way to reach the room is via the portal at the socket.
21 - Arch-Curate Vyrthur
22 - Wayshrine
Exits:
- Portal to the wayshrine in Darkfall Passage.
- Entrance to the Glacial Crevice (not shown).
- Exit from the Glacial Crevice (not shown).
- Entrance to the Inner Sanctum.
- Exit from the Inner Sanctum.


