 Did we miss anything in this location? Is there something we didn't discover? Let us know!
Background: The Morning After
You hunker down in the janitor's locker room amid the smells of industrial-strength cleansers, floor wax, and body odor. Sleep is impossible as you must be constantly on your guard for the telltale sounds of security teams or building maintenance crews.
Did we miss anything in this location? Is there something we didn't discover? Let us know!
Background: The Morning After
You hunker down in the janitor's locker room amid the smells of industrial-strength cleansers, floor wax, and body odor. Sleep is impossible as you must be constantly on your guard for the telltale sounds of security teams or building maintenance crews.
Morning eventually comes and with it, another chance at Project Aegis.
Background: Collecting the Sample
The brutish, dog-eat-dog existence of a slum dweller is a far cry from the quiet desperation and existential nothingness of a corporate wage-slave. Yet after your time at Telestrian Industries, it's unclear which is more bleak.
The elevator rises smoothly, its blanderized music assaulting you once again as you ascend to the executive floor.
And your goal.
Karma Points
- [2] Install lab Commlink Chip (#2).
- [2] Install the boardroom Commlink Chip (#4).
- [2] Install the accounting office Commlink Chip (#5).
Walkthrough
You'll begin this mission in a locker room in the Basement (#1). To continue on, you'll just need to loot a locker, where you'll find a janitor's uniform and three Commlink Chips. Grabbing these things will allow you to leave the locker room and take the elevator (Exit A) up to the Main Floor.
When you reach the Main Floor, you'll immediately run into Steve Scott, your supervisor. No matter what you say to him, he'll instruct you to wander around and clean up whatever needs cleaning. This will give you the freedom of movement necessary to plant the three Commlink Chips:
- Lab Chip (#2). To install this chip, you'll need to convince the nearby Telestrian Tech Worker to leave the room. With Charisma 4 (or later 2 or 5), you'll be able to get him to leave right away. Otherwise, you'll need to pick the right dialogue options:
- "So ka. I get it."
- "Yeah, it's never about solving the problem."
If you say the right things to the worker, then he'll leave. If you say the wrong things to him, then he'll still leave -- but he'll complain to your supervisor (see below). When you install the chip, you'll earn 2 karma points.
Note: Depending on what you say to the worker, he might mention that one of Silverstar's corporate values is "Efficiency."
- Boardroom Chip (#4). To install this chip, you'll need to convince the nearby Telestrian Security Guard to leave the room. With Charisma 4 (or later 2 or 5), you'll be able to get him to leave right away. Otherwise, you'll need to pick the right dialogue options:
- "From what I can tell..."
- "Look, I know it's 'Duty Before All' around here..."
If you say the right things to the security guard, then he'll leave. If you say the wrong things to him, then he'll still leave -- but he'll complain to your supervisor (see below). When you install the chip, you'll earn 2 karma points.
Note: When you first enter the boardroom, two guards will be talking, and they'll mention that one of Silverstar's corporate values is "Duty Above All."
- Accounting Office Chip (#5). To install this chip, you'll need to convince the nearby Telestrian Worker to leave the room. However, unlike the other workers, he'll be miffed, and he won't have much to say to you. To make him more talkative, you'll need to have the Matrix LAN Parts from the lab (#3) in your possession. The parts will mollify him, and if you have Charisma 4 (or later 2 or 5), then you'll be able to convince him to let you "fix" his computer. Otherwise, you'll need to pick the right dialogue options:
- "Heh, me too."
- "You're totally right."
To fix the worker's computer, you'll just need to click on it. You won't need Decking or any other skill or attribute. Then when you talk to the worker again, he'll agree to leave the room. If you failed to convince the worker to let you fix his computer, then he'll still leave, but he'll complain to your supervisor (see below). When you install the chip, you'll earn 2 karma points.
Note: When you first enter the office, a guard will be chewing out the worker, and the worker will mention that one of Silverstar's corporate values is "Duty Above All."
The only way to fail this first part of the mission is to repeatedly say the wrong things at the chip sites. Each time you anger a worker or make somebody suspicious, he'll complain to your supervisor, and after three complaints, your supervisor will fire you -- which will force you to load your game. So you'll need to be at least a little bit careful and say the right things at least once.
After you've installed the three Commlink Chips, you should head over to the guard next to the elevator (Exit A). When you tell him about the chips, he'll allow you to use the elevator to go up to the Top Floor, where you'll find Erik Silverstar's office.
Inside the office (#6), you'll meet Silverstar, and he'll congratulate you for demonstrating one of his "three key values." If you guess that he means "Duty Above All," then he'll laugh and say no, and he'll inform you that "Duty" is his first value while "Vigilance" is his third. He'll then give you a form to fill out, and he'll head down to the Main Level to check out those suspicious Commlink Chips that you planted.
While Silverstar is gone, you should examine his office. You'll find five paintings on the walls -- "Vigilance," "Independence," "Unity," "Efficiency," and "Duty" (from left to right) -- and you'll notice that their frames can be pressed. You'll also spot a bar with a bottle of scotch and a half-smoked cigar.
Given this set-up, it shouldn't come as a surprise that you'll have to solve a puzzle to collect the Aegis sample, and that Silverstar's three values will play an important role. From talking to people on the Main Floor, you might know that two of the values are "Duty" and "Efficiency." From talking to Silverstar, you might know that "Duty" is the first value and that "Vigilance" is the third. Thus, the proper order for pressing the painting frames is "Duty," "Efficiency," and then "Vigilance."
You'll be "timed" while trying to solve the puzzle, which means you'll only be allowed to press 11 frames before Silverstar returns to his office. If you press the right frame, then it'll stay pressed. If you press a wrong frame, then all of the frames will return to their starting position, and you'll have to begin again. If you take too long, then you'll get caught and have to load your game. When you eventually get the code right, a shelf will move out of the way, revealing a secret room.
Inside the secret room (#7), you'll find a safe with a DNA scanner. To get it open, you'll need to pick up the half-smoked cigar from the bar in Silverstar's office, and use the DNA from it. When the safe opens, you'll find the Aegis sample inside, but then all of the alarms in the building will go off, and you'll be forced to flee. To escape the building, you'll just need to make your way to the exit elevator (Exit B). Nobody will get in your way.
Note: If you don't want to deal with the puzzle in Silverstar's office, then you can just go to the exit elevator (Exit B) as soon as you reach the Top Floor. You'll be allowed to leave, and the game will just assume that you have the Aegis sample. You won't lose anything for bailing out early.
When you exit the building, you'll end up on the street outside -- where Detective McKlusky will be waiting for you. No matter what you say to him, he'll shove you into his car and take you to James Telestrian's estate, where the next mission will begin.
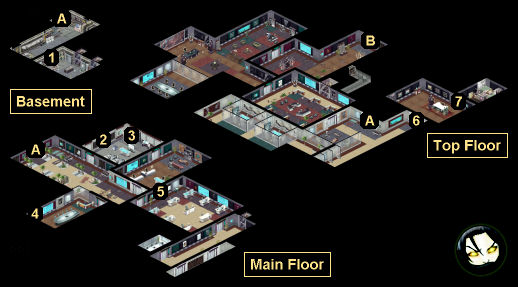
1 - Locker Room
2 - Power Junction
3 - Server
4 - Power Junction
5 - Power Junction
6 - Erik Silverstar's Office
7 - Secret Room
Exits
- Main elevator.
- Exit elevator.


